Claim Binder User Guide

Find your question, then follow the steps: where to start, what to tap, and what you should see when it worked.

Written for the beta on iPhone and iPad. Button names can still change before release. The same answers are inside the app, and work with no signal: Settings → Help. Questions: support@poshjoshllc.com.

About this guide

Find your question, then follow the steps: where to start, where to scroll, what to tap, and what you should see when it worked. Words in bold are the exact button or screen names in the app.

  • Every answer starts from the bottom tab bar, so you can follow it from any screen.

  • At larger text sizes, screens get longer. If a step says "scroll down", keep scrolling until you see the bold label.

  • Claim Binder works without signal. Only iCloud sync, sharing with family, buying the unlock, Find from the Address, photos kept only in iCloud (when you import them or add before photos) and the web links Claim Binder opens need a connection.

  • The same answers are inside the app: Settings → Help. They're on your iPhone or iPad, so they work with no signal.

For beta testers

  • Use a practice claim. Don't put your only copy of real records in a test build. Keep your own originals.

  • Buying: buying the unlock in TestFlight is a free test purchase. It doesn't carry over to the App Store version.

  • When something goes wrong: take a screenshot, then use TestFlight's feedback (take a screenshot and tap Share Beta Feedback), or email support@poshjoshllc.com. Say what you tapped, what you expected, and what happened.

  • When this guide is wrong: tell us the step number and what you saw instead. That's as useful as a bug report.

Back to questions

Getting around

Everything starts from the tabs along the bottom of the screen. Every tab shows the claim you picked last; change claims from the claim's name at the top of the Claim tab.

Tab What lives there
Claim The main screen for the current claim: status, deadlines, adjuster, payments, coverage, Quick capture
Photos Damage photos for the whole event, grouped by room (one list, with no rooms, when every claim in the event is a vehicle claim); the camera; Find Before Photos and Import from Photos
Items Damaged items by room, with prices and photos
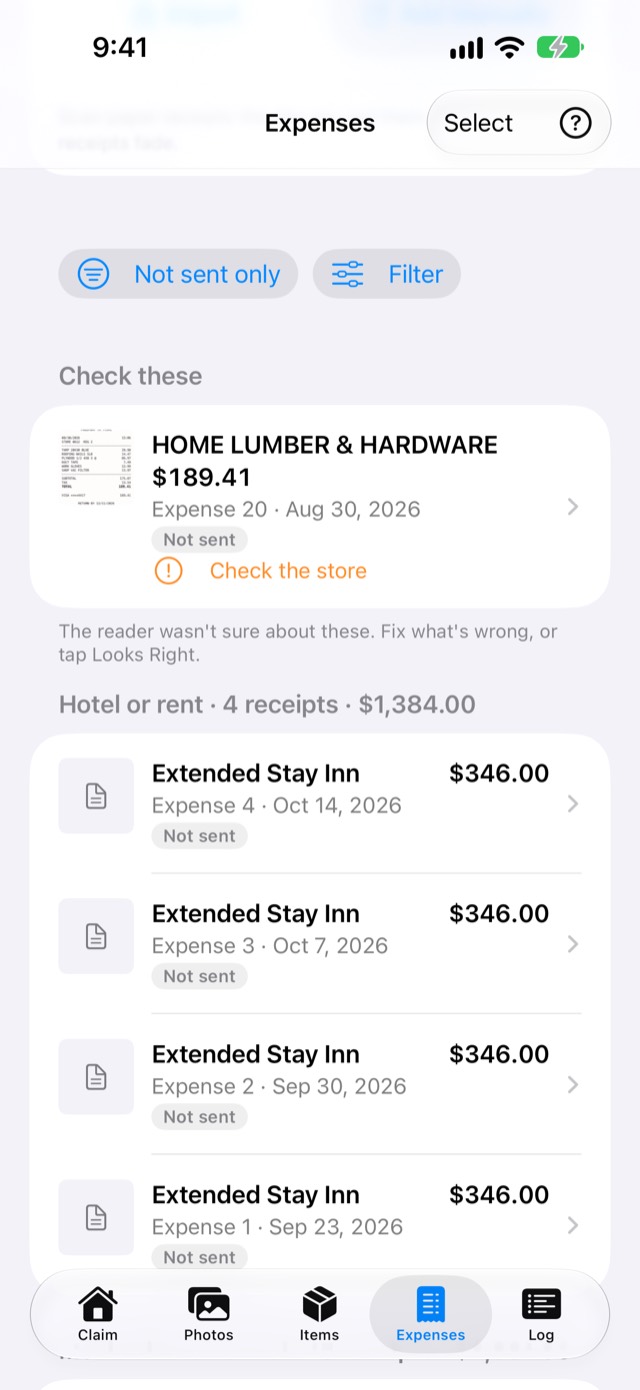
Expenses Receipts and other costs you paid, with Check these for receipts the reader wasn't sure about
Log Two halves: Contacts & dates (contacts, the contact log, voice notes, deadlines) and Documents

A vehicle claim has no Items tab, so it shows four tabs. Rooms belong to the whole event, so they stay while any claim in the event uses them.

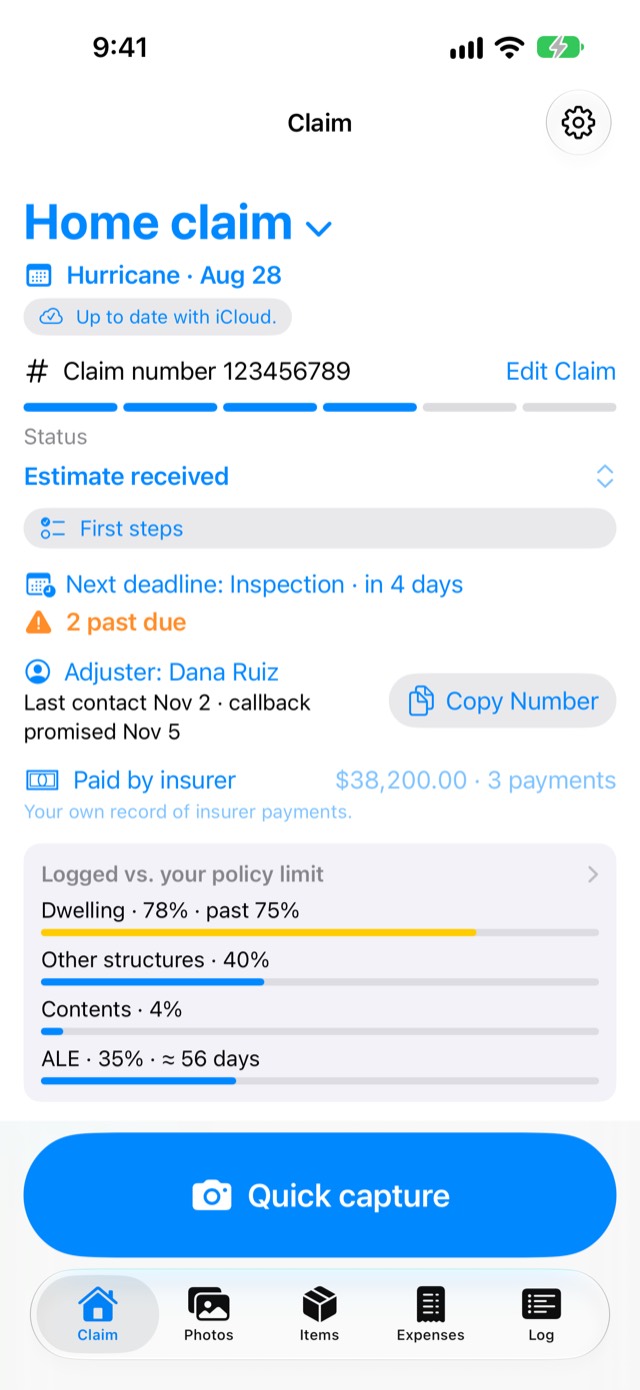
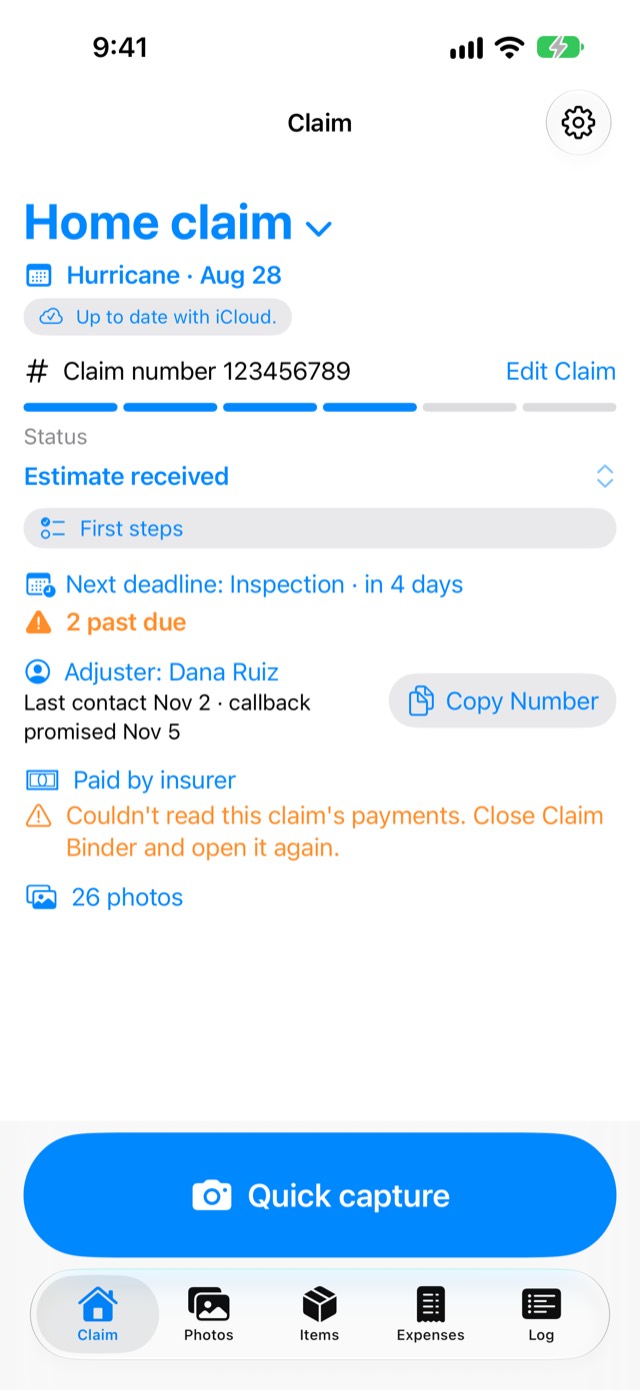
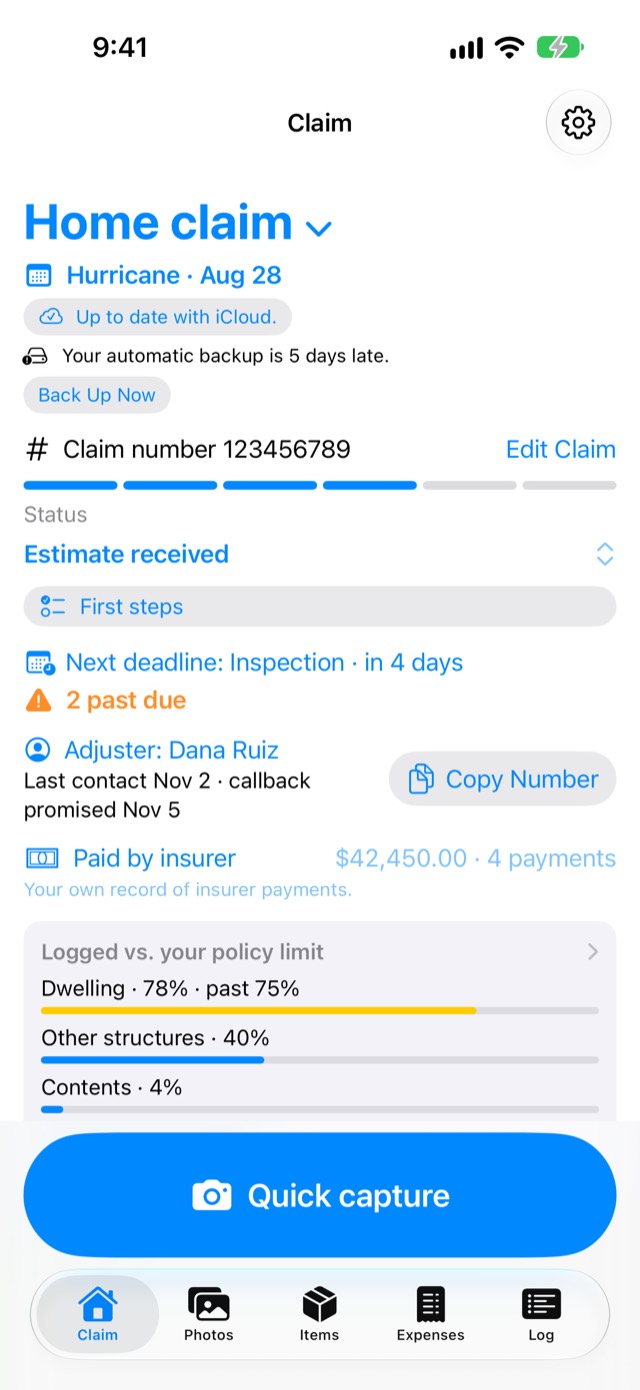
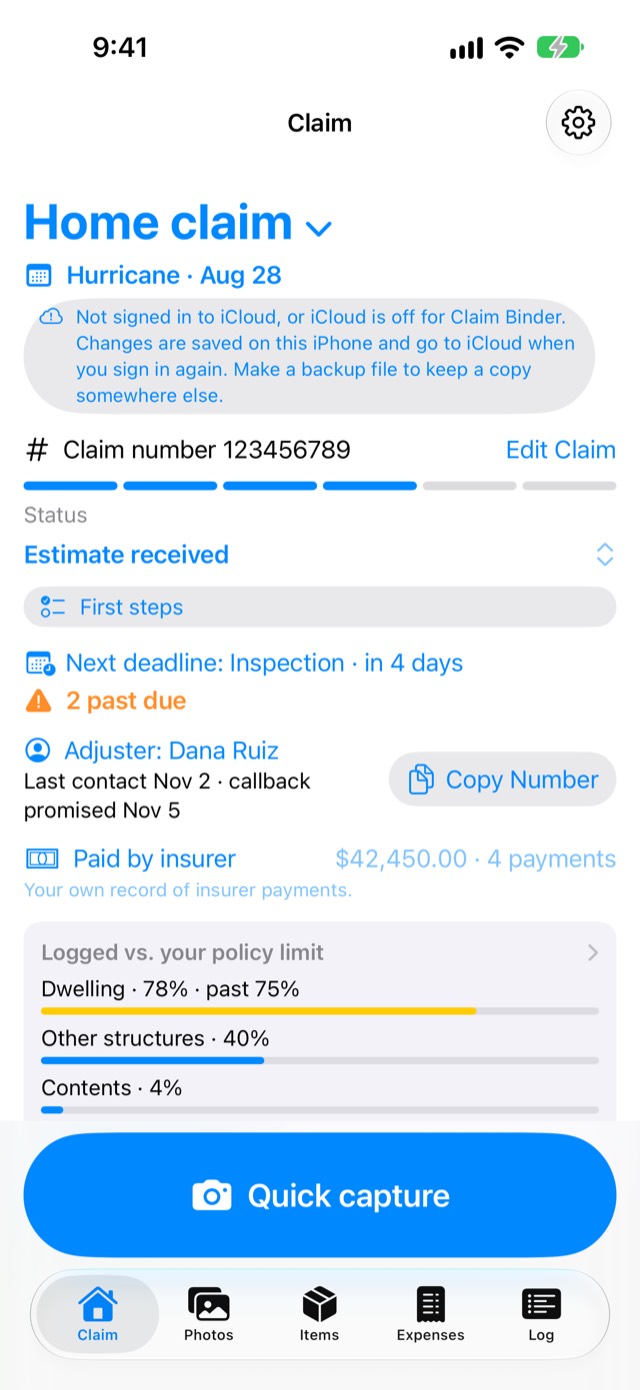
The Claim tab, top to bottom

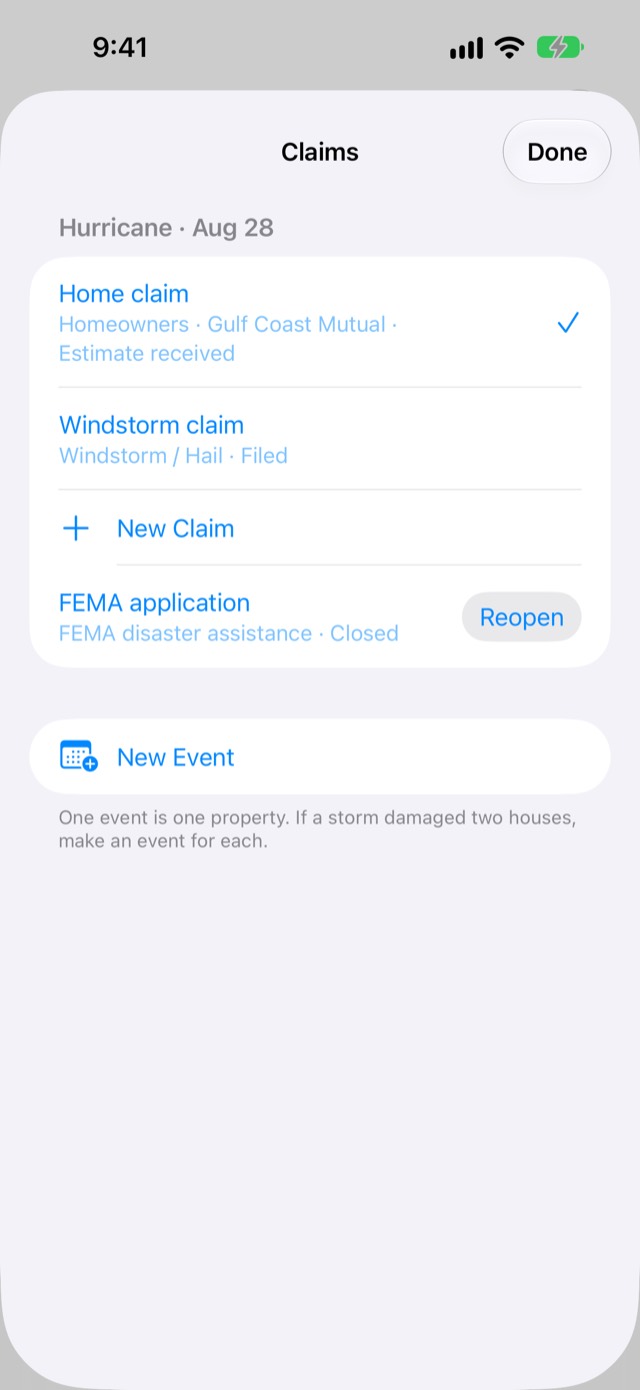
  1. The claim's name ▾ at the very top. Tap it to open Claims: every claim and event, closed claims with Reopen beside them, New Claim under the current event and New Event at the bottom.

  2. The event's line under it ("Hurricane · Aug 28"). Tap it to name the event or change its date of loss.

  3. The iCloud line: "Up to date with iCloud.", or how many changes are waiting to send. Tap it to open Settings. The gear (Settings) at the top right opens Settings too.

  4. Status: six bars and where the claim stands. Tap it to change the status.

  5. Next deadline, with "past due" under it in orange when something is late. Tap it to open the deadline; tap "past due" to see the list.

  6. Adjuster row with a Call button (Copy Number on a device that can't place calls). With no adjuster yet, Add your adjuster.

  7. Paid by insurer: the total paid and the number of payments, "Your own record of insurer payments." Tap it to open Payments.

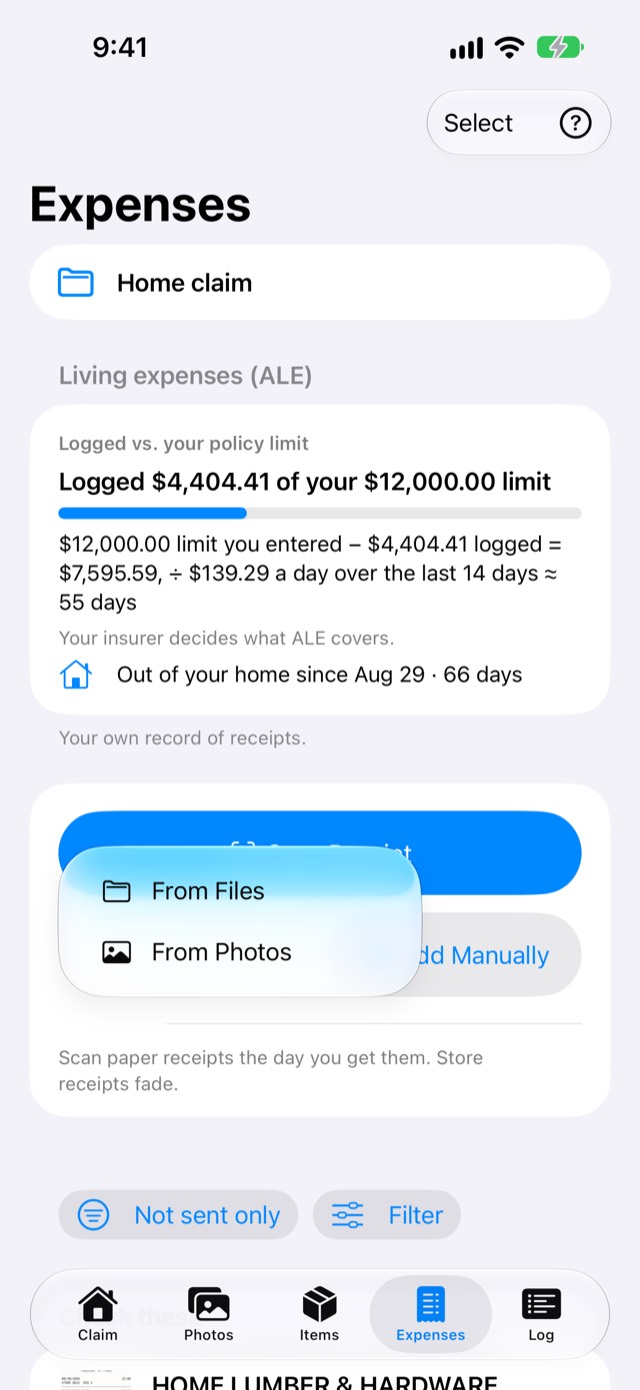
  8. Logged vs. your policy limit: one bar per coverage. Tap it to open Coverage.

  9. Quick capture at the bottom, near your thumb: opens the camera.

You may also see First steps (a short checklist for a new claim) and notices, such as photos still waiting to be saved, or "Your iPhone is almost out of storage" while less than 1 GB is free.

Back to questions

Screenshot: Claim tab of the Home claim, top of the screen

Settings

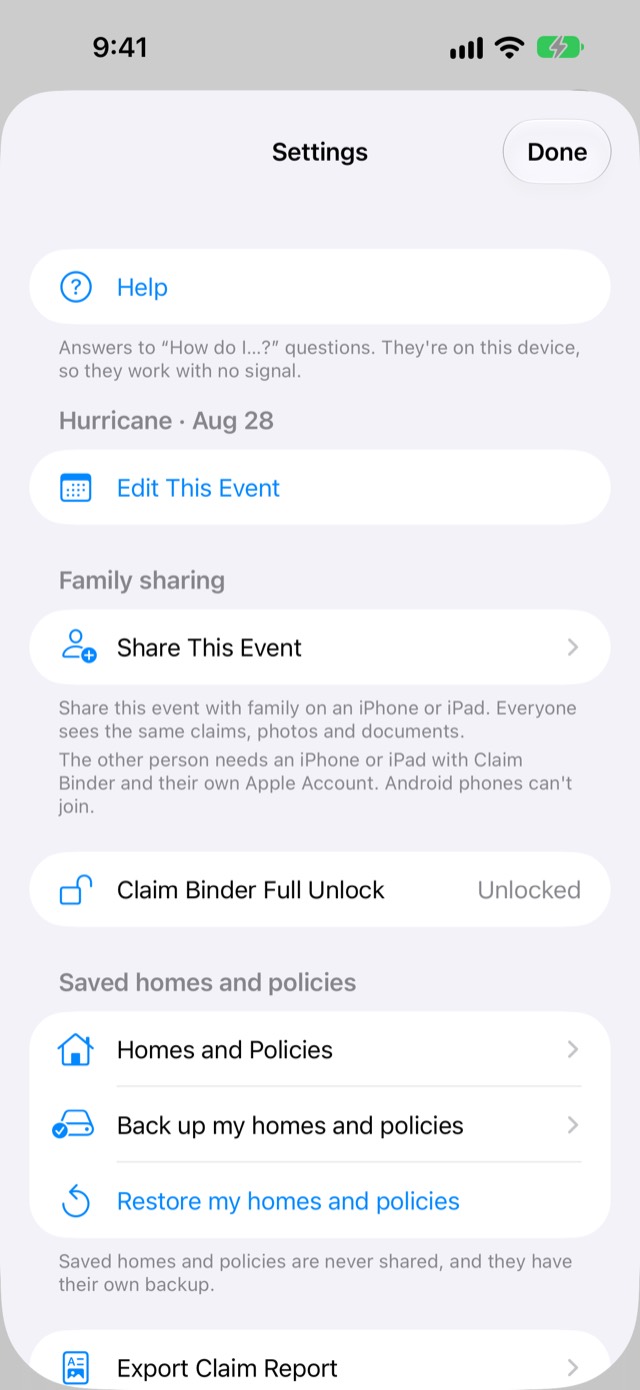
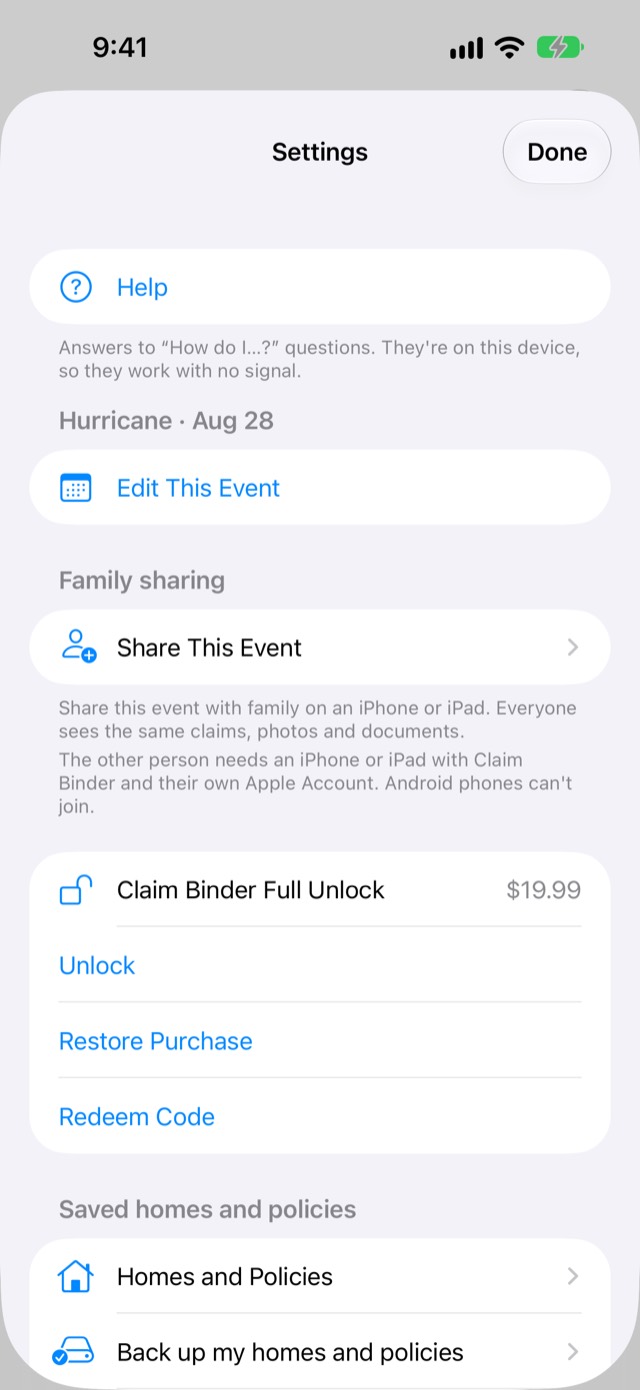
Tap the gear (Settings) at the top right of the Claim tab. Top to bottom, Settings holds:

  • Help: every answer in this guide, on your iPhone or iPad.

  • The event: Edit This Event (or Set Up This Event).

  • Family sharing: Share This Event. While the event isn't shared, it says who can join: "The other person needs an iPhone or iPad with Claim Binder and their own Apple Account. Android phones can't join."

  • Claim Binder Full Unlock: Unlock, Restore Purchase, Redeem Code.

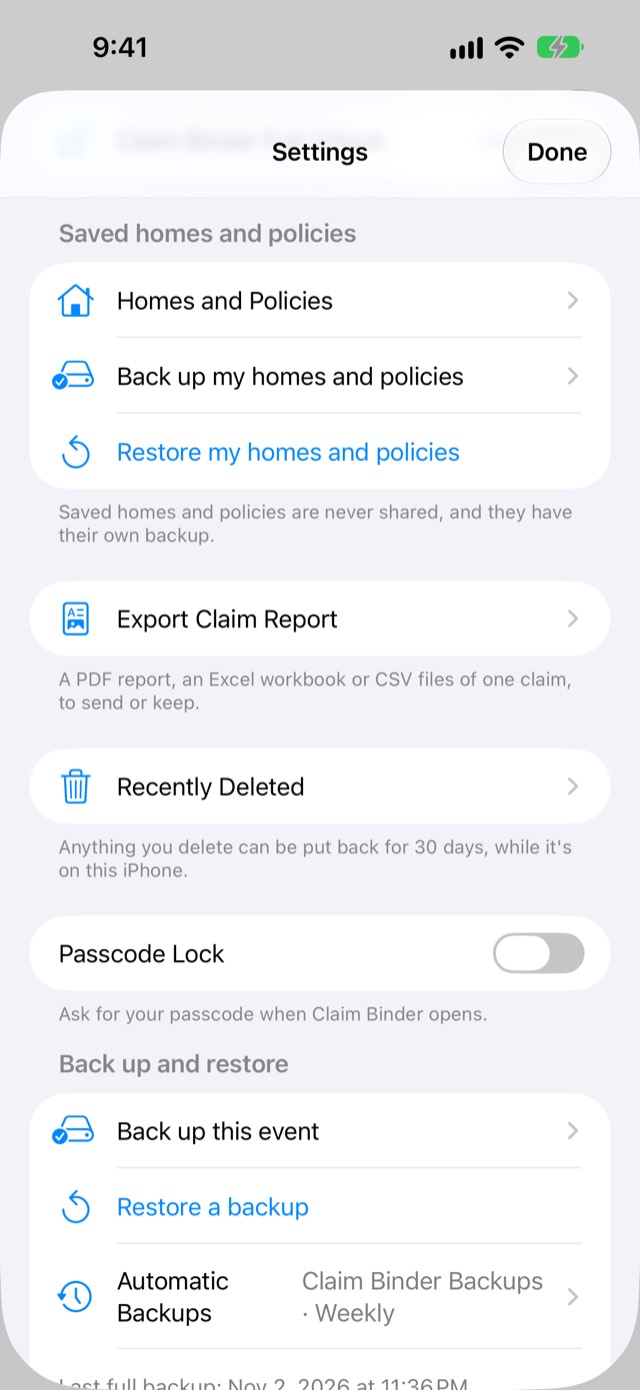
  • Saved homes and policies: Homes and Policies, Back up my homes and policies, Restore my homes and policies.

  • Export Claim Report (its Export History is inside it).

  • Recently Deleted.

  • The lock: Face ID Lock (or Touch ID Lock, Optic ID Lock, Passcode Lock).

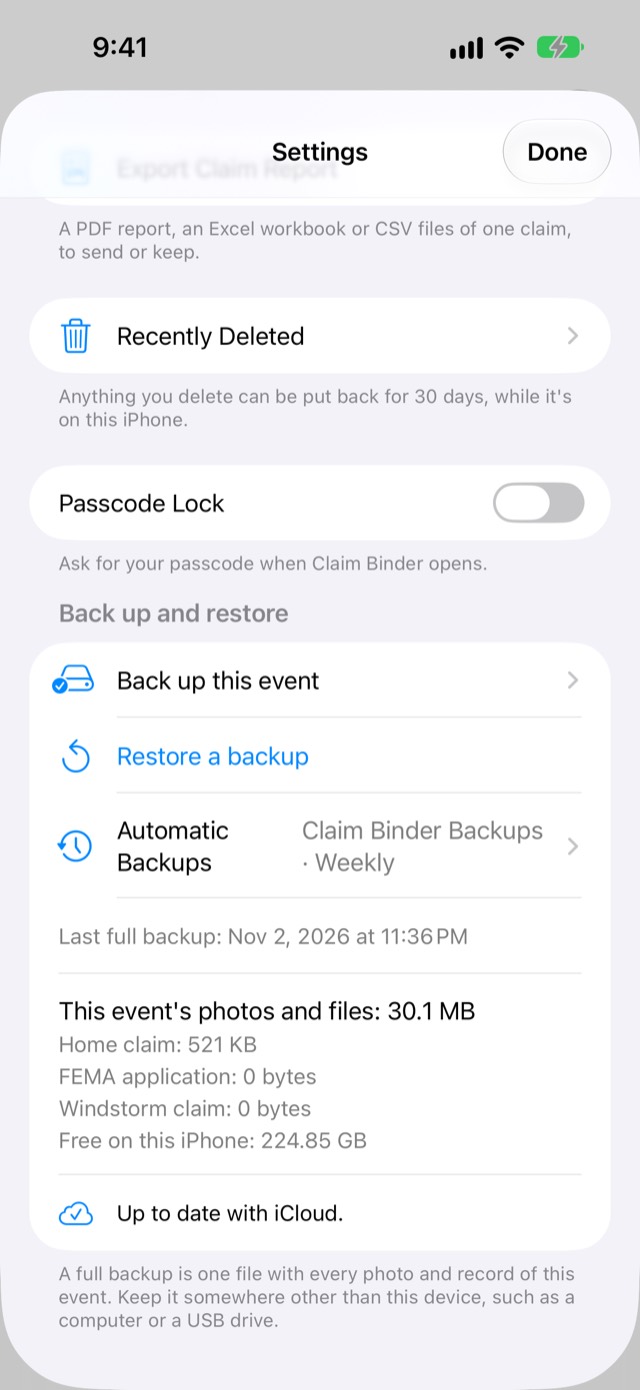
  • Back up and restore: Back up this event, Restore a backup, Automatic Backups, the last full backup, how much space the event takes, and the iCloud line.

Back to questions

Screenshot: Settings, top of the list

Help inside the app

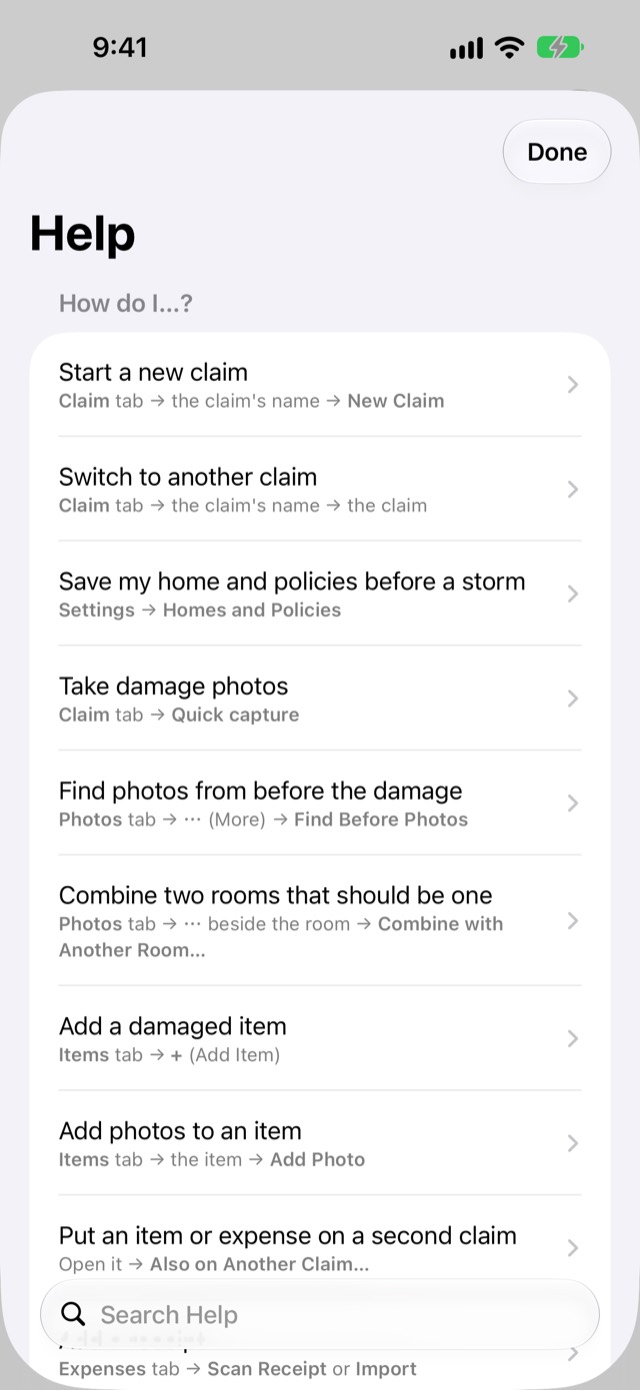
Three ways in, all working with no signal:

  • Settings → Help: search, the How do I…? list, and every topic by section.

  • First Steps → How to use Claim Binder.

  • The Help button (a question mark, top right) on Payments, Expenses, Items, both halves of the Log, Coverage, Structure Damage, Export Claim Report and Automatic Backups. It opens the answer for that screen.

Back to questions

Screenshot: Help, the How do I…? list

Select several at once

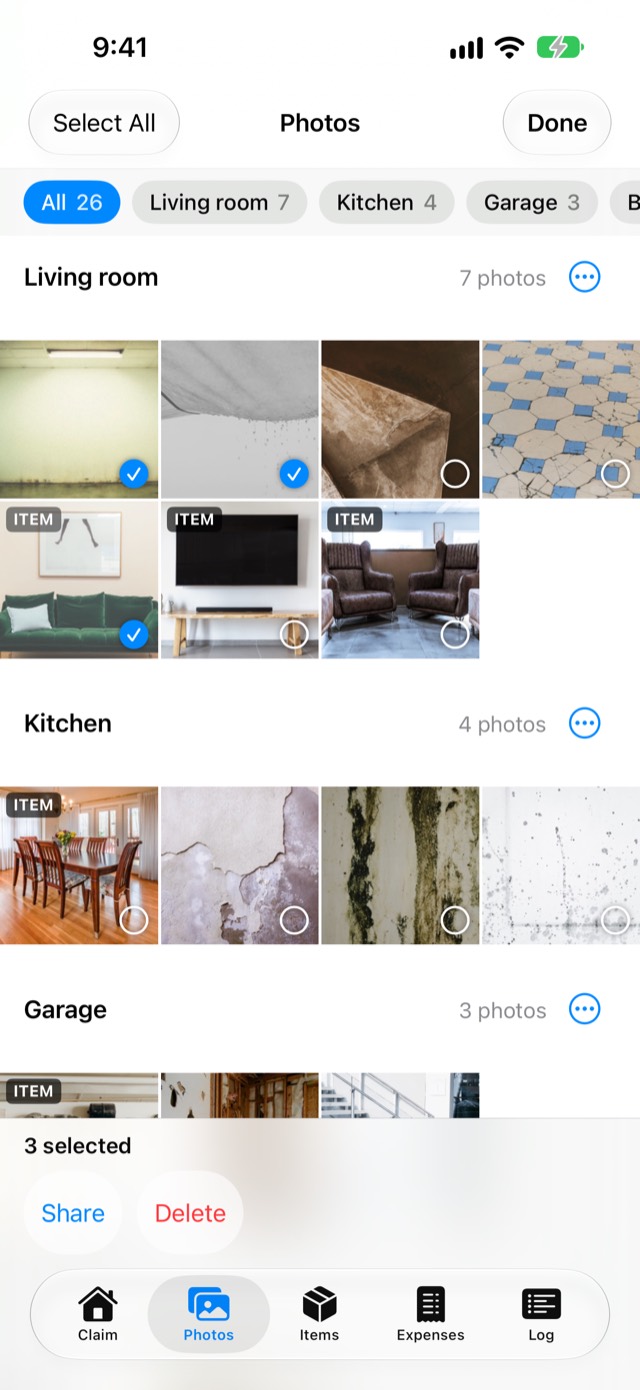
These lists have a Select button at the top right: Photos, Items, Expenses, Documents, Payments (the half shown, Received or Paid out), estimate lines on Structure Damage, the contact log, Deadlines and Recently Deleted.

  1. Open the list. To narrow it first, pick a room chip (Photos), use Filter (Expenses) or the Type picker (Documents).

  2. Tap Select (top right).

  3. Tap each row or photo you want. A tick shows on each, and the bottom bar counts them ("3 selected").

  4. To pick everything showing, tap Select All (top left). It picks only what the room, filter or search shows. Tap Deselect All to clear.

  5. Tap a button in the bottom bar:

    • Share and Delete on photos, items, expenses, documents and payments.

    • Delete on estimate lines and contact log entries.

    • Mark Done and Delete on deadlines.

    • Restore on Recently Deleted.

  6. Tap Done (top right) to stop selecting.

You should see a question first for Delete ("Delete 3 photos?") with Delete and Cancel. Everything you delete goes to Recently Deleted together, and one Undo brings it all back. A deleted photo keeps its place on its items, so Undo or Restore puts it back where it was.

Sharing one record is free. Sharing several at once (one PDF or separate files) is part of the one-time unlock. A View only person sees Share only.

Back to questions

Screenshot: Photos tab in Select mode, 3 photos ticked, the bottom bar

"Update Claim Binder to change this"

If a record shows the orange note "This record was made by a newer version of Claim Binder. Update the app to change it.", someone in the event changed it with a newer version of Claim Binder on another device.

  1. Update Claim Binder from the App Store on this iPhone or iPad.

  2. Open the record again.

You should see the note go away, and the record can be changed again. Until you update, you can still see it, share it and back it up. Nothing is lost.

Back to questions

How do I…?

The short path for each common task. The section named in the last column has the full steps.

How do I… Short path Section
Start a new claim Claim tab → the claim's name ▾ → New Claim Claims and events
Switch to another claim Claim tab → the claim's name ▾ → tap the claim Claims and events
Name the event or change its date of loss Claim tab → the event's line under the claim's name Claims and events
Save my home and policies before a storm Claim tab → gear → Settings → Homes and Policies Claims and events
Photograph each room before a storm Settings → Homes and Policies → Room Walkthrough Claims and events
Reopen a closed claim Claim tab → the claim's name ▾ → Reopen Claims and events
Take damage photos Claim tab → Quick capture, or Photos tab → Take photos Photos
Find photos from before the damage Photos tab → ⋯ (More) → Find Before Photos Photos
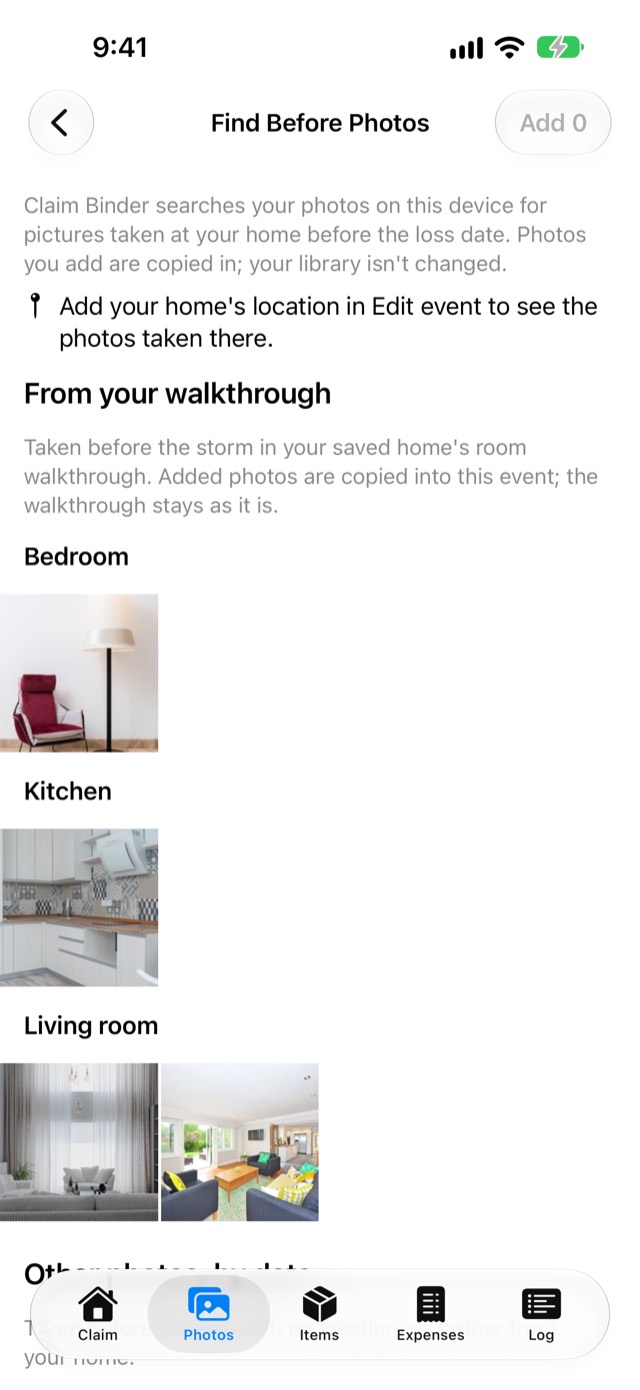
Add my room walkthrough photos after a storm Photos tab → ⋯ (More) → Find Before Photos → From your walkthrough Photos
Bring in photos from my library Photos tab → ⋯ (More) → Import from Photos Photos
Add a note to a room Photos tab → ⋯ beside the room → Room Note Photos
Correct a photo's time Photos tab → the photo → Correct the Time Photos
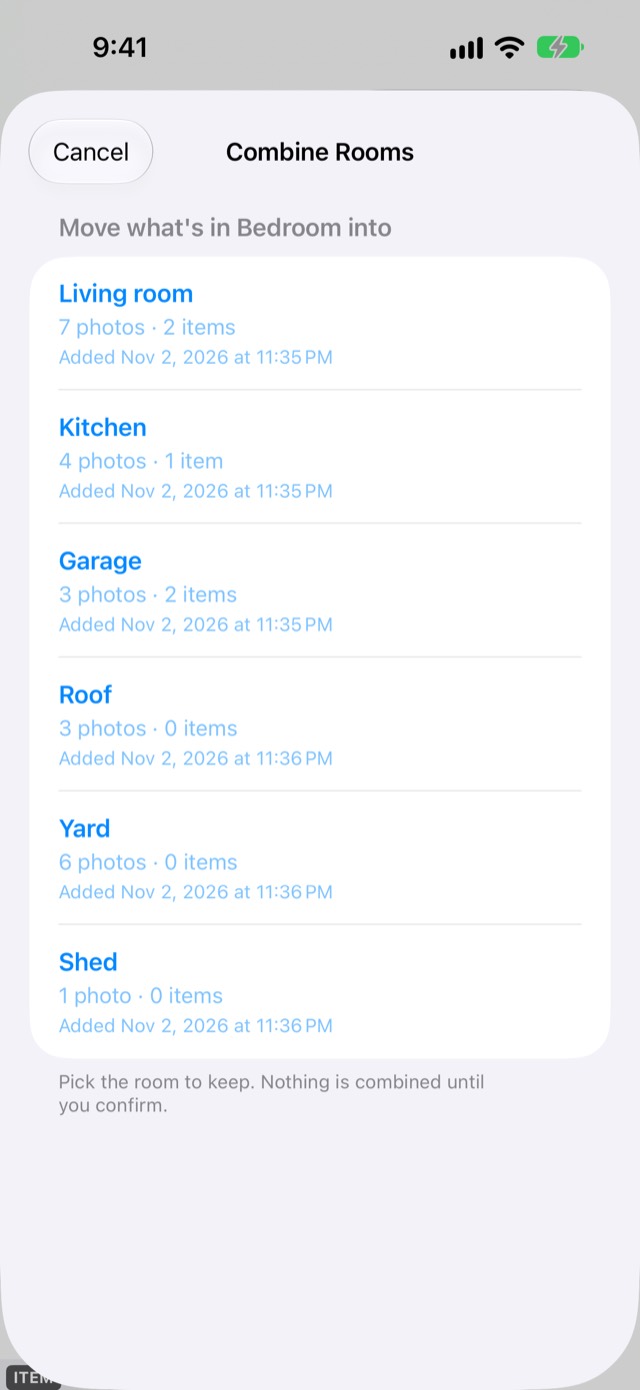
Combine two rooms that should be one Photos tab → All → ⋯ beside the room → Combine with Another Room… Photos
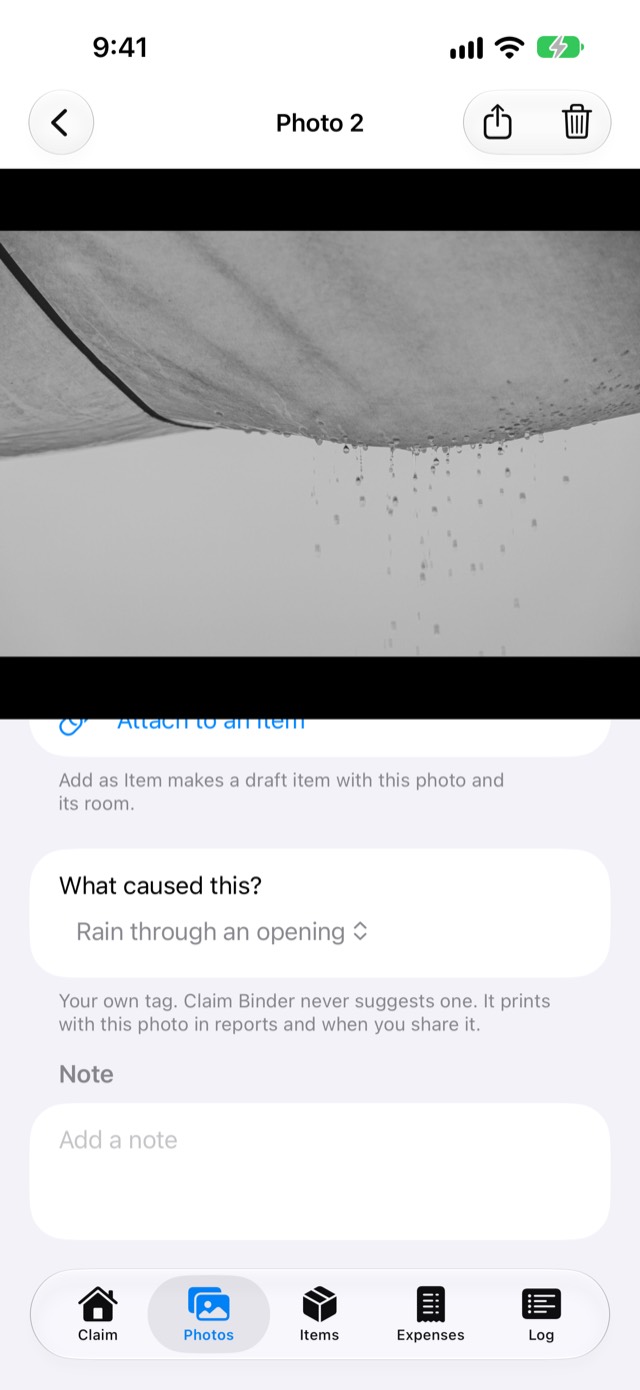
Tag what caused the damage Photos tab → the photo → What caused this? Photos
Add a damaged item Items tab → + (Add Item), or ⊕ beside a room Damaged items
Describe an item out loud Items tab → + (Add Item) → Describe It Out Loud Damaged items
Add photos to an item Items tab → the item → Add Photo Damaged items
Put an item or expense on a second claim Open it → Also on Another Claim… Damaged items
Add a receipt Expenses tab → Scan Receipt or Import Expenses and receipts
Add an expense with no receipt (tips, parking) Expenses tab → Add Manually Expenses and receipts
Add mileage Expenses tab → Add Manually → Category Mileage Expenses and receipts
Show only hotel receipts (or one coverage) Expenses tab → Filter Expenses and receipts
Add a payment from the insurer Claim tab → Paid by insurer → Scan a Check or Add Manually Payments
Record money I paid a contractor Claim tab → Paid by insurer → Paid out → Add Paid Out Payments
Add a letter or estimate from the insurer Log tab → Documents → Scan Document or Import Documents
Turn a document into an expense or payment Log tab → Documents → the document → Make an Expense or Make a Payment Documents
Add my adjuster's phone number Log tab → Contacts & dates → Add Contact Contacts and deadlines
Log a call or email Log tab → Contacts & dates → Log a Contact Contacts and deadlines
Record notes after a phone call Log tab → Contacts & dates → Voice Note Contacts and deadlines
Add a deadline Log tab → Contacts & dates → Add Deadline Contacts and deadlines
Send what the adjuster asked for Log tab → open the Documents requested deadline → Send What's Left Contacts and deadlines
Enter my policy limits Claim tab → Logged vs. your policy limit → Edit Limits Coverage and estimates
Enter a repair estimate Coverage → Structure Damage → Add Line Coverage and estimates
Share the event with my family Settings → Share This Event → Invite Someone Sharing with family
Leave an event someone shared with me Settings → Shared by [name] → Leave This Event Sharing with family
Buy the unlock Settings → Claim Binder Full Unlock → Unlock The unlock and free limits
Get the unlock on a new iPhone or iPad Settings → Claim Binder Full Unlock → Restore Purchase The unlock and free limits
Back up the claim to a file Settings → Back up and restore → Back up this event Backup and recovery
Back up automatically Settings → Back up and restore → Automatic Backups Backup and recovery
See how much space my claim takes Settings → Back up and restore Backup and recovery
Undo something I just did Tap Undo in the bar at the bottom, or shake the iPhone Backup and recovery
See an old value and put it back Open the record → History → Restore Backup and recovery
Get something back I deleted Settings → Recently Deleted → Restore Backup and recovery
Get my claim back after signing out of iCloud Tap Put Back My Copy when Claim Binder offers it Backup and recovery
Lock Claim Binder with Face ID or my passcode Settings → Face ID Lock (or Passcode Lock) Lock Claim Binder
Select or delete several at once Open the list → Select (top right) Getting around
Share a receipt with card numbers covered Open it → Share → check Share Preview → Send Reports and sharing
Share several receipts as one PDF Expenses tab → Select → tick them → Share → One PDF Reports and sharing
Send a claim report Settings → Export Claim Report → Preview & Share Reports and sharing
Get an Excel spreadsheet of my claim Settings → Export Claim Report → Format → Excel Reports and sharing
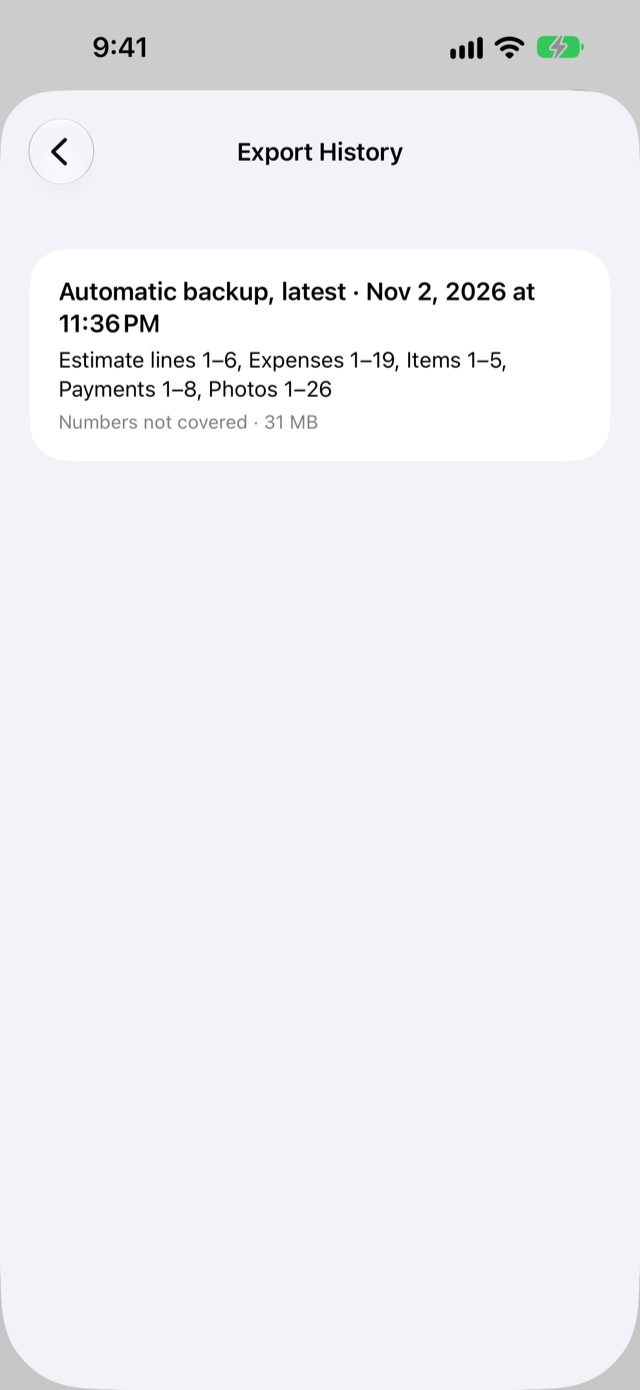
See what I sent and when Settings → Export Claim Report → Export History Reports and sharing

Claims and events

An event is what happened to one property ("Hurricane · Aug 28"). Each event holds one or more claims (homeowners, windstorm, flood, FEMA, vehicle). Photos, rooms and documents belong to the event and show on every claim in it; items, expenses and payments belong to one claim.

Start a new claim

  1. Tap the Claim tab.

  2. Tap the claim's name with ▾ at the very top.

  3. Under the event, tap New Claim. (For a different storm or property, tap New Event at the bottom first.)

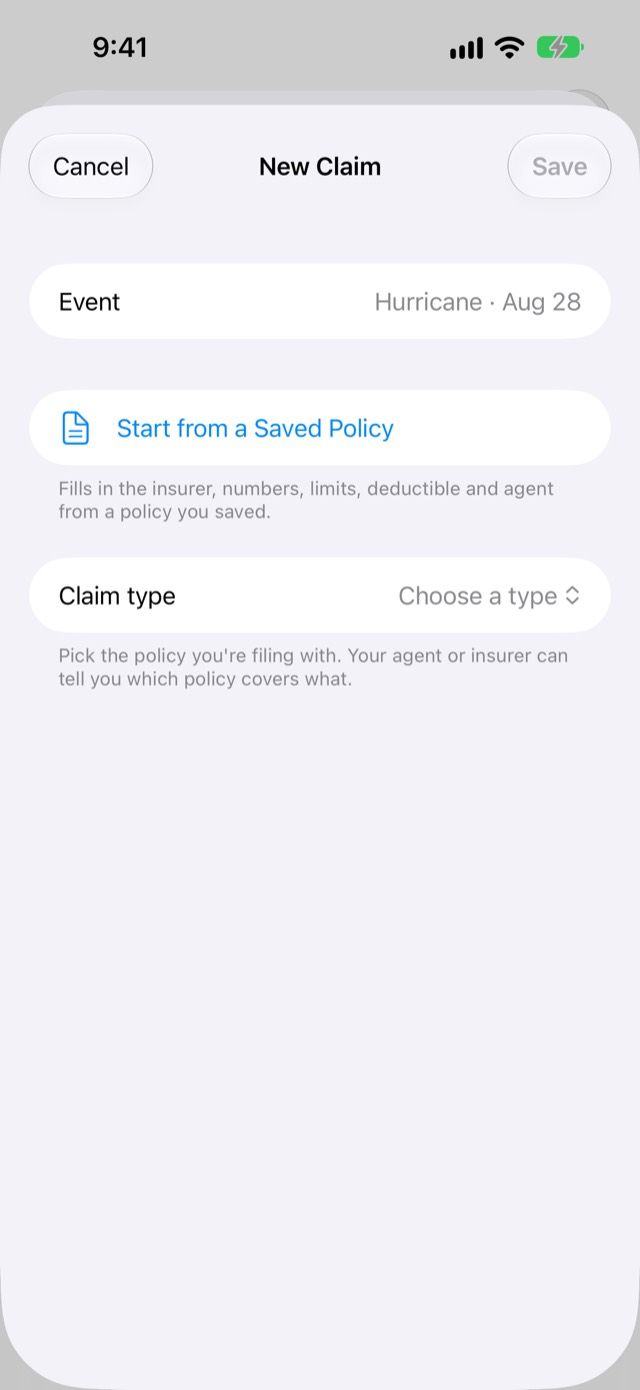
  4. If you saved a policy, tap Start from a Saved Policy and pick it. It fills in the insurer, numbers, limits and agent.

  5. Pick the Claim type, then fill in what you know. Anything can be added later.

  6. Tap Save.

You should see First Steps open, and the new claim's name at the top of the Claim tab.

  • With no claim yet, the Claim tab shows Start a Claim instead.

  • If another claim is open and you haven't bought the unlock, the Unlock screen opens first with "You have a claim open."

  • For a Windstorm / Hail claim with the insurer still blank, tap Use TWIA (Texas Windstorm Insurance Association) to fill it in. It's only a suggestion; Edit Claim offers it too.

One event is one property. If a storm damaged two houses, make an event for each.

Back to questions

Screenshot: New Claim form (Claims → New Claim), empty

Switch to another claim

  1. Claim tab → tap the claim's name ▾ at the top.

  2. Tap the claim you want.

Every tab now shows that claim. In Claims, a check mark shows the one you're working in.

Back to questions

Screenshot: Claims: the event's claims, the FEMA claim closed with Reopen

Edit, close or delete a claim

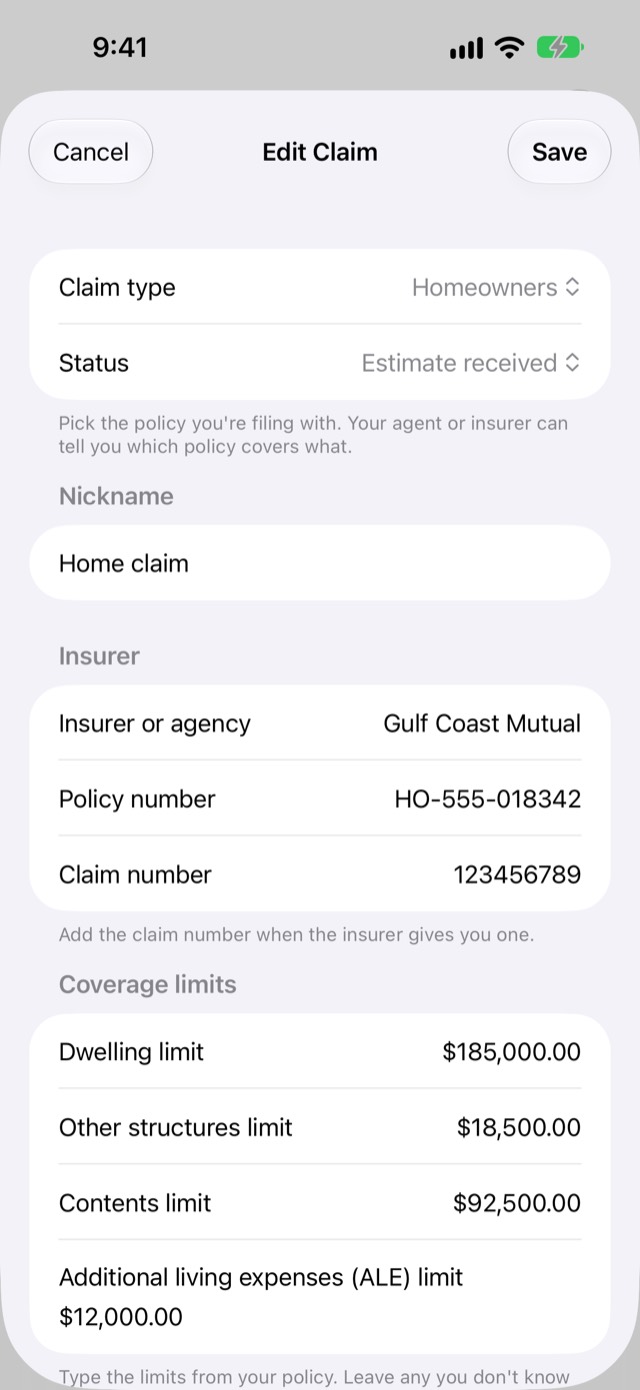
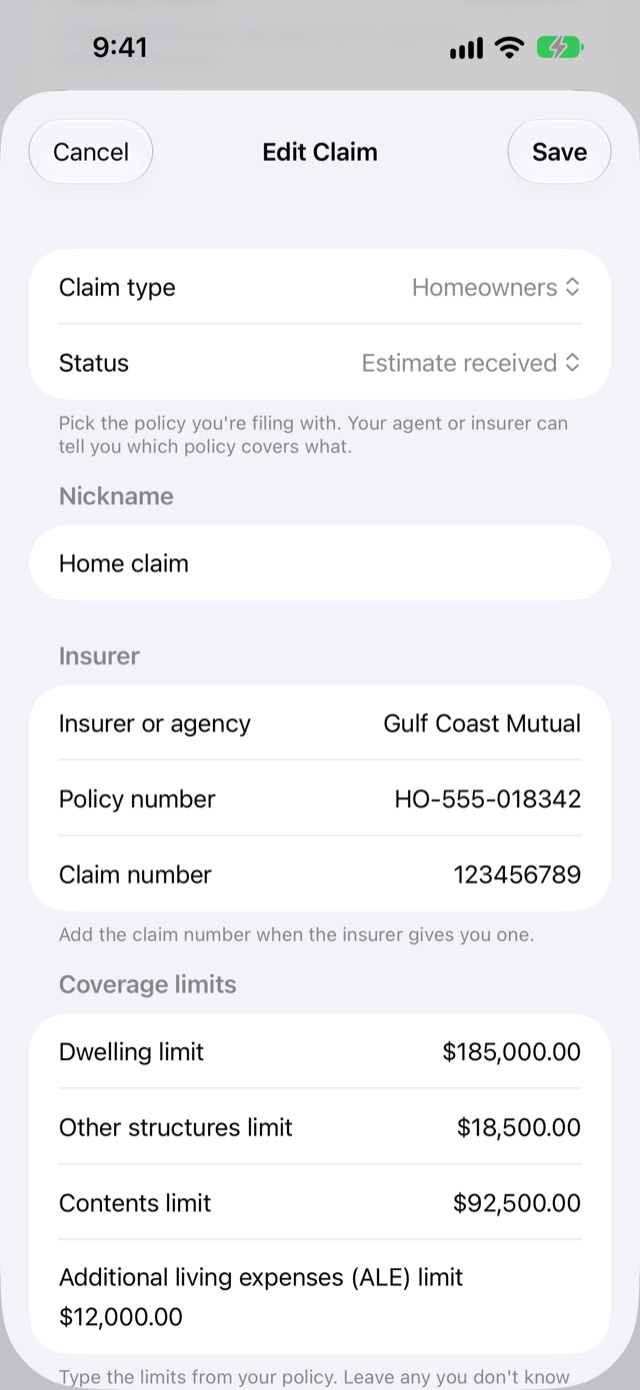
  1. Claim tab → tap Edit Claim.

  2. Change what you need, such as the claim number or the limits, then tap Save.

  3. To close the claim, tap Close Claim, then Close Claim again.

  4. To delete it, tap Delete Claim, type the claim's name, then tap Delete Claim.

You should see a closed claim stay in Claims with all its records, listed after the open claims with Reopen beside it. Closing a claim deletes nothing. A deleted claim sits in Recently Deleted for 30 days; its photos and documents stay with the event.

Back to questions

Screenshot: Edit Claim, top of the form

Reopen a closed claim

Use this when hidden damage turns up later, repairs cost more, or a claim was closed by mistake. Reopening keeps all its records.

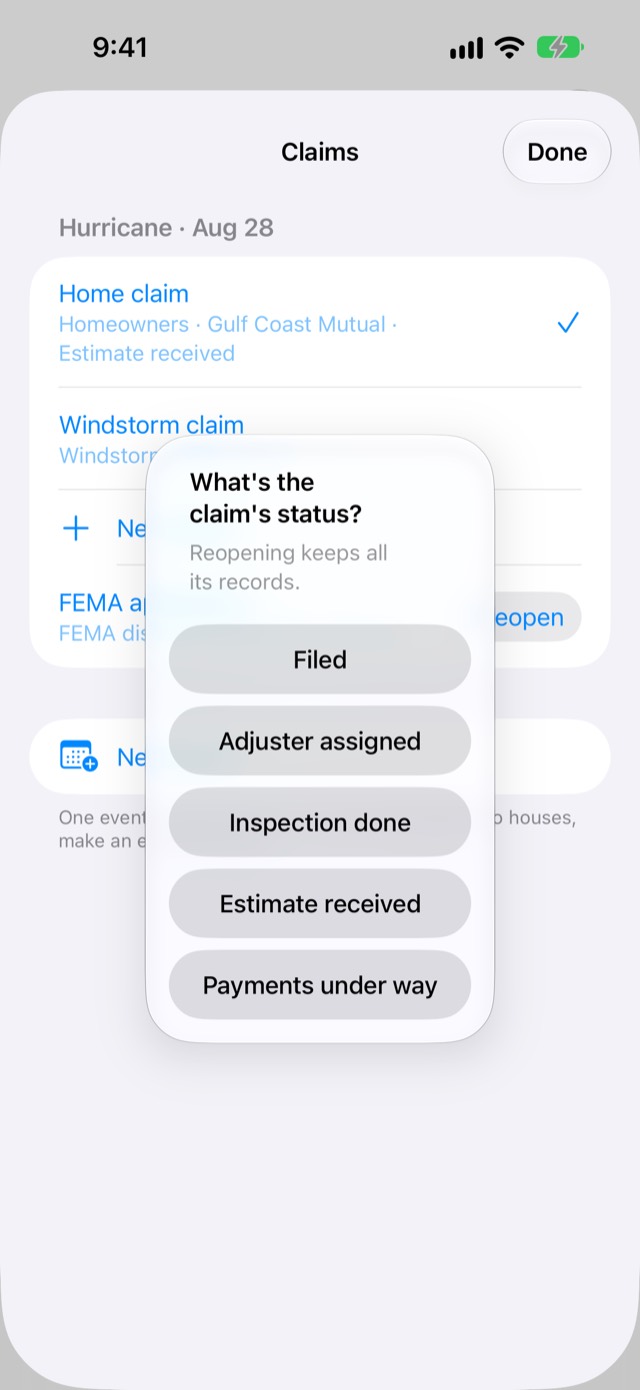
  1. Claim tab → tap the claim's name ▾ → tap Reopen beside the closed claim. (Or, on the closed claim's Claim tab, tap Status → Reopen Claim.)

  2. If another claim is open and you haven't bought the unlock, the Unlock screen opens with "You have a claim open." Tap Close a Claim Instead to close the other one, or Unlock.

  3. Answer What's the claim's status? by tapping where the claim stands now, for example Estimate received.

You should see the claim open again on the Claim tab, with its status under Status.

Back to questions

Screenshot: Claims → Reopen: "What's the claim's status?"

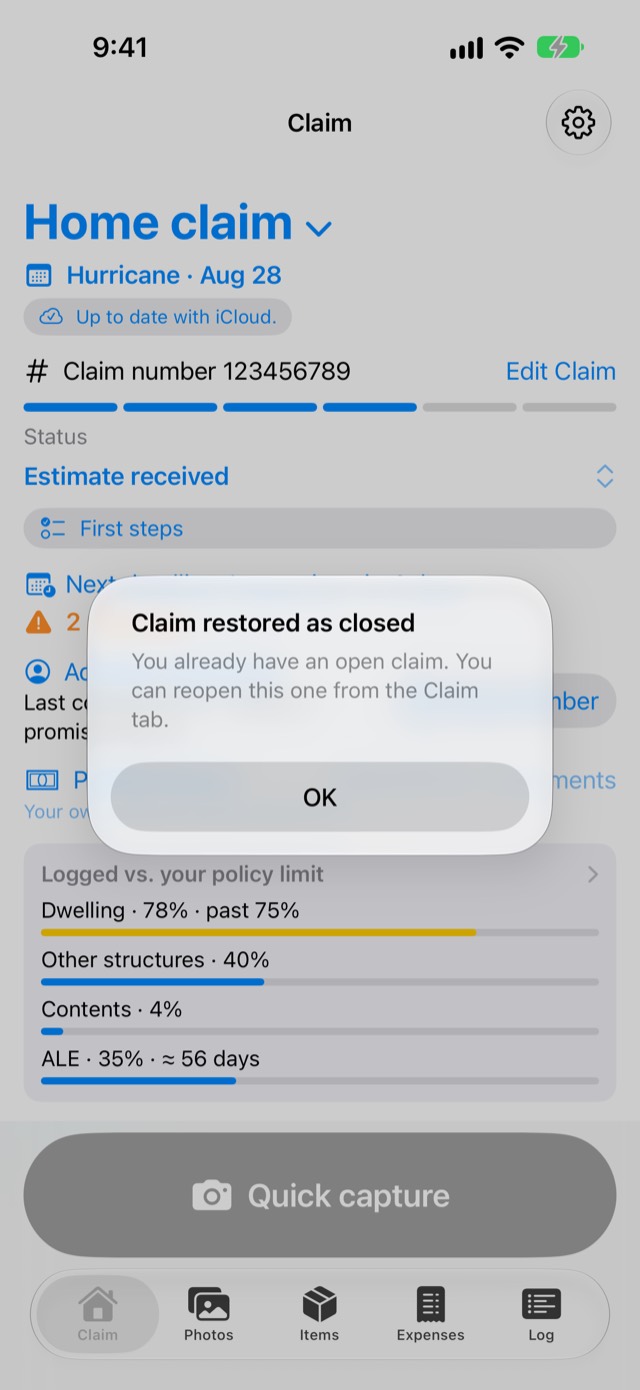
A restored claim came back closed

If you see Claim restored as closed after Restore in Recently Deleted or after Restore a backup, that's the free one-open-claim rule: "You already have an open claim. You can reopen this one from the Claim tab." Nothing is lost. Close your other open claim (or buy the unlock), then reopen it as above.

Back to questions

Screenshot: "Claim restored as closed" alert

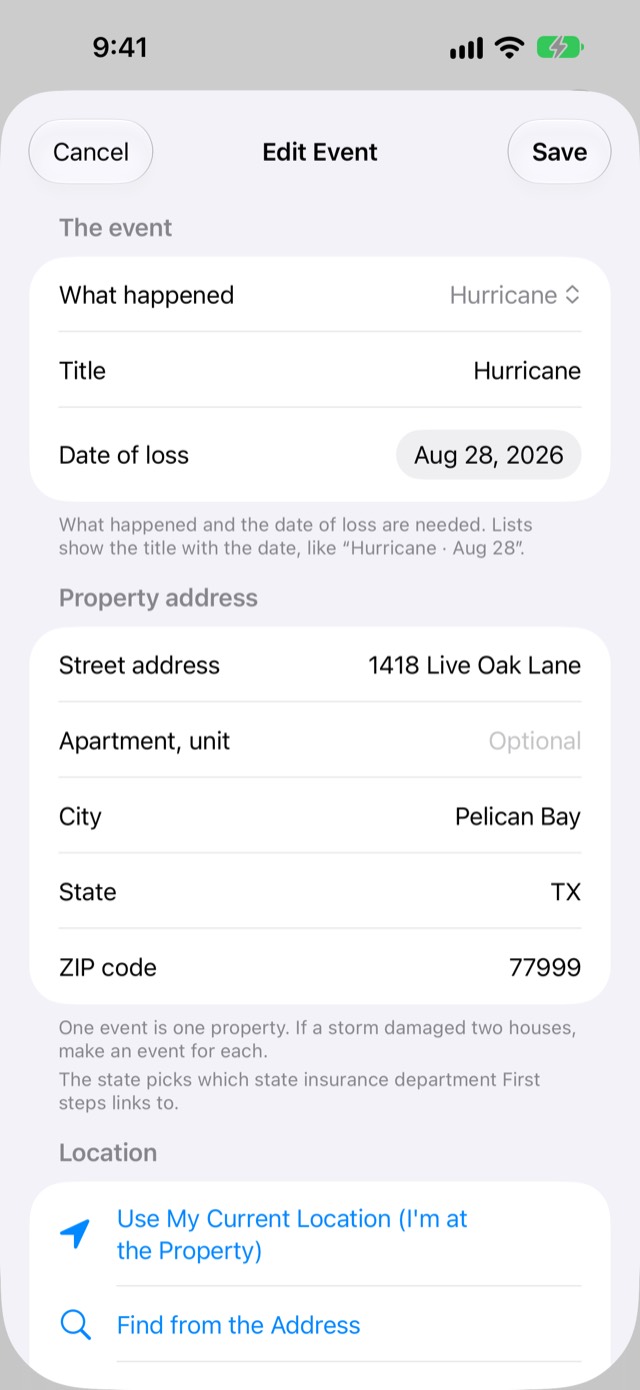
Name the event or change its date of loss

  1. Claim tab → tap the event's line under the claim's name (it shows the event and its date). For an unnamed event, tap Set Up This Event.

  2. Pick What happened, check the Title and the Date of loss, and fill in the property's address.

  3. Tap Save.

You should see the event's title and date under the claim's name, such as "Hurricane · Aug 28". You can also open it from Settings → Edit This Event. Find Before Photos uses the date of loss and the home's location.

Back to questions

Screenshot: Edit Event: what happened, title, date of loss, address

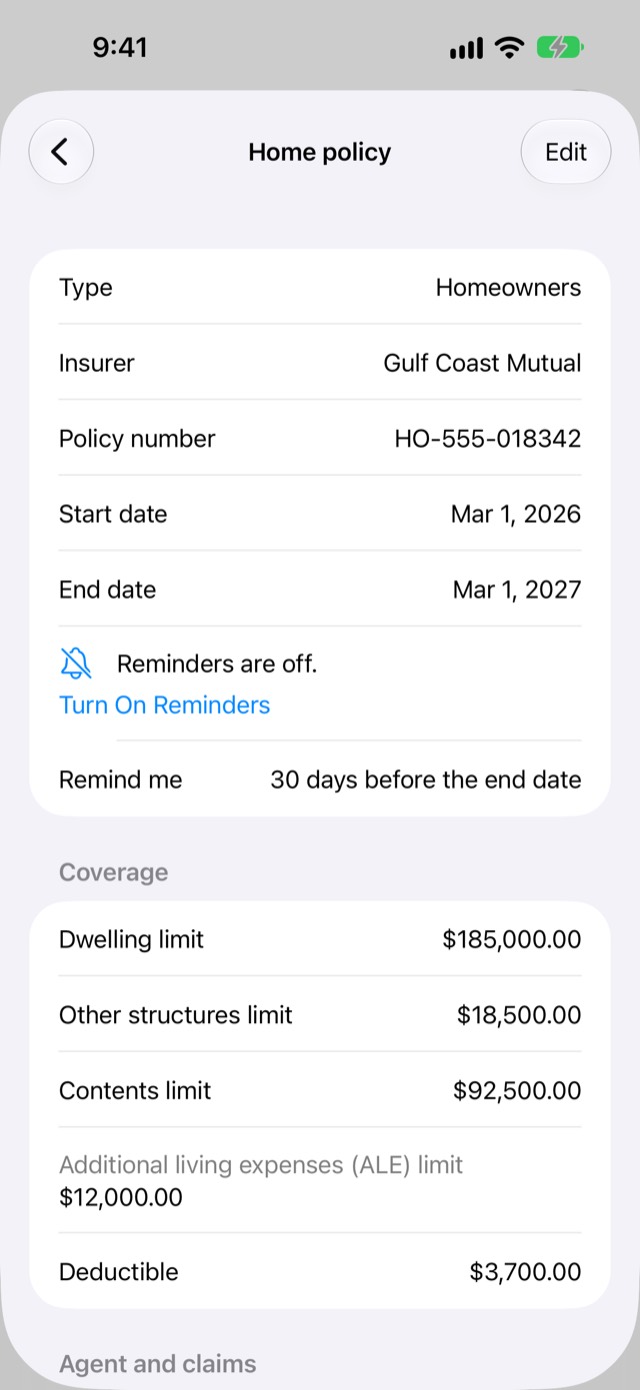
Save homes and policies before a storm

  1. On the Claim tab, tap the gear at the top right to open Settings.

  2. Tap Homes and Policies.

  3. Tap Add Home, fill in the address, then tap Save.

  4. Tap Add Policy under the home. Enter the insurer, policy number, dates, limits, agent and claims phone, then tap Save.

  5. On the policy's screen, tap Add Papers, then Scan the Declarations Page.

You should see the policy under its home, with its end date. A reminder comes 30 days before it ends unless you change Remind me.

On the policy's screen, Start a Claim from This Policy fills a new claim with its details, and Call dials the agent or the claims line. The numbers are on your phone with no connection. For a Windstorm / Hail policy, Use TWIA (Texas Windstorm Insurance Association) fills in the insurer. Saved homes and policies are never shared, and they have their own backup.

Back to questions

Screenshot: A saved policy's screen (Home policy), with its reminder

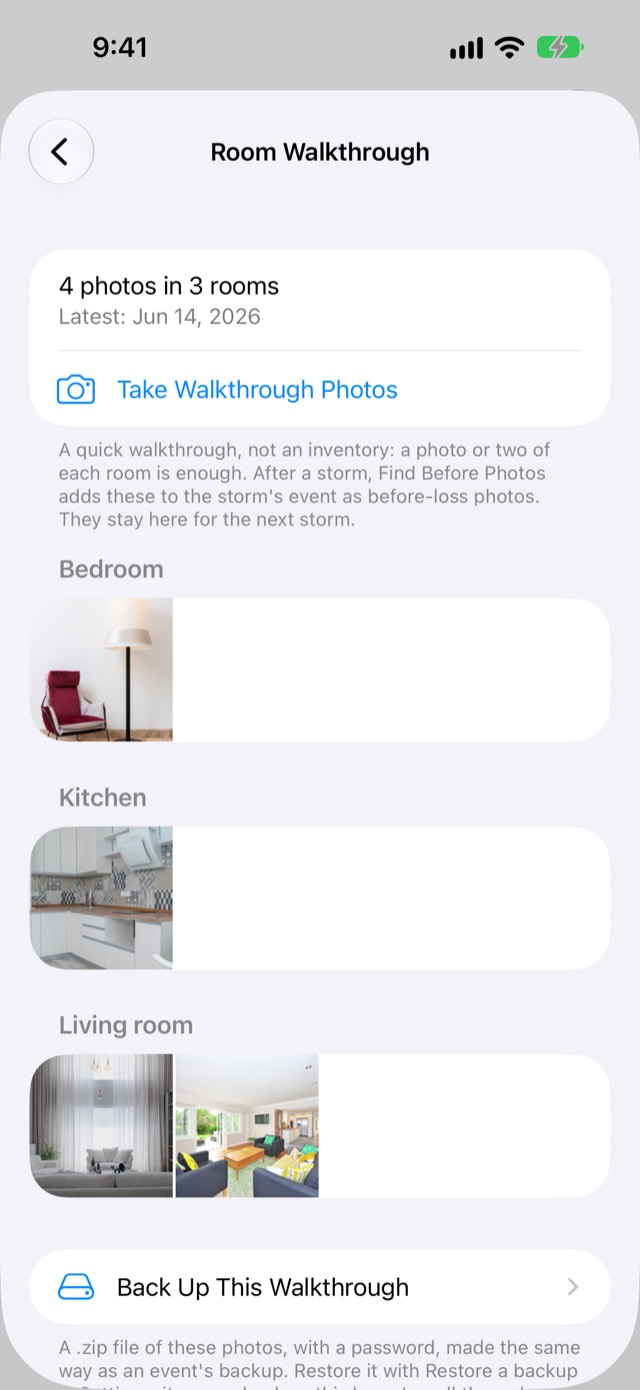
Take a room walkthrough of my home before a storm

A quick walkthrough, not an inventory: a photo or two of each room is enough. After a storm, these become your before-loss photos.

  1. On the Claim tab, tap the gear at the top right to open Settings.

  2. Tap Homes and Policies, then Room Walkthrough under your home. Add the home first if it isn't there (see above).

  3. Tap Take Walkthrough Photos.

  4. Tap the room chip to pick or add a room, then take a photo or two of the room. Do the same for each room.

  5. Tap the X to close the camera.

You should see the photos on Room Walkthrough, by room, with how many photos in how many rooms, such as "2 photos in 2 rooms".

The walkthrough stays on your phone and in your own iCloud. It's never shared, and automatic backups keep it. To keep a copy somewhere else, tap Back Up This Walkthrough and save the file, as for an event's backup; Restore a backup in Settings brings it back as this home's walkthrough. To remove it, tap Delete Walkthrough: it goes to Recently Deleted for 30 days.

Back to questions

Screenshot: Room Walkthrough of the saved home: photos by room (Pexels room photos, June 2026)

Photos

Photos belong to the event, so one photo shows on every claim from that storm. No copies are made, and the original is never changed.

Rooms show while the event has no claim yet, or any claim that isn't a vehicle claim. When every claim in the event is a vehicle claim, the Photos tab is one list with no rooms, and the camera saves photos with no room. Add a home claim and rooms come back, with each photo's room as it was.

Take damage photos

  1. Claim tab → scroll to the bottom → Quick capture. (Or Photos tab → Take photos, the camera at the top right.)

  2. At the top of the camera, make sure the switch says Damage photo.

  3. Tap the room chip and pick the room, or Not sure yet. (The chip isn't there when every claim in the event is a vehicle claim.)

  4. Take the photos. Where your iPhone has it, tap 0.5× to fit a whole room.

You should see the count at the top go up, such as "3 saved". Tap the small picture of your last photo to see it.

Each photo saves the moment you take it, with the time and location, even with no signal. While less than 1 GB is free, the camera says "Your iPhone is almost out of storage: [free] free. Free up space so photos and backups keep saving."

Back to questions

Photograph an item for the item list

  1. Claim tab → Quick capture, and flip the switch to Item photo.

  2. Take one photo per item.

Each photo becomes a draft item on the Items tab marked Needs details. Fill in the name and price later. On a free claim with 10 items, more item photos are kept as damage photos: "Saved as a damage photo. Free claims hold 10 items."

Back to questions

Move a photo to another room, or add a note

  1. Photos tab → tap the photo.

  2. Tap Room and pick the room.

  3. Type your note under Note.

You should see the photo under its new room on the Photos tab. In an event with only vehicle claims, rooms are hidden, so Room isn't on the photo's screen. For a note about the whole room, see the next section.

Back to questions

Screenshot: Photo detail: Taken, Location, Room

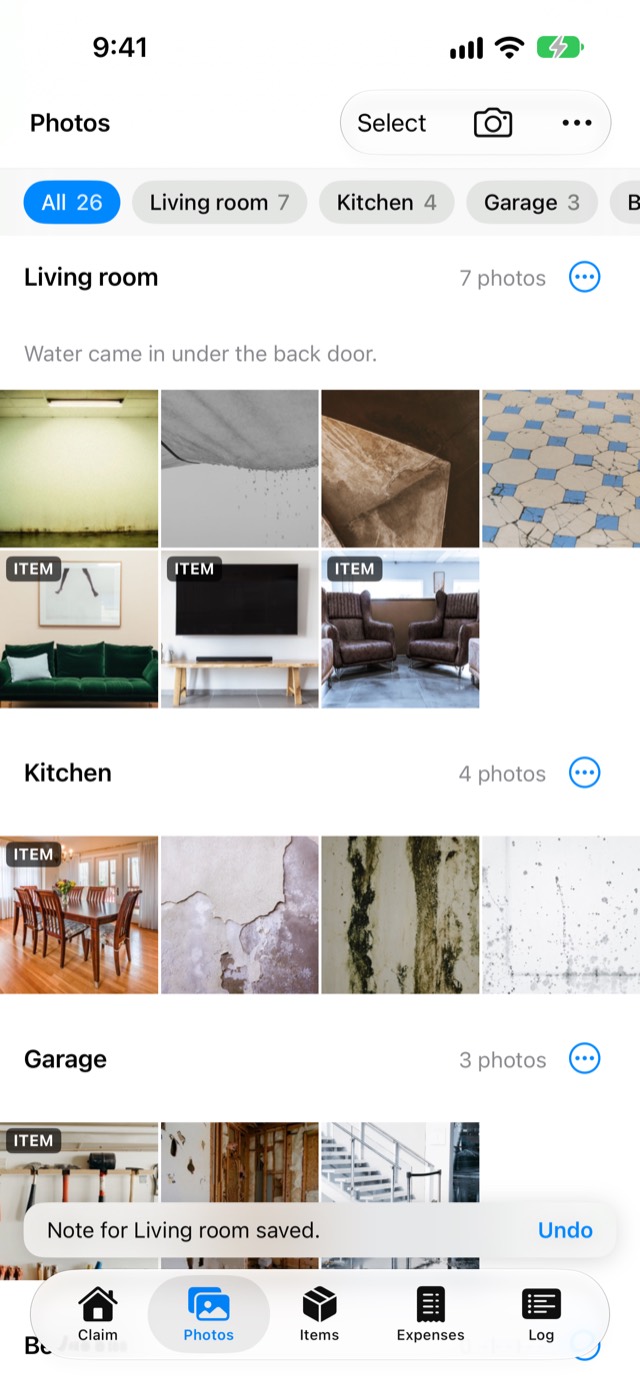
Add a note to a room

  1. Photos tab (or Items tab) → find the room's heading and tap the ⋯ at its right end.

  2. Tap Room Note.

  3. Type the note, such as "Water came in under the back door."

  4. Tap Save.

You should see the note under the room's name on the Photos and Items tabs. It prints with each photo of that room in the full claim report and in the Excel workbook's Room note column. To change it, open Room Note again; to remove it, clear the text and tap Save. Undo puts it back.

Back to questions

Screenshot: Photos tab: Living room with its note, the Undo bar after Save

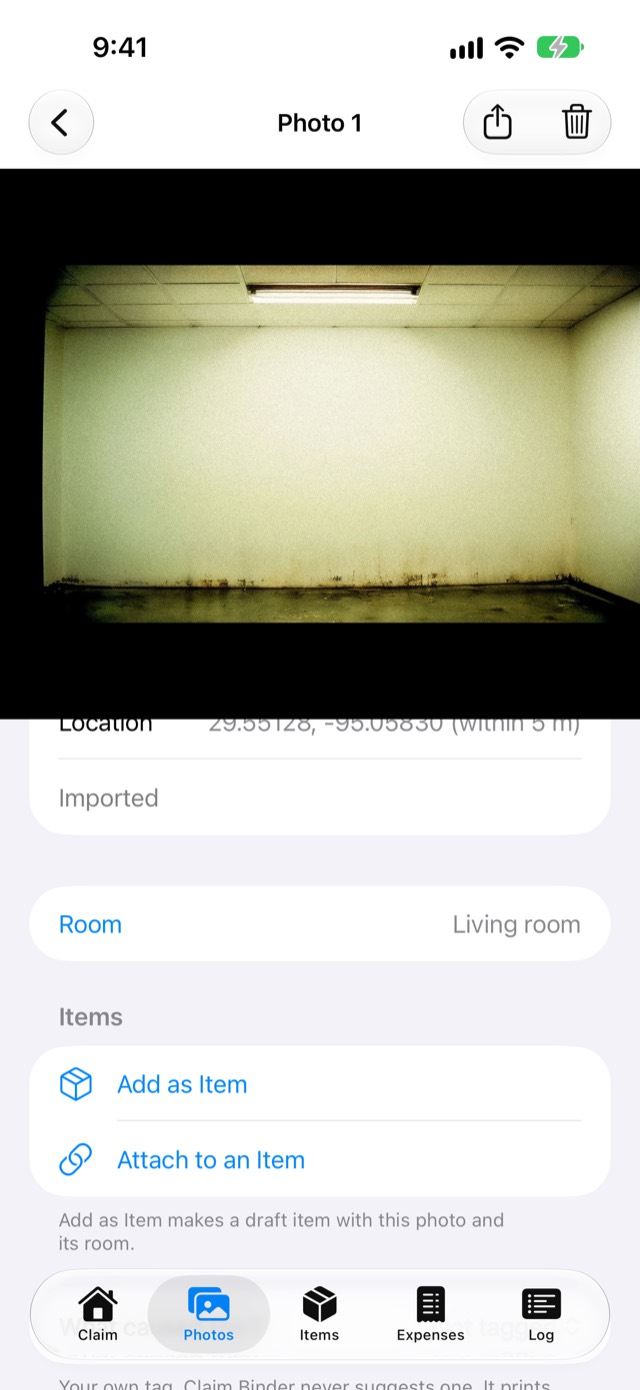
Turn a photo into an item, or attach it to one

  1. Photos tab → tap the photo.

  2. Tap Add as Item (makes a new item) or Attach to an Item (pick an item you have).

You should see the item listed under Items on the photo's screen; tap it to open the item. These buttons show only when the claim you're working in holds items.

Back to questions

Screenshot: Photo detail: Add as Item and Attach to an Item

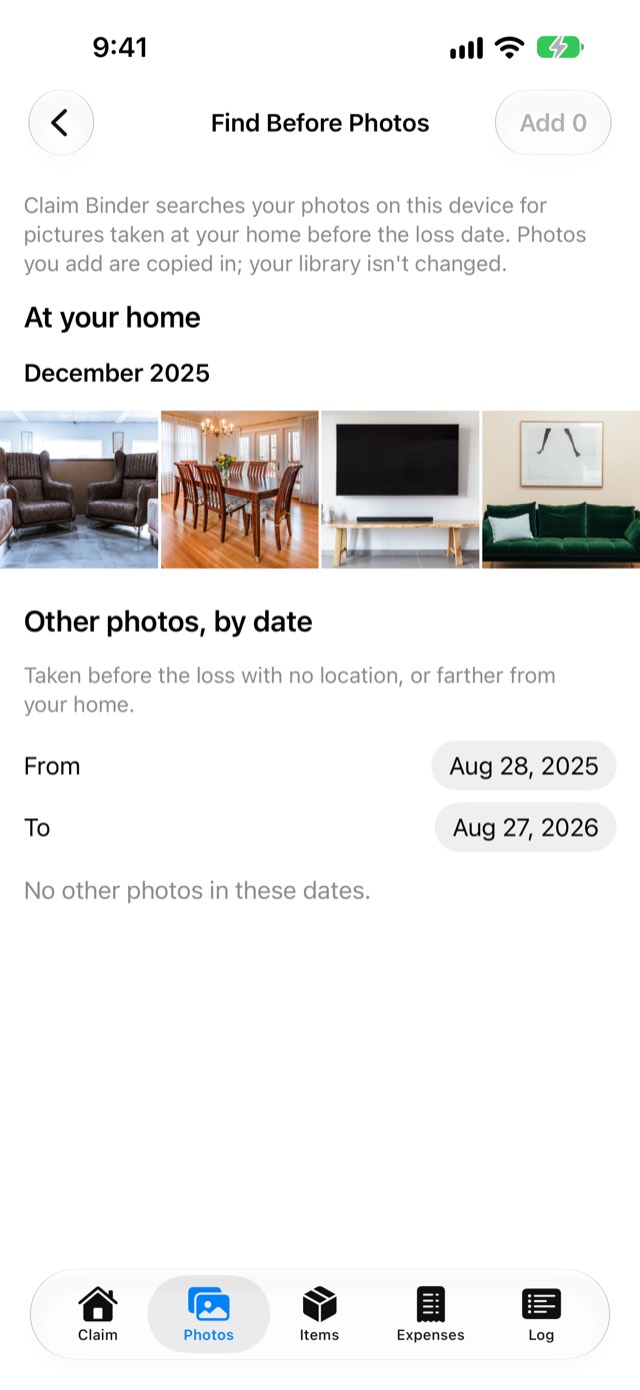
Find photos from before the damage

Useful for proving what your home and belongings looked like.

  1. Photos tab → tap the ⋯ (More) at the top right → Find Before Photos. (On an iPad it may be in the bar itself. It's also on First Steps, and under Add Photo on an item.)

  2. Allow access to your photo library if asked.

  3. Tap the photos you want. At your home lists photos taken there before the loss; Other photos, by date lists the rest.

  4. Tap Add at the top right.

You should see the photos on the Photos tab with a BEFORE badge. Your phone's photo library isn't changed. It needs the event's date of loss, and the home's location for At your home: add them with Edit This Event in Settings.

Back to questions

Screenshot: Find Before Photos: At your home, December 2025

Add my room walkthrough photos after a storm

  1. Start the storm's event from your home: Claim tab → the claim's name ▾ → New Event → Start from a Saved Home, and pick the home. Skip this if the event already started from it.

  2. Photos tab → tap the ⋯ (More) at the top right → Find Before Photos. It's also on First Steps.

  3. Under From your walkthrough, tap the photos you want, or all of them.

  4. Tap Add at the top right.

You should see "2 walkthrough photos added." (with your number), then the photos on the Photos tab in rooms of the same names, with a BEFORE badge.

The photos are copied in. Your walkthrough stays as it is, ready for the next storm. A photo already added shows Added and isn't added twice. Only your own phone has your walkthrough: someone you shared an event with doesn't see it.

Back to questions

Screenshot: Find Before Photos in a new event started from the saved home: From your walkthrough first

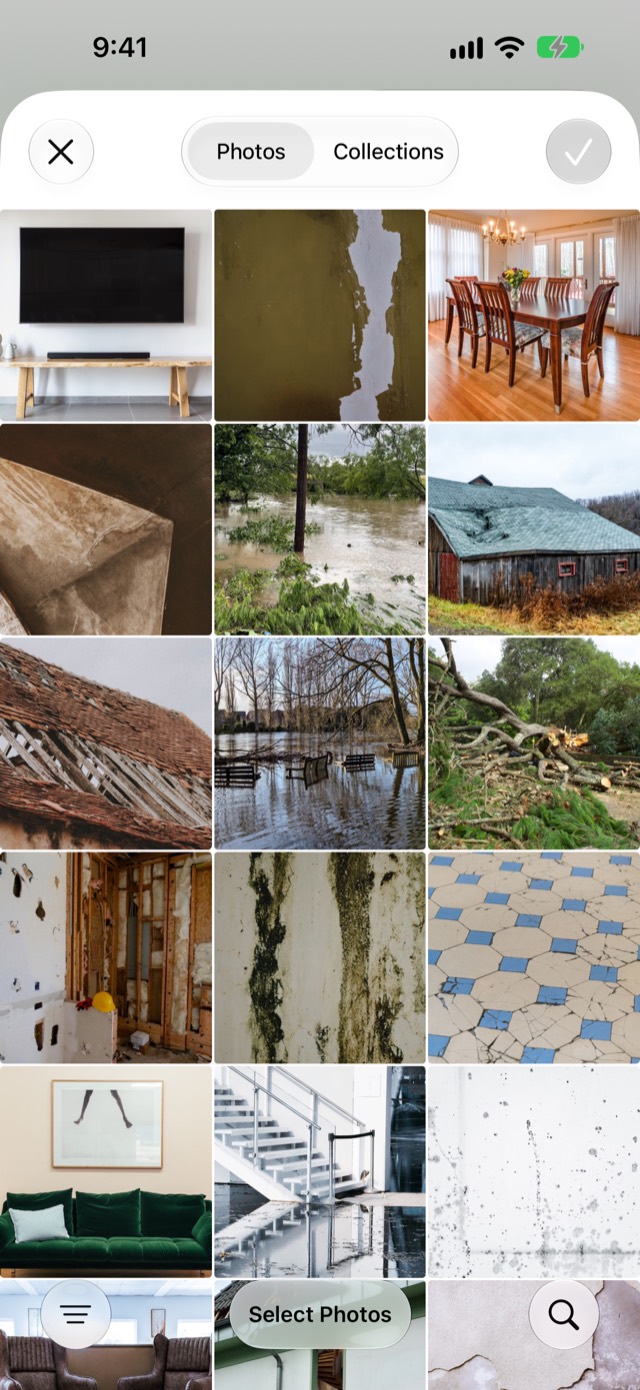
Bring in photos from your phone's library

  1. Photos tab → tap the ⋯ (More) at the top right → Import from Photos. (On an iPad it may be in the bar itself.)

  2. Pick the photos, then tap Add.

You should see Import finished with how many photos came in, and the photos on the Photos tab. A photo that's already in the event is skipped, never added twice. A photo stored only in iCloud needs a connection to download.

Back to questions

Screenshot: Import from Photos: iOS's photo picker

Combine two rooms that should be one

Use this when the same room shows up twice (two Kitchen sections), for example after two people added photos on different phones.

  1. Photos tab → tap the All chip at the top.

  2. Scroll to one of the two room headings. At the right end of the heading, tap ⋯ (a circle with three dots).

  3. Tap Combine with Another Room….

  4. Pick the room to keep. The list shows each room's photo and item counts.

  5. In the box "Move everything in Kitchen into Kitchen?", tap Combine (or Cancel).

You should see one room section holding all the photos, and on the Items tab one room with all its items. A bar says "Kitchen combined into Kitchen." with Undo. The emptied room goes to Recently Deleted. Rooms and their ⋯ aren't shown in an event with only vehicle claims.

Back to questions

Screenshot: Combine Rooms: pick the room to keep (from Bedroom)

Tag what caused the damage

  1. Photos tab → tap the photo.

  2. Scroll to What caused this? and pick Wind, Hail, Water (flood or storm surge), Rain through an opening or Not sure.

It's your own tag; Claim Binder never suggests one. It prints with the photo in reports and when you share it.

Back to questions

Screenshot: Photo detail: What caused this? set to Rain through an opening

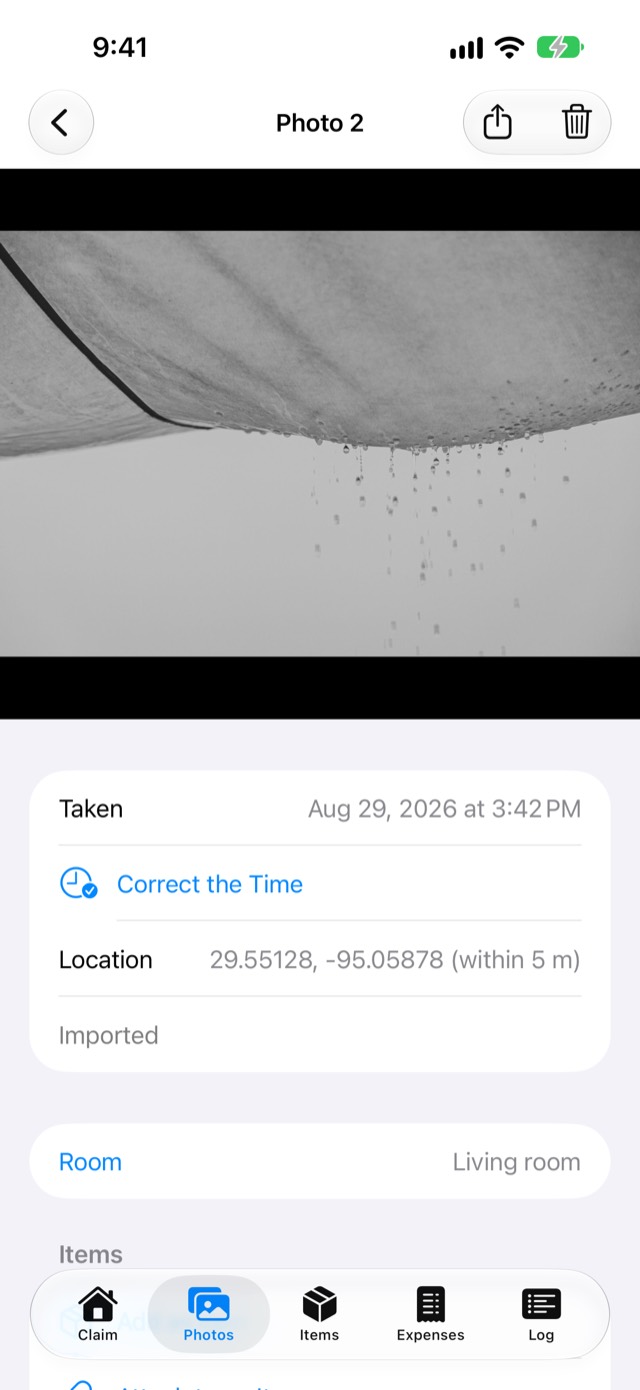
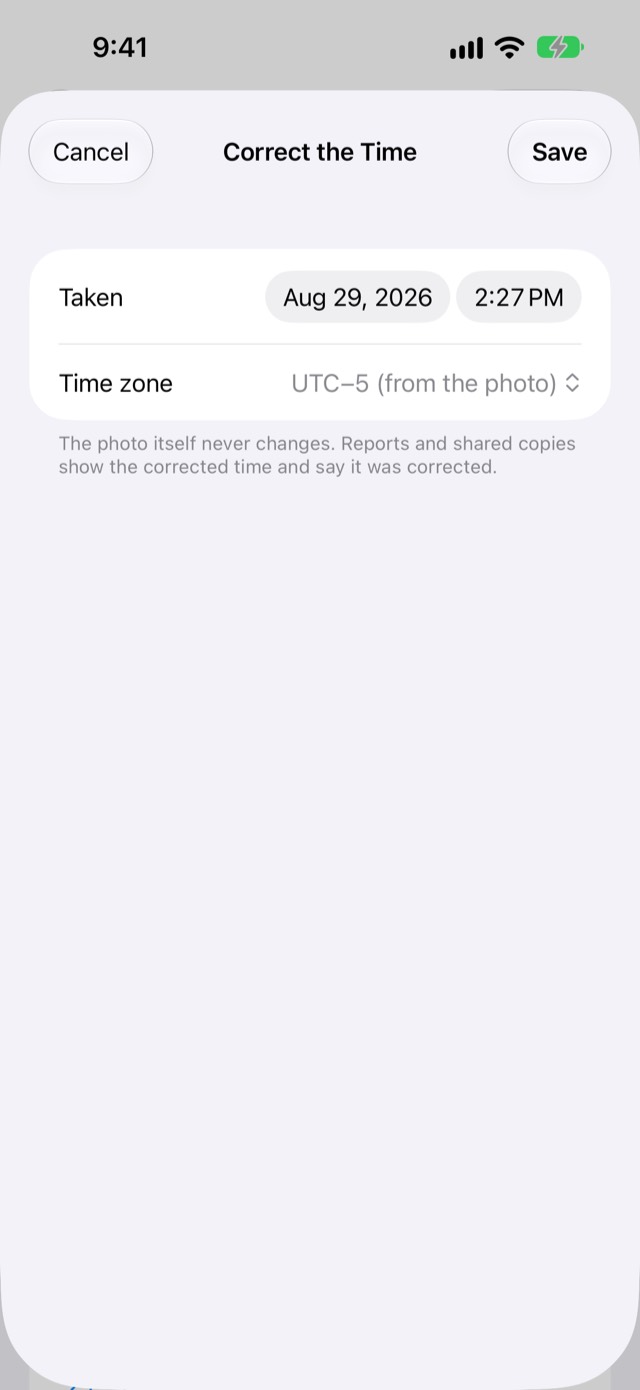
Correct a photo's time

Use this when the camera's clock was wrong, or a photo came in with the wrong time.

  1. Photos tab → tap the photo.

  2. Under Taken, tap Correct the Time.

  3. Pick the date and time, and the Time zone if it's different.

  4. Tap Save.

You should see the corrected time beside Taken, and under it the photo's own time, such as "Taken Aug 29, 2026 at 2:15 PM (original)". The photo itself and its original time never change. Reports and shared copies show the corrected time and say "Time corrected by the policyholder". To go back, tap Use the Original Time. A corrected time can't be in the future.

Some photos carry only their offset from UTC, shown as a zone such as "UTC−5 (from the photo)". Claim Binder doesn't guess which zone that was. If you know, pick yours.

Back to questions

Screenshot: Correct the Time sheet

Damaged items

The item list is your contents inventory: what was damaged, how many, and what it cost. Prices are per unit (4 × $120.00 = $480.00), matching insurer contents forms. Replacement prices are your own estimates; your insurer decides what's covered. A vehicle claim has no Items tab.

Add an item

  1. Tap the Items tab.

  2. Tap + (Add Item) at the top right, or the ⊕ beside a room to add it straight to that room.

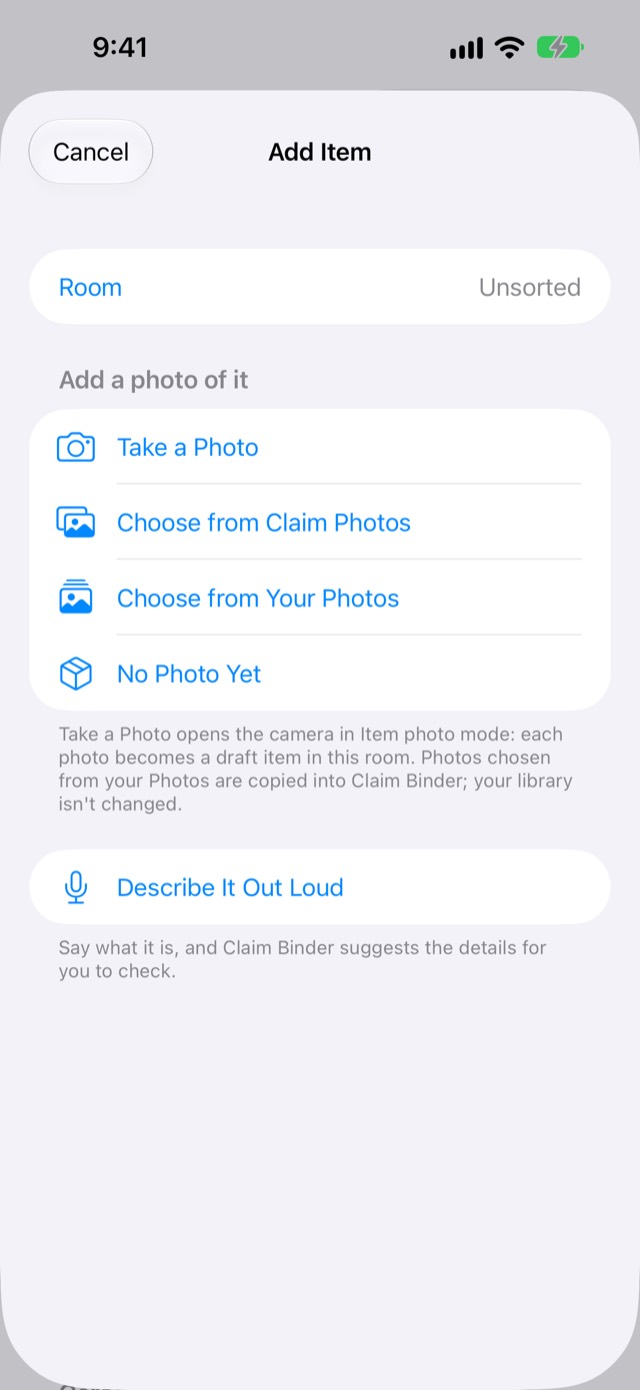
  3. Choose Take a Photo, Choose from Claim Photos, Choose from Your Photos or No Photo Yet.

  4. Fill in the name, room, quantity and prices you know. Leave the rest for later.

You should see the item under its room with its number (Item 12), quantity and total. Items with no photo show Needs photo; items with no name show Needs details. On a free claim the tab shows how many you've used, such as "7 of 10 free items".

Back to questions

Screenshot: Add Item: the four ways to add a photo

Describe an item out loud

Only on an iPhone or iPad with Apple Intelligence (iOS 26 or later), while Apple Intelligence is on. Without it, type the details yourself; everything else works the same.

  1. Items tab → tap + (Add Item) → Describe It Out Loud. On an item's screen it's under its photos.

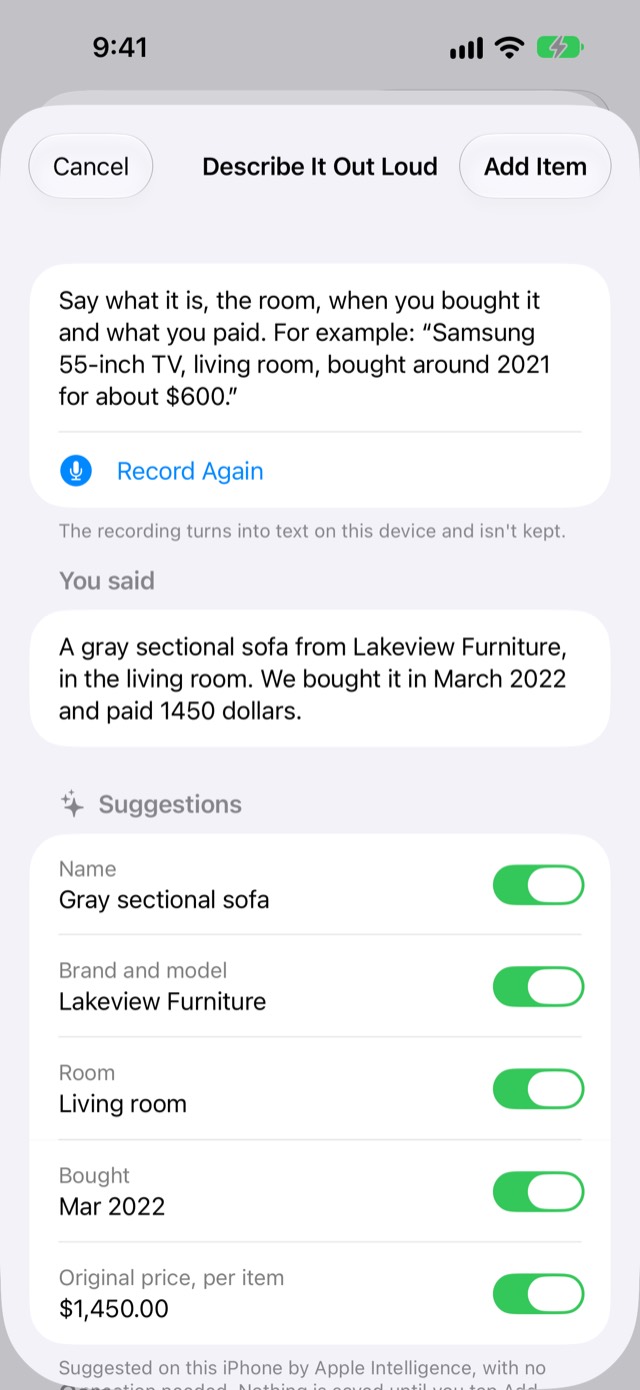
  2. Tap Record and say what it is, the room, when you bought it and what you paid. Tap Stop.

  3. Check the suggestions. Untick any that are wrong.

  4. Tap Add Item, or Use on an item's screen.

You should see the item with the details you kept. You can change any of them.

Only the price you said you paid is suggested. Claim Binder never suggests a replacement price or what an item is worth. The recording turns into text on your phone and isn't kept. Nothing is sent anywhere.

Back to questions

Screenshot: Describe It Out Loud: what was said and the suggestions, ticked

Add photos to an item

  1. Items tab → tap the item.

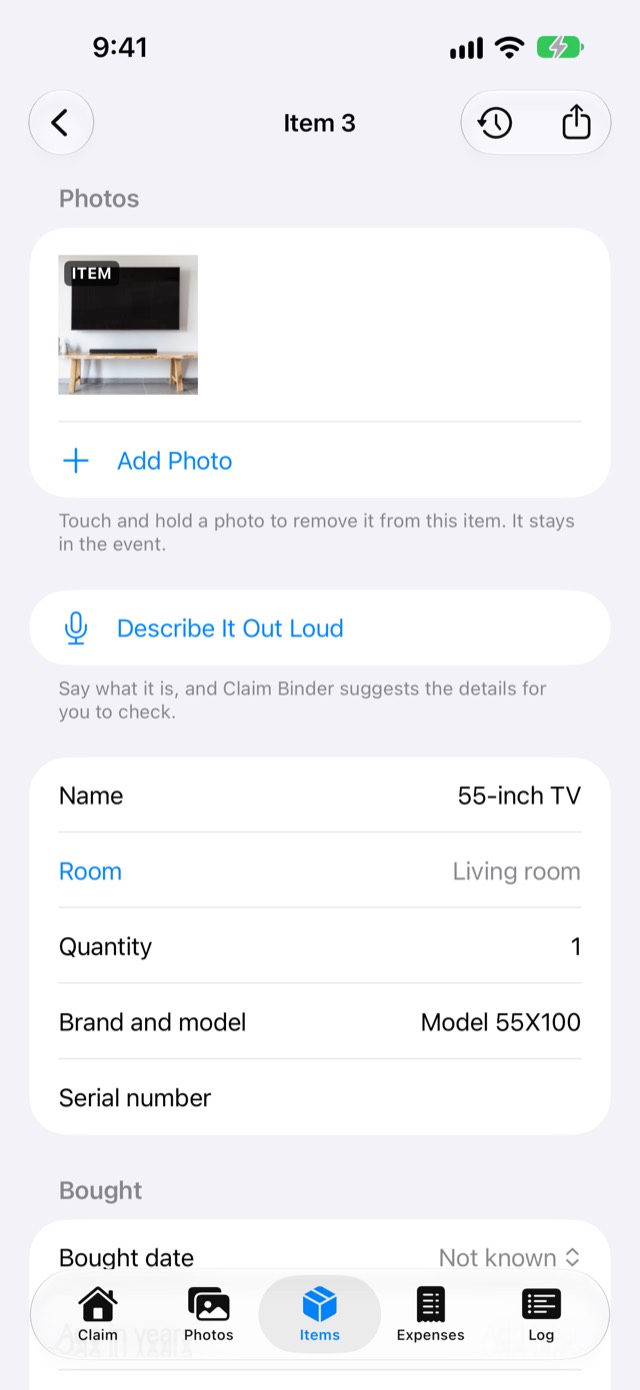
  2. Tap Add Photo, then Take a Photo, Choose from Claim Photos, Choose from Your Photos or Find Before Photos.

You should see the photo in the item's row of photos. Touch and hold a photo to remove it from the item; it stays in the event. Or start from the photo: Photos tab → tap the photo → Attach to an Item.

Back to questions

Screenshot: Item detail (55-inch TV): the Add Photo choices

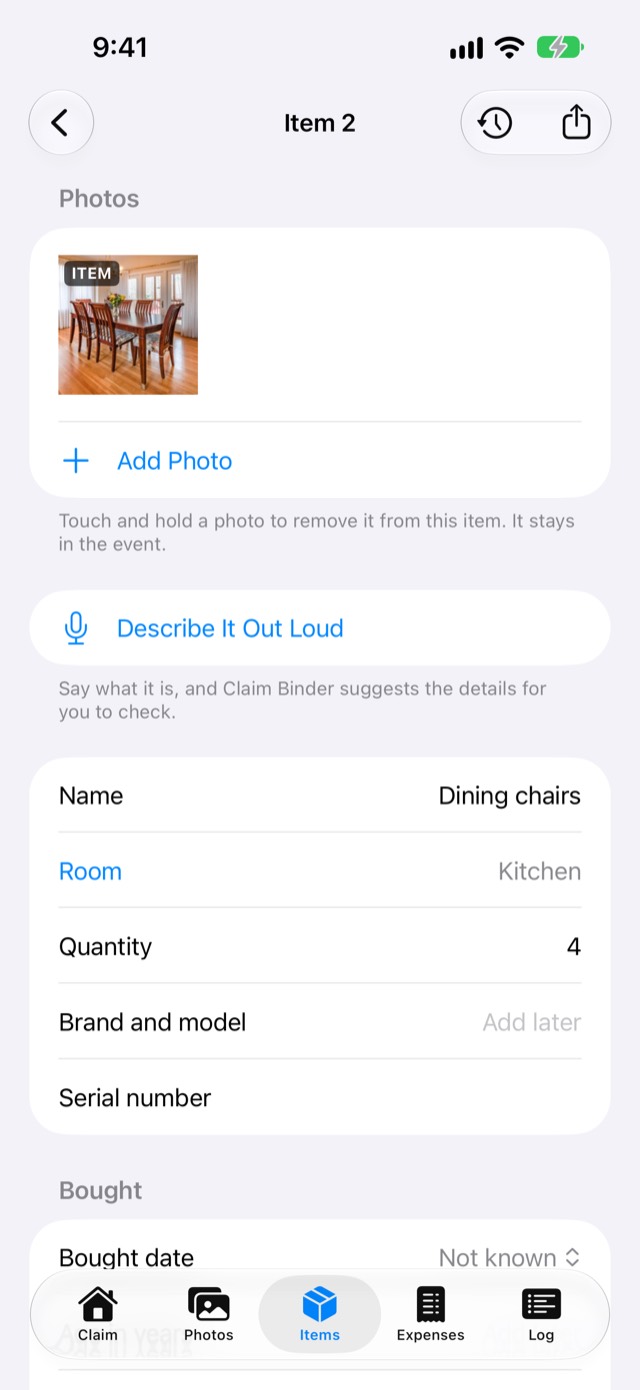
Add a receipt or proof of purchase to an item

  1. Items tab → tap the item.

  2. Tap Add Photo → Choose from Your Photos and pick the picture of the receipt or the order screenshot. For a paper receipt, tap Take a Photo.

You should see the receipt among the item's photos. It's saved as one of the item's photos; there's no separate receipt field on an item. For money you spent after the damage, add the receipt on the Expenses tab instead.

Back to questions

Screenshot: Item detail (Dining chairs): the item's photos

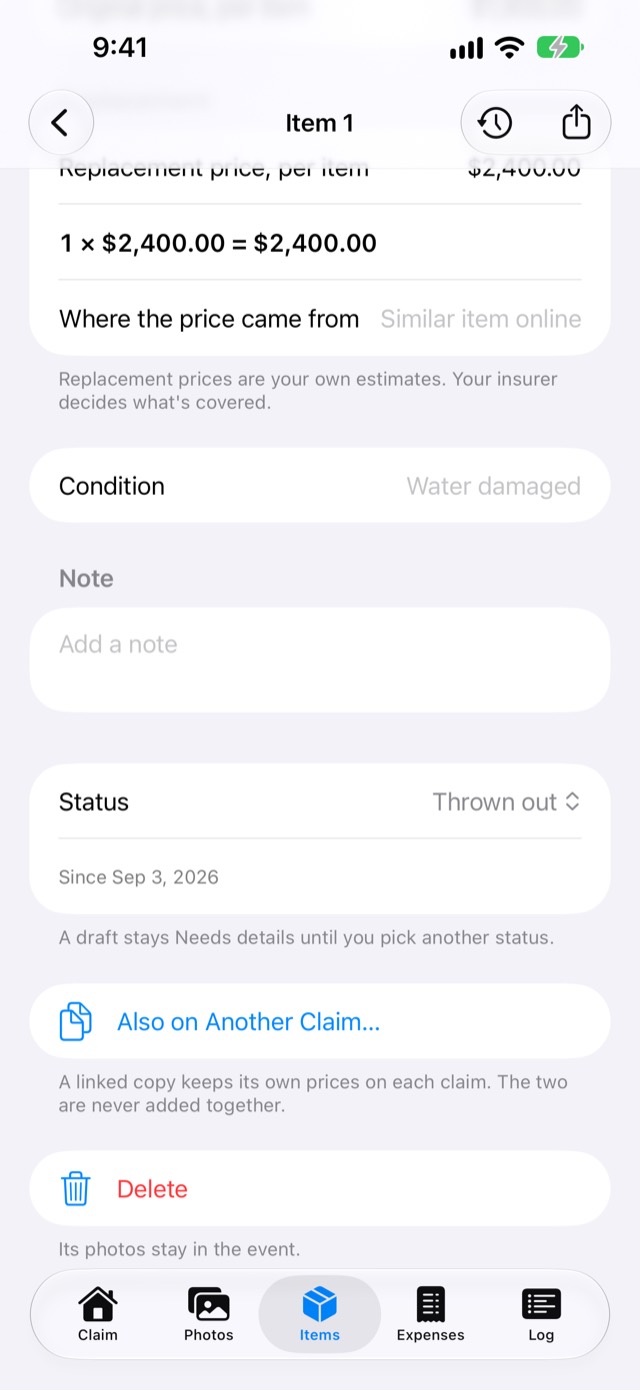
Mark an item thrown out

  1. Items tab → tap the item.

  2. Scroll to Status and pick Thrown out.

  3. If it has no photo, Claim Binder asks "Take a photo before it goes?". Tap Take Photo, or Mark Thrown Out Anyway.

You should see Thrown out on the item's row, and the day under Status.

Back to questions

Screenshot: Item detail (Sectional sofa): Status Thrown out, since Sep 3

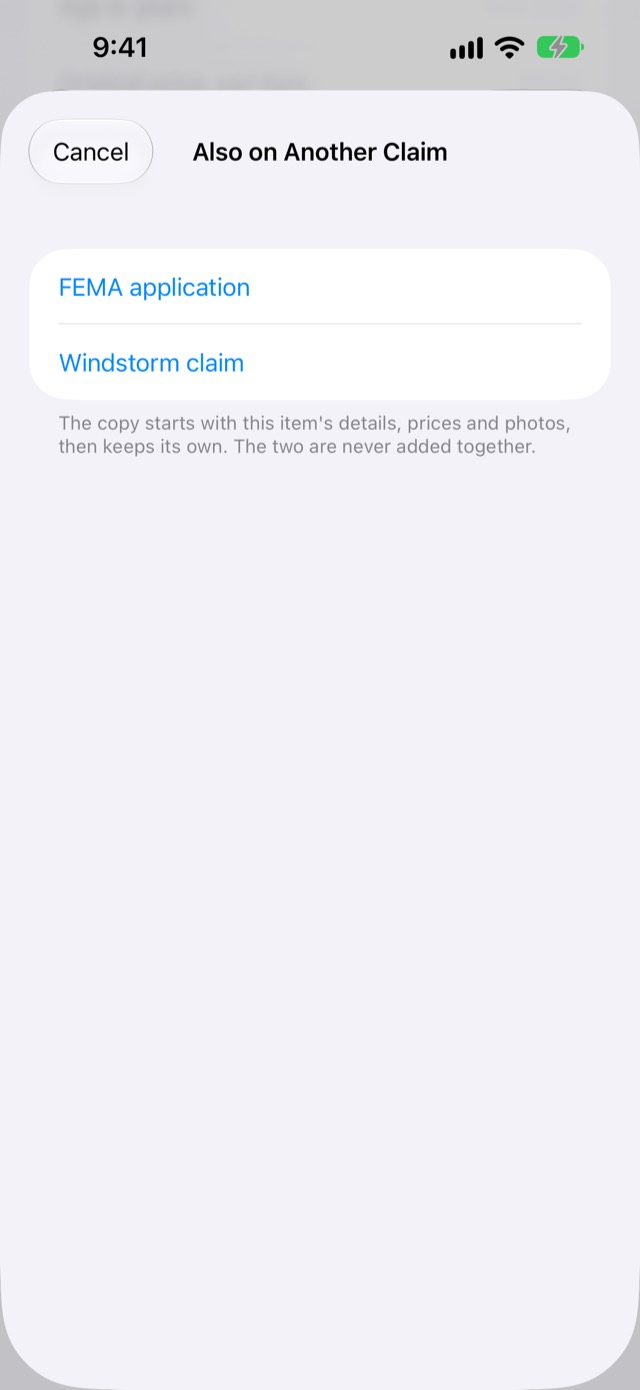
Put an item on a second claim

Use this when the same item is claimed on two claims (for example homeowners and FEMA).

  1. Items tab → tap the item.

  2. Tap Also on Another Claim… and pick the claim.

Both copies show "Also on" with the other claim's name. Each claim keeps its own prices; they're never added together, and the app never decides who pays. Expenses have Also on Another Claim… too.

Back to questions

Screenshot: Also on Another Claim: the claims to pick

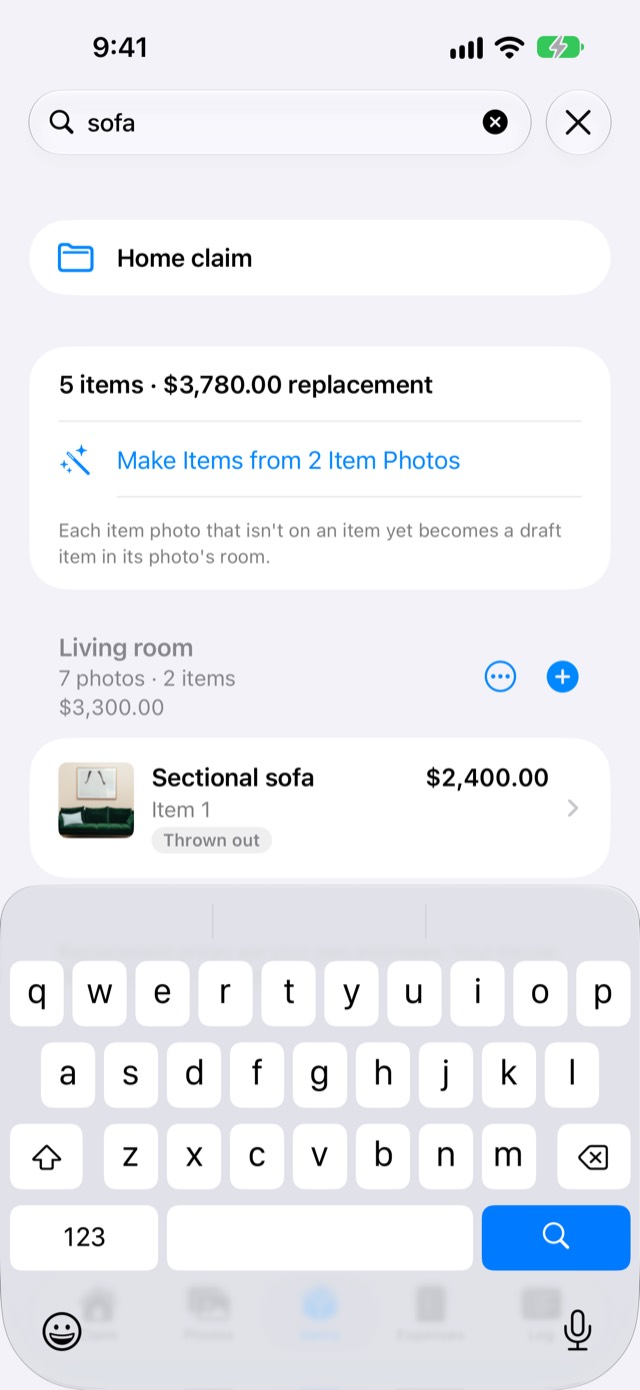
Find an item

Items tab → tap the search field at the top (pull the list down a little if you don't see it), then type a name, brand or serial number. You should see only the matching items; clear the search to see them all.

Back to questions

Screenshot: Items tab searching "sofa"

Expenses and receipts

Expenses are what you paid out of pocket because of the damage: hotels, meals, supplies, a rental car. Money paid to a contractor for repairs goes under Payments → Paid out instead.

Scan a paper receipt

  1. Tap the Expenses tab.

  2. Tap Scan Receipt at the top.

  3. Hold the phone over the receipt. Add more pages for a long receipt, then tap Save in the scanner.

  4. If you scanned two or more pages, tap One Receipt, or Separate Receipts if each page is its own receipt.

You should see the expense in the list, filled in from the receipt (store, date, amount) once it's read; "Reading…" shows meanwhile. Scan receipts the day you get them; store receipts fade. On a free claim with 10 expenses, a new receipt is kept as a document instead; open it later and tap Make an Expense.

Back to questions

Screenshot: Expenses tab: the scanned receipt under Check these

Add a receipt from email or a screenshot

  1. Expenses tab → Import → From Files or From Photos.

  2. Pick the PDF or picture.

You should see the new expense, read like a scanned one. Or from another app (Mail, Files): tap the attachment, then Share → Claim Binder → Receipt.

Back to questions

Screenshot: Expenses → Import: From Files, From Photos

Add an expense by hand

Use this for anything with no receipt, such as cash tips, parking or a lost receipt.

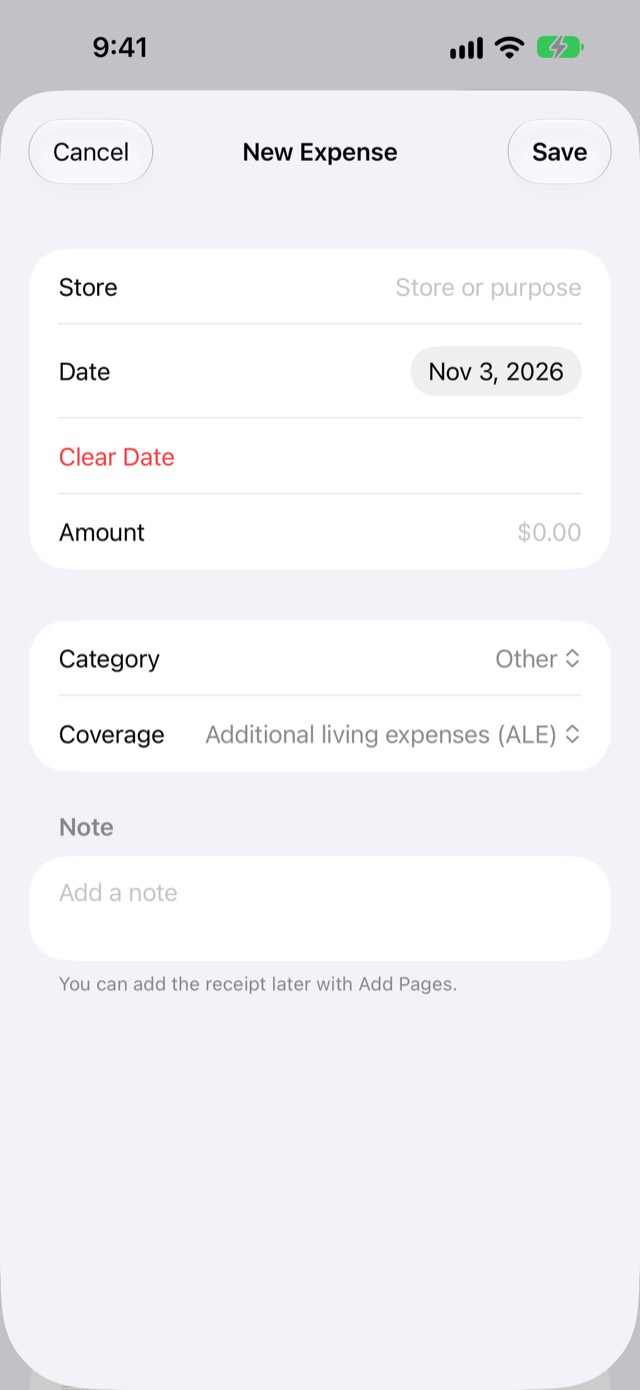
  1. Expenses tab → tap Add Manually.

  2. Fill in Store (the store, or what it was for), Date and Amount.

  3. Pick a Category and check the Coverage.

  4. Tap Save.

You should see the new expense open, headed Details where a scanned one says From the receipt. To add a receipt later, tap Add Pages. On a free claim, it counts toward the 10 expenses; see The unlock and free limits.

Back to questions

Screenshot: New Expense form (Add Manually), empty

Add mileage

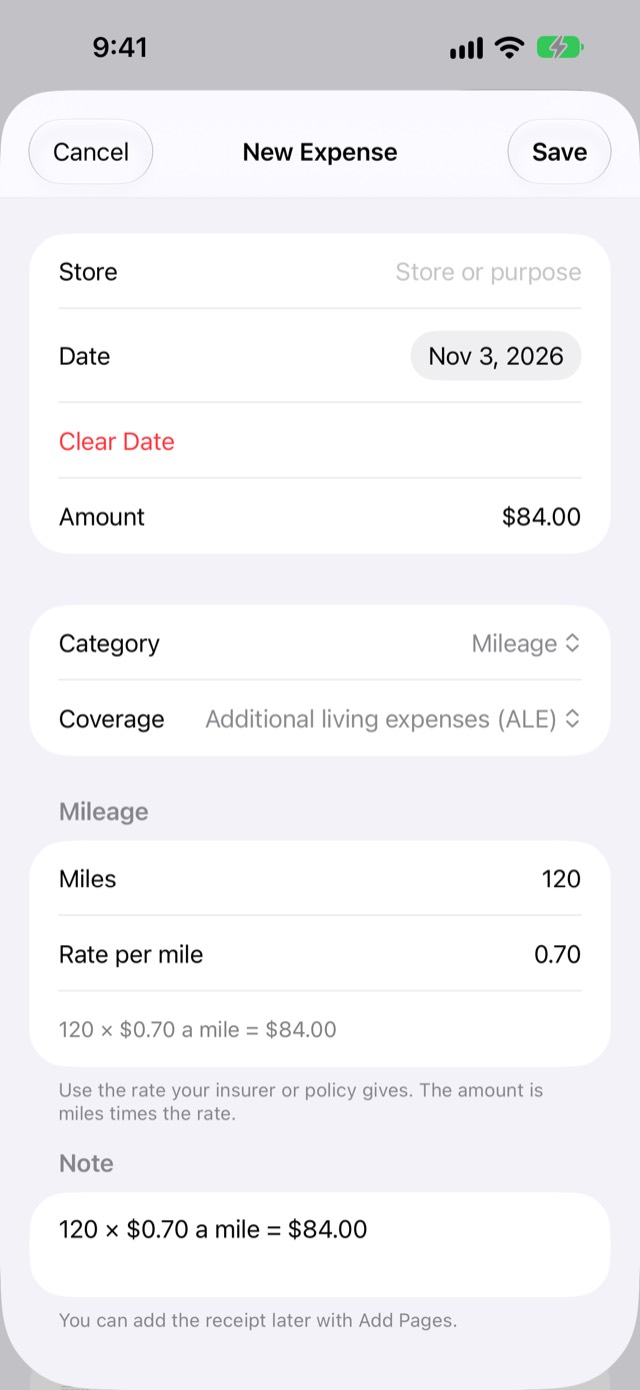
  1. Expenses tab → tap Add Manually.

  2. Pick Mileage as the Category.

  3. Type the Miles and the Rate per mile. Use the rate your insurer or policy gives.

  4. Tap Save.

You should see the amount filled in by itself, with the working, such as "120 × $0.70 a mile = $84.00".

Back to questions

Screenshot: New Expense with Category Mileage: miles, rate and the amount worked out

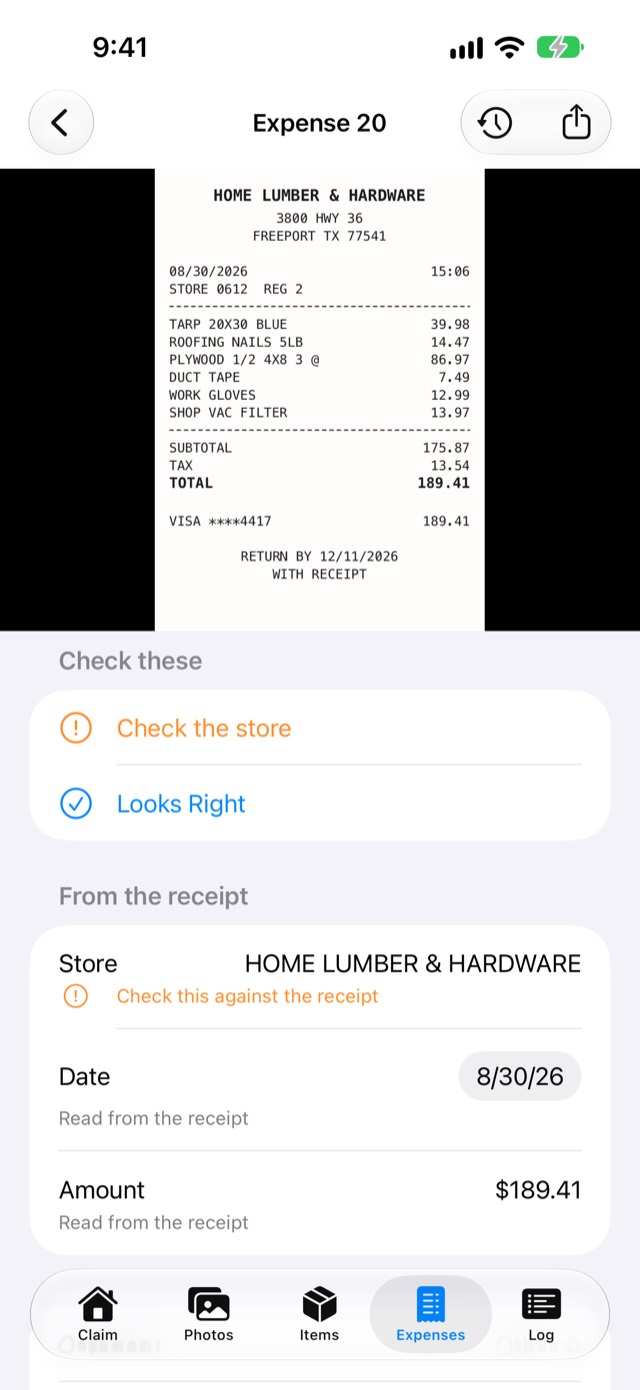
Fix a receipt the app couldn't read

Unclear scans appear under Check these at the top of the Expenses tab, with a line saying what to check ("Check the amount").

  1. Tap the expense.

  2. Fix the field that's wrong, or tap Looks Right if it's already right.

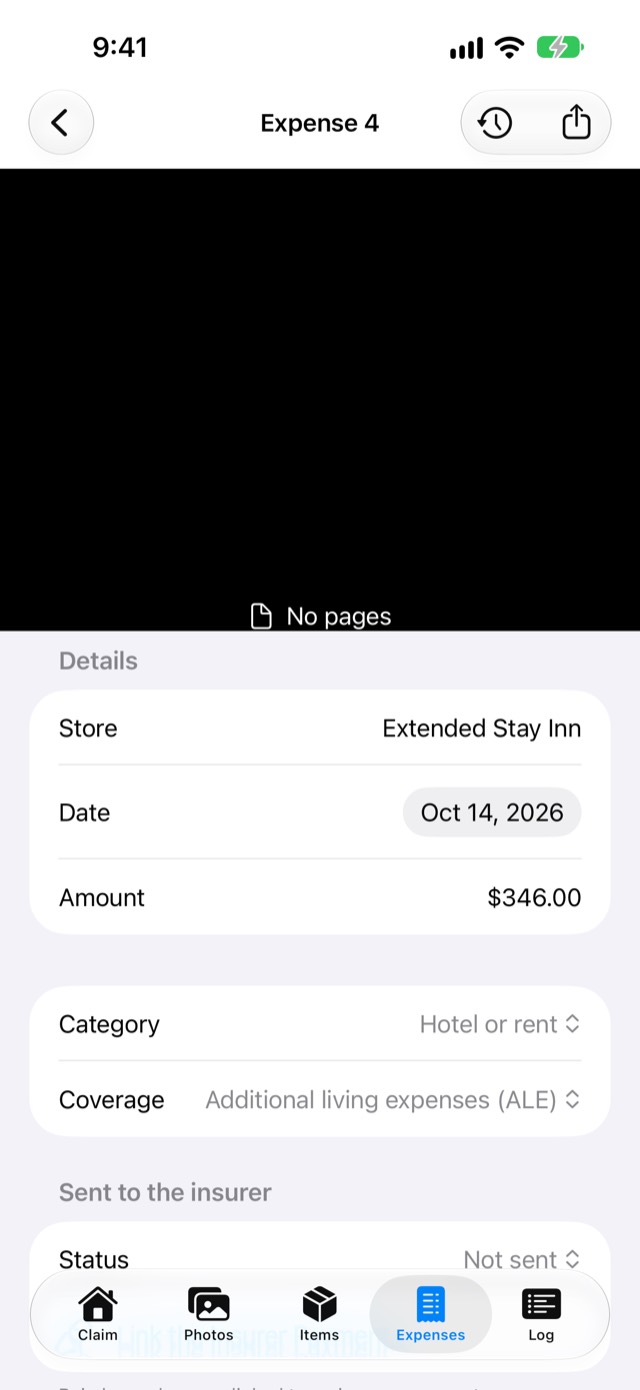
You should see the expense leave Check these once each flagged field is fixed, or after Looks Right. "This may be a duplicate of Expense 4." means another expense on this claim has the same date and amount: delete the copy, or tap Looks Right if both are real.

Back to questions

Screenshot: Expense detail of a scanned receipt: Check the store, Looks Right

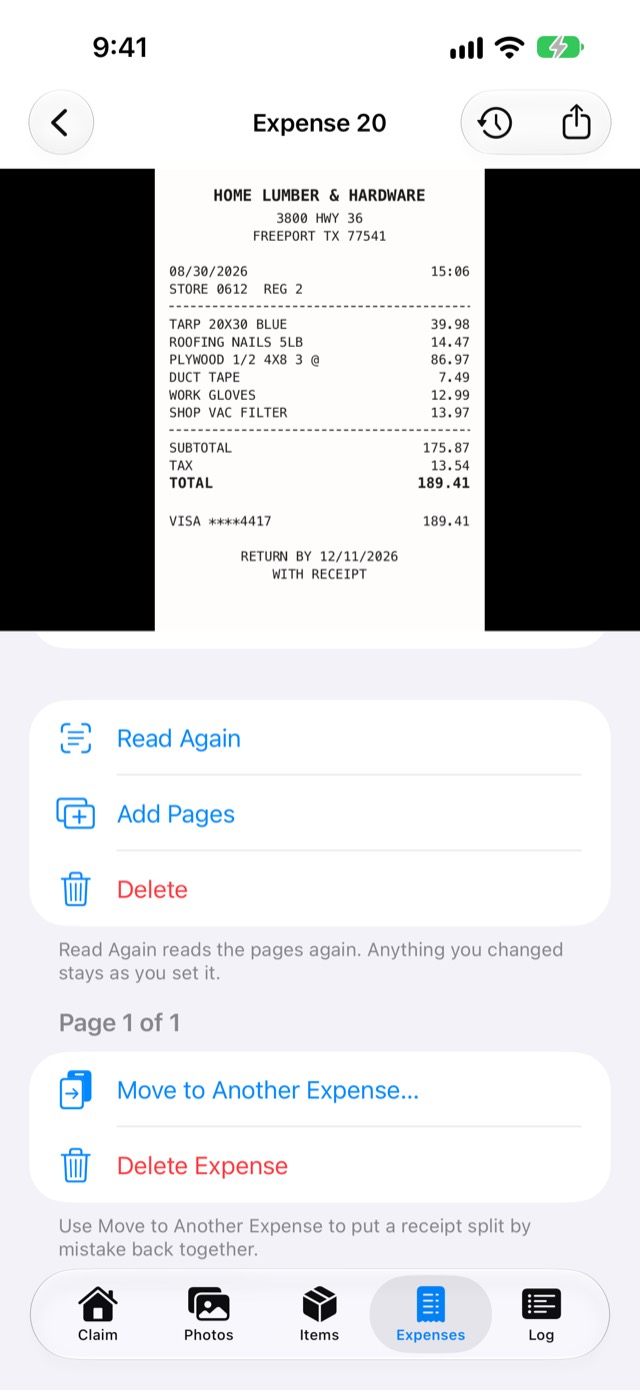
Add a page, or split two receipts scanned together

  1. Expenses tab → tap the expense.

  2. To add a page, tap Add Pages, then Scan, From Files or From Photos.

  3. For two receipts in one scan, swipe to the second receipt's page, then tap Move to a New Expense.

You should see the new page at the end, or a new expense with the moved page. Tap Read Again to read the pages again; anything you changed stays as you set it.

Back to questions

Screenshot: Expense detail: Add Pages and Move to Another Expense…

Mark an expense sent or reimbursed

  1. Expenses tab → tap the expense.

  2. Under Sent to the insurer, set Status to Sent (with its date) or Reimbursed.

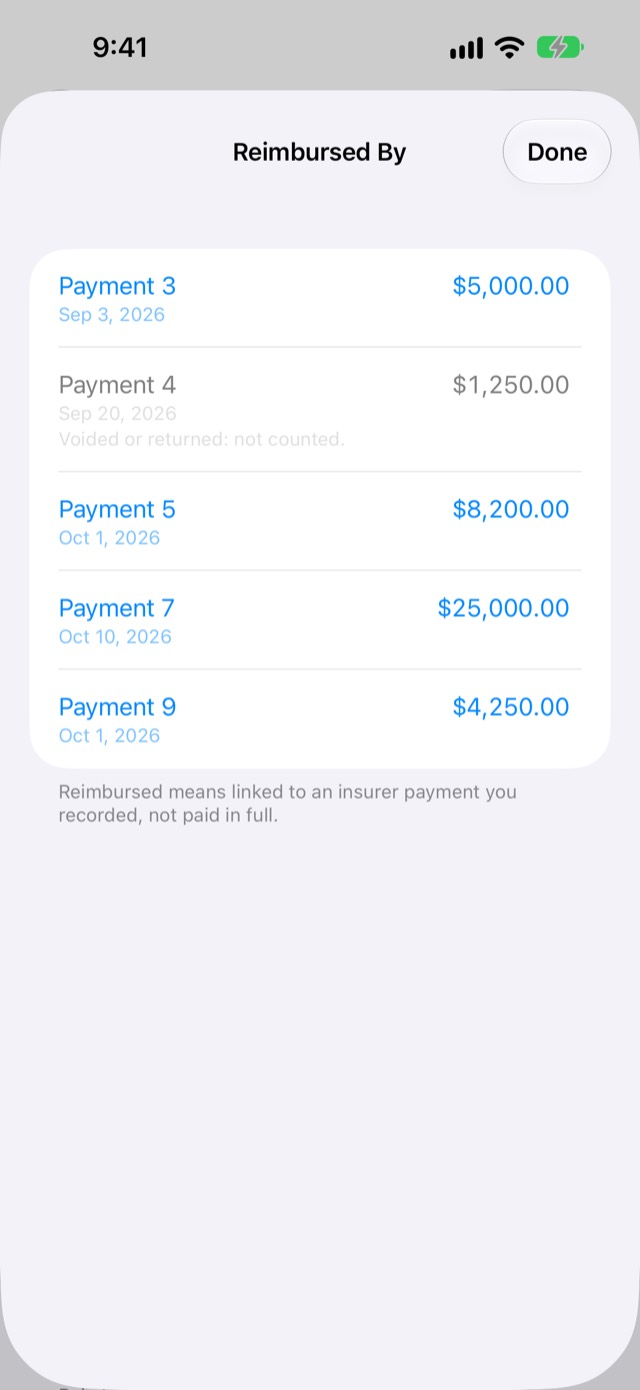
  3. For Reimbursed, tap the insurer payment that covered it under Reimbursed By, then Done.

You should see the status on the expense's row. The payment lists the expenses it reimbursed. "Reimbursed" means linked to an insurer payment you recorded, not paid in full.

Back to questions

Screenshot: Expense detail: Sent to the insurer, Status

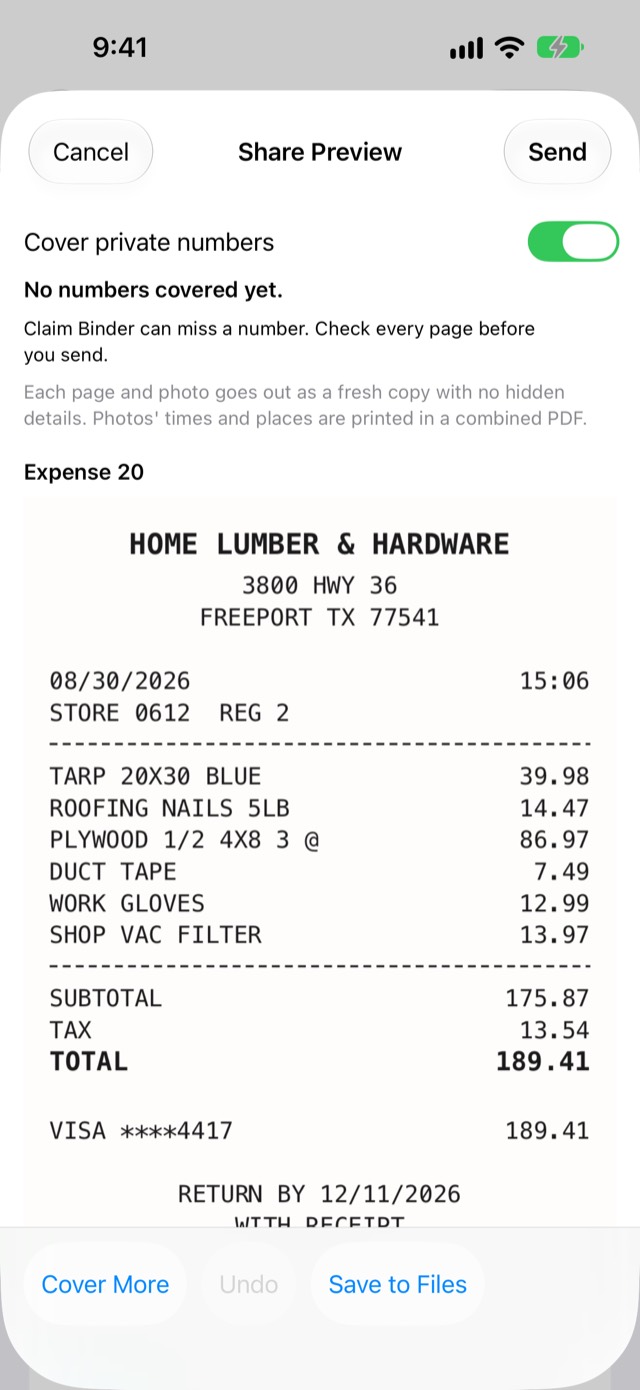
Share a receipt

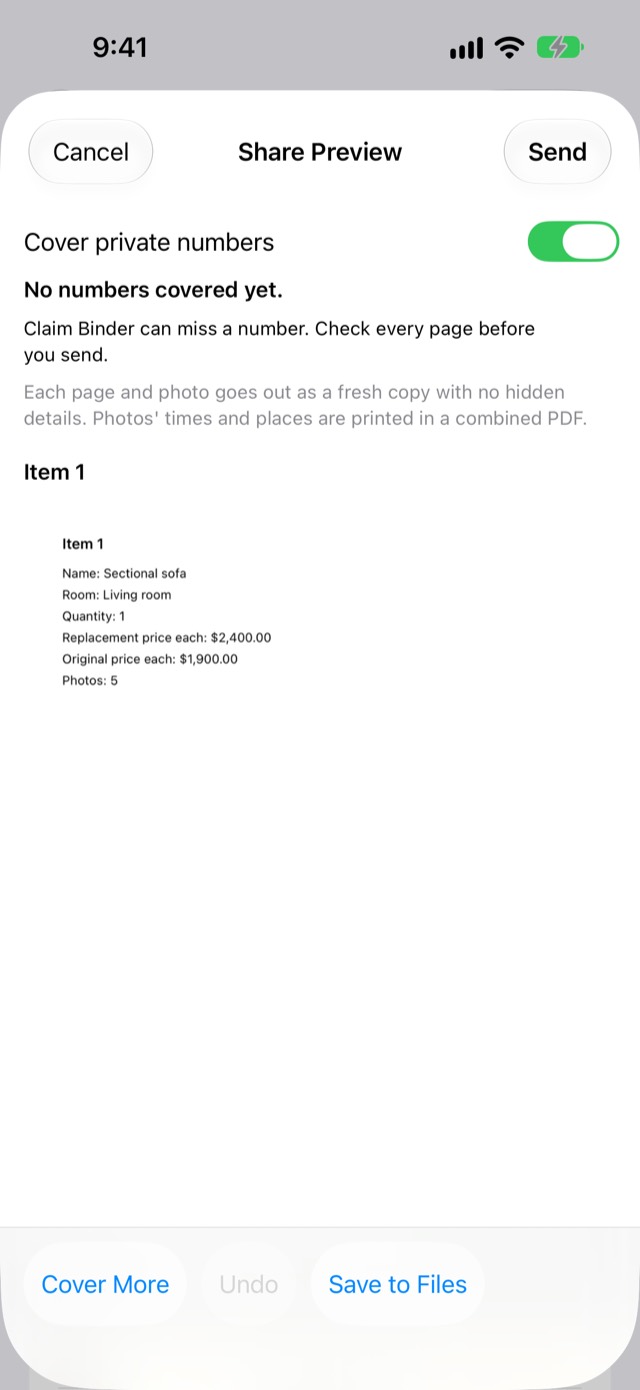
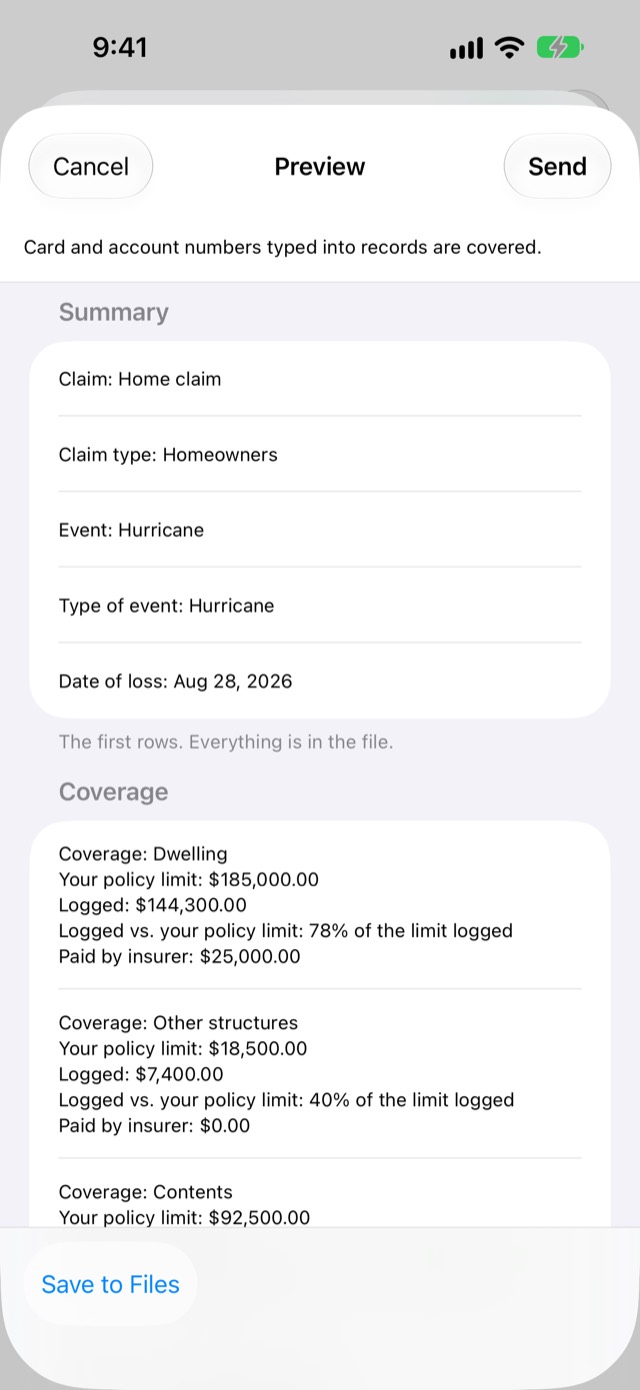
Open the expense → Share (top right, the square with an up arrow). Share Preview opens with card and account numbers covered. Check every page, then tap Send or Save to Files. The full steps are under Reports and sharing with your insurer.

Back to questions

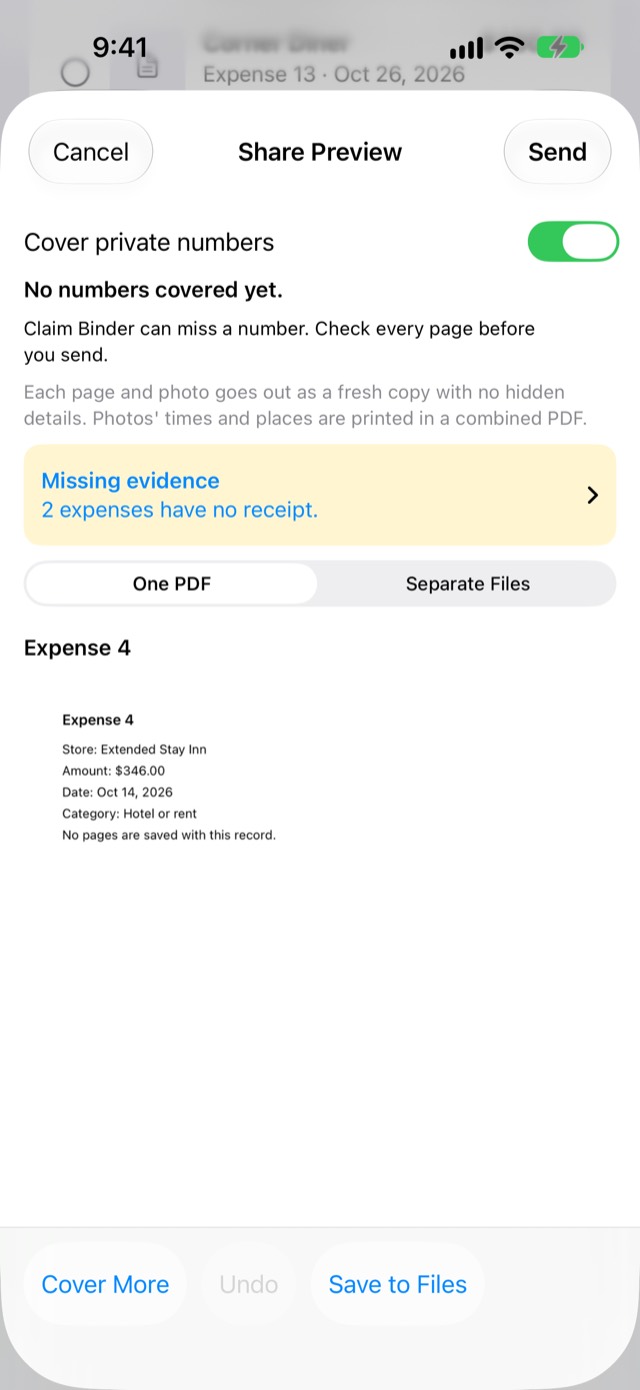
Screenshot: Share Preview of the scanned receipt

Show only some expenses

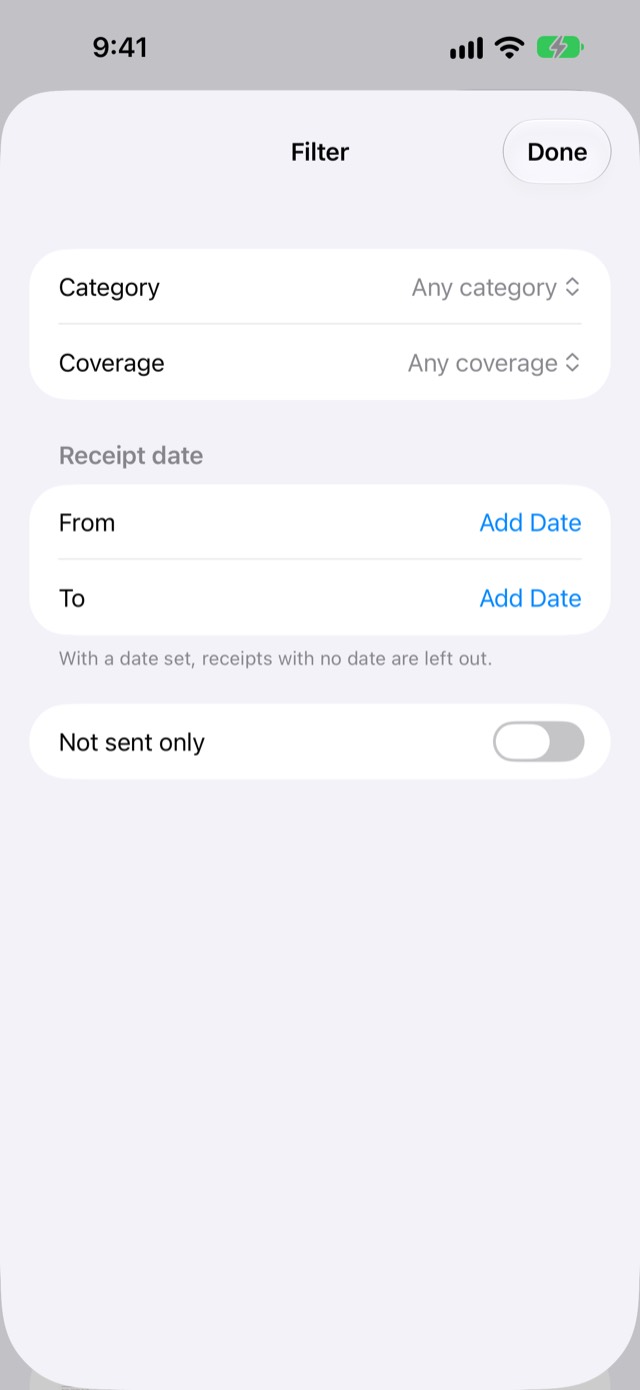
  1. Expenses tab → tap Filter.

  2. Pick a Category (for example Hotel or rent), a Coverage, or dates under Receipt date. Tap Done.

  3. To see only what you haven't sent yet, tap Not sent only (its own button beside Filter).

You should see only the matching expenses, and the button reads Filter (1) (the number of filters on; Not sent only isn't counted there). Tap Clear Filters to see everything again. Select All picks only what the filter shows.

Back to questions

Screenshot: Expenses Filter sheet

Payments

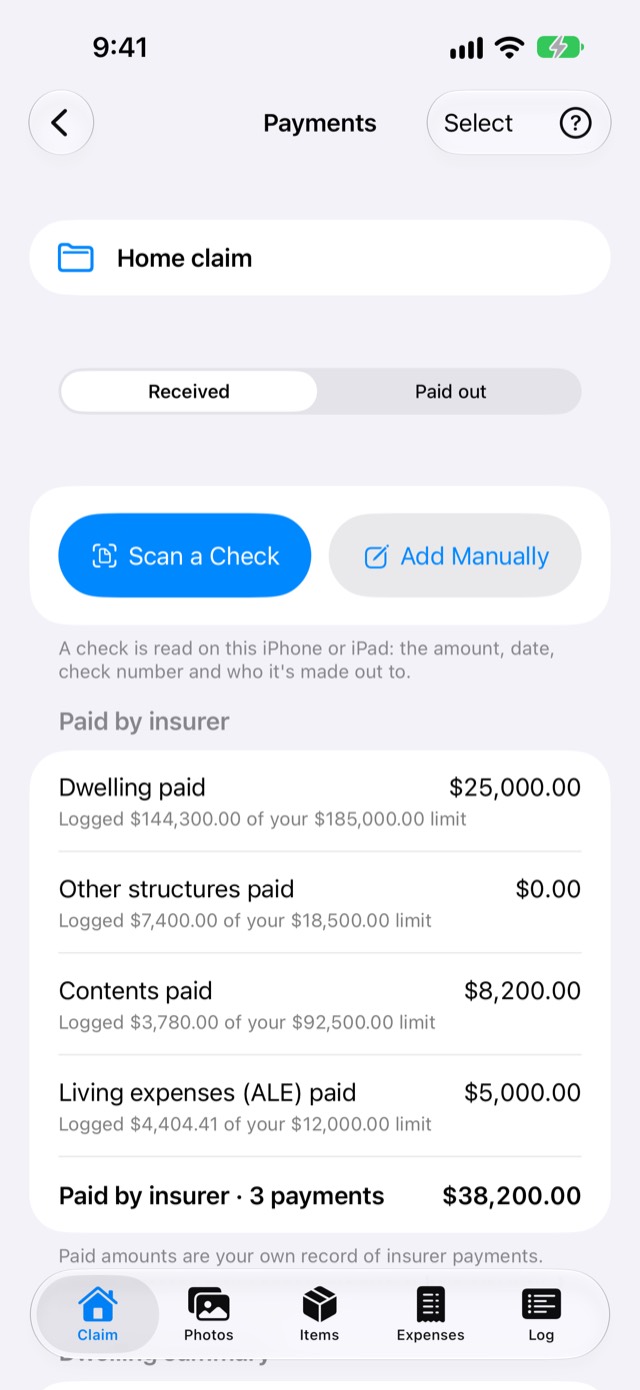
Payments live on the Payments screen, opened from the Paid by insurer row on the Claim tab. It has two halves at the top: Received (money from the insurer, and releases from your mortgage company) and Paid out (money you paid for repairs). The totals are your own record of insurer payments.

Open the Payments screen

  1. Tap the Claim tab.

  2. Scroll down to Paid by insurer (below the next deadline and adjuster rows). At larger text sizes it's further down.

  3. Tap it.

You should see Payments, with Received and Paid out at the top.

Back to questions

Screenshot: Payments, Received half

Add a check from the insurer

  1. Open Payments (above). Make sure Received is picked at the top.

  2. Tap Scan a Check and scan the front.

  3. When asked "Scan the back too?", tap Scan the Back or Not Now.

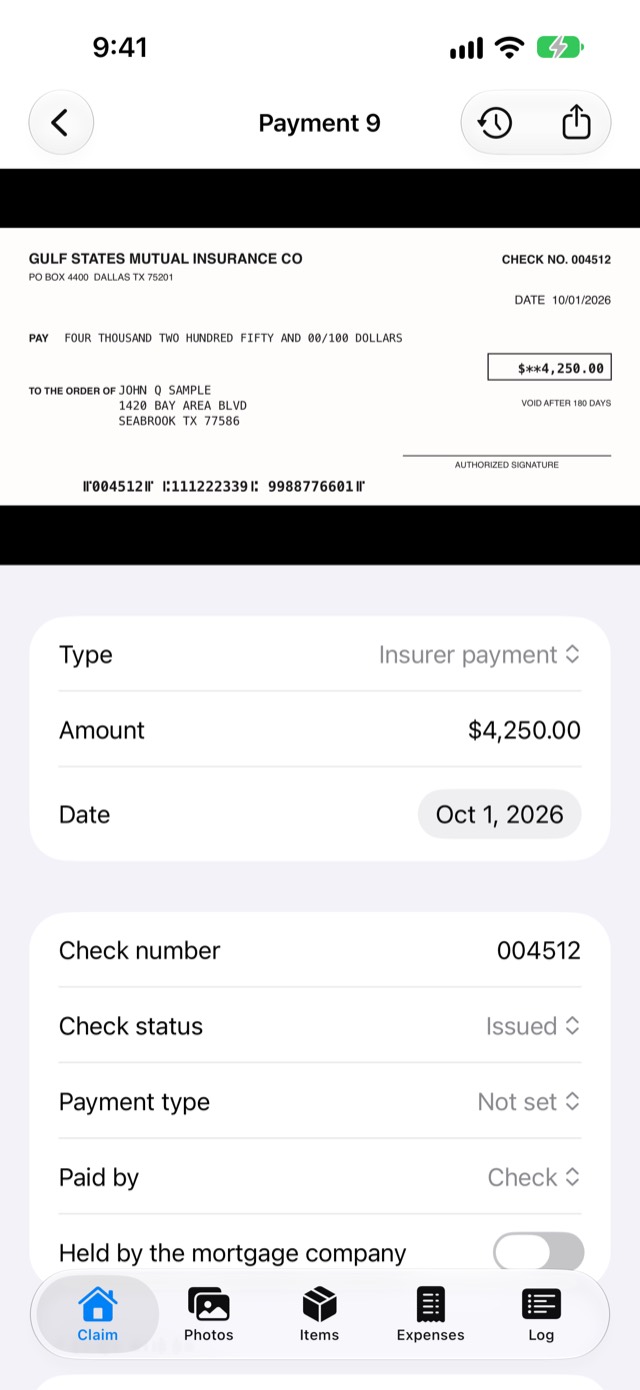
  4. Tap the new payment and check the amount, date, check number and Made out to. Fix anything wrong.

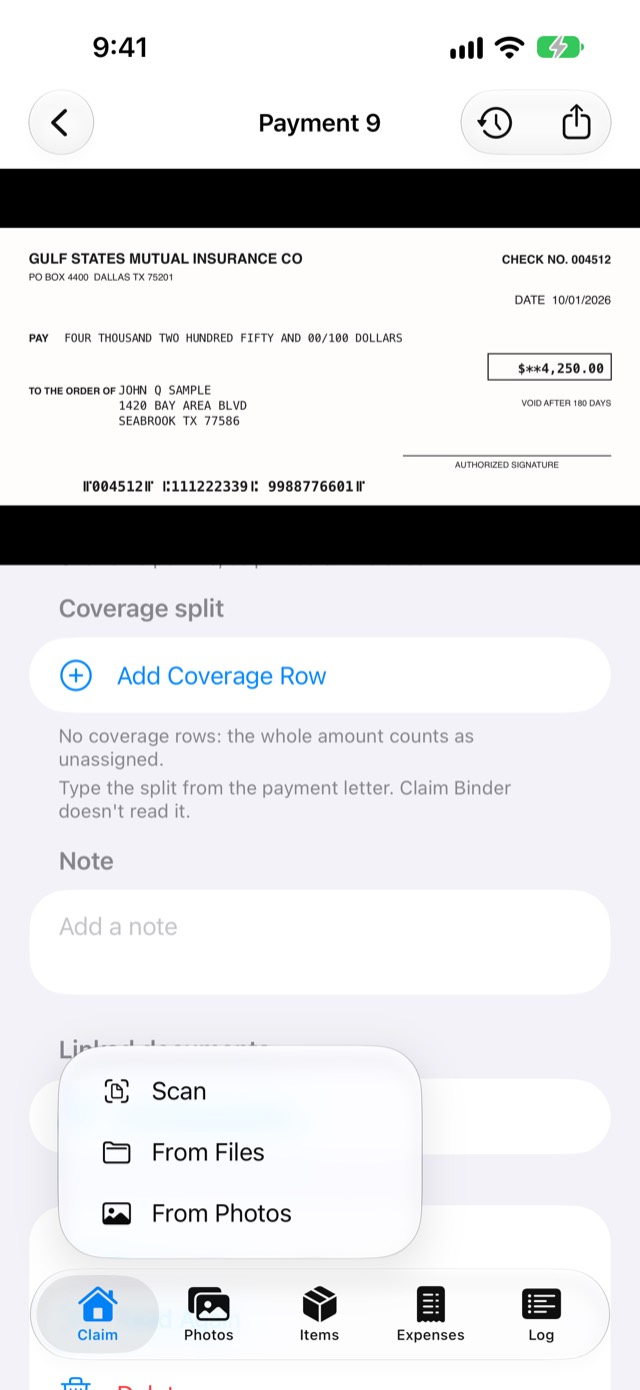
  5. Under Coverage split, tap Add Coverage Row for each coverage the letter names, and type its amount. If you don't know yet, leave it: the payment counts as Unassigned.

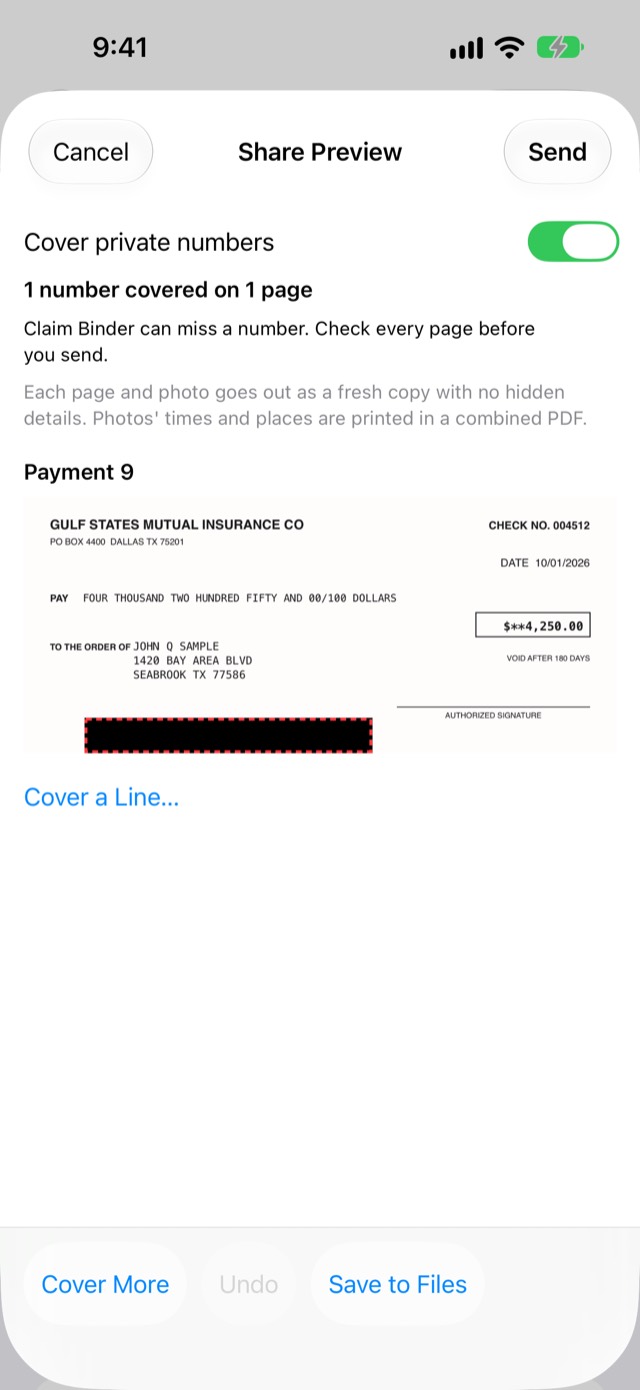
You should see the payment in the Received list with its number, date and amount, and Paid by insurer on the Claim tab goes up. If the check names your mortgage company, Mortgage company must co-sign turns on by itself.

Type the split from the payment letter; Claim Binder doesn't read it. Once you add the letter with Add Payment Letter (next sections), its pages show after the check's on the payment, so you can read it while you type.

Back to questions

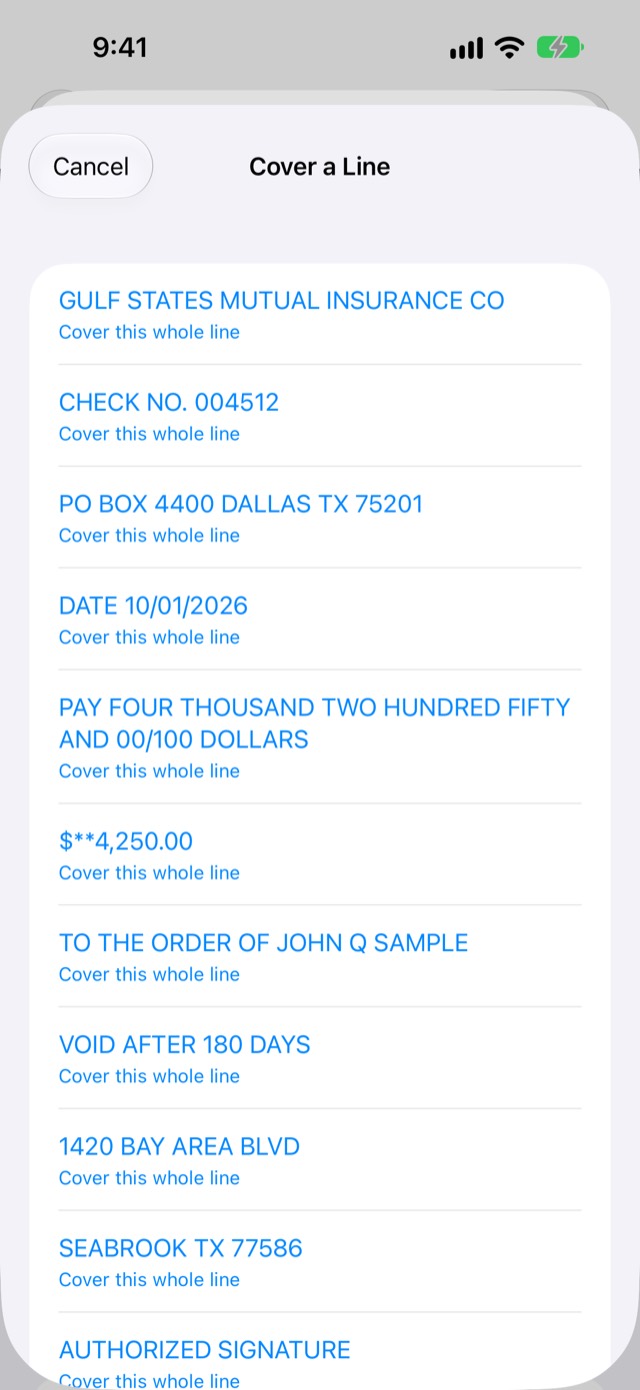
Screenshot: Payment 9: a scanned check (made-up sample)

Add a direct deposit or a payment with no check

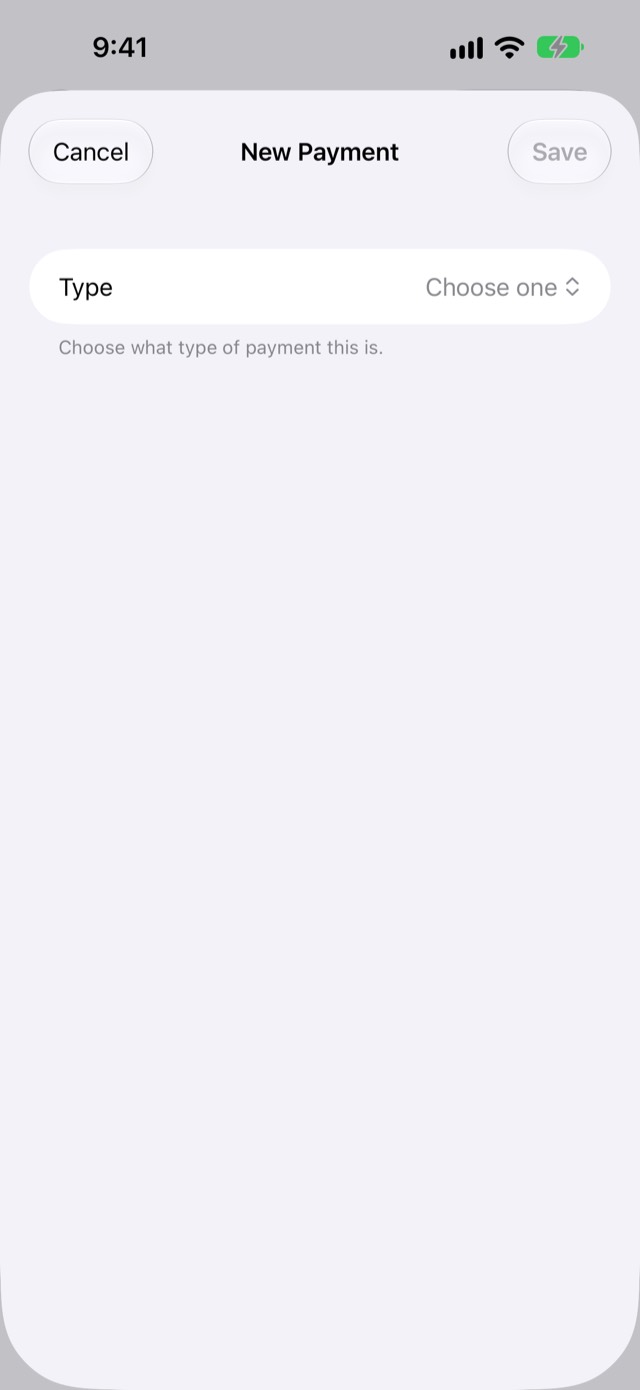
  1. Payments → Add Manually.

  2. Set Type to Insurer payment.

  3. Fill in Amount and Date, and set Paid by (Direct deposit, Check or Other).

  4. Tap Save.

You should see the new payment open. Add its split under Coverage split, as for a check.

Back to questions

Screenshot: New Payment form (Add Manually)

Add the payment letter that explains a check

  1. Payments → tap the payment.

  2. Tap Add Payment Letter, then Scan, From Files or From Photos.

  3. Swipe the pages at the top of the payment to the letter, and type the split from it under Coverage split. Claim Binder doesn't read the split for you.

You should see the letter's pages on the payment, after the check, each marked like "Document 7 · page 1 of 2". The letter is listed under Linked documents and saved in Log → Documents, where it shows this payment under Payments. To delete, read again or move a page of the letter, tap Open Document 7 (its own number) over the page; the payment's screen only shows the letter's pages.

Back to questions

Screenshot: Payment 9: the Add Payment Letter choices

Record money the mortgage company released

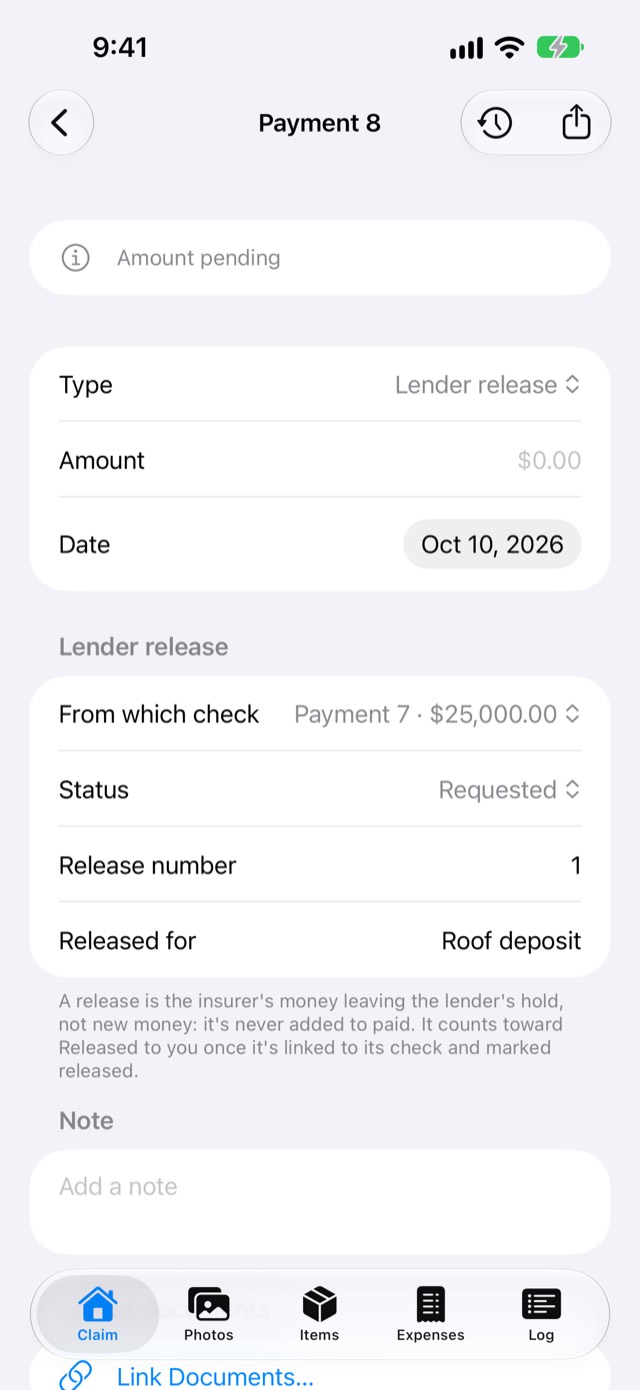
  1. Payments → Add Manually → set Type to Lender release.

  2. Under From which check, pick the insurer check the mortgage company is holding.

  3. Set Status to Requested or Released, and type the amount once you know it. Leave it blank while it's requested.

  4. Tap Save.

You should see the release in the Received list. Once it's Released and linked to its check, it counts toward Released to you. First turn on Held by the mortgage company on the check, so it shows under From which check. A release is never added to the paid total again; it's the insurer's money leaving the lender's hold.

Back to questions

Screenshot: Payment 8: a lender release, requested

Record money you paid a contractor

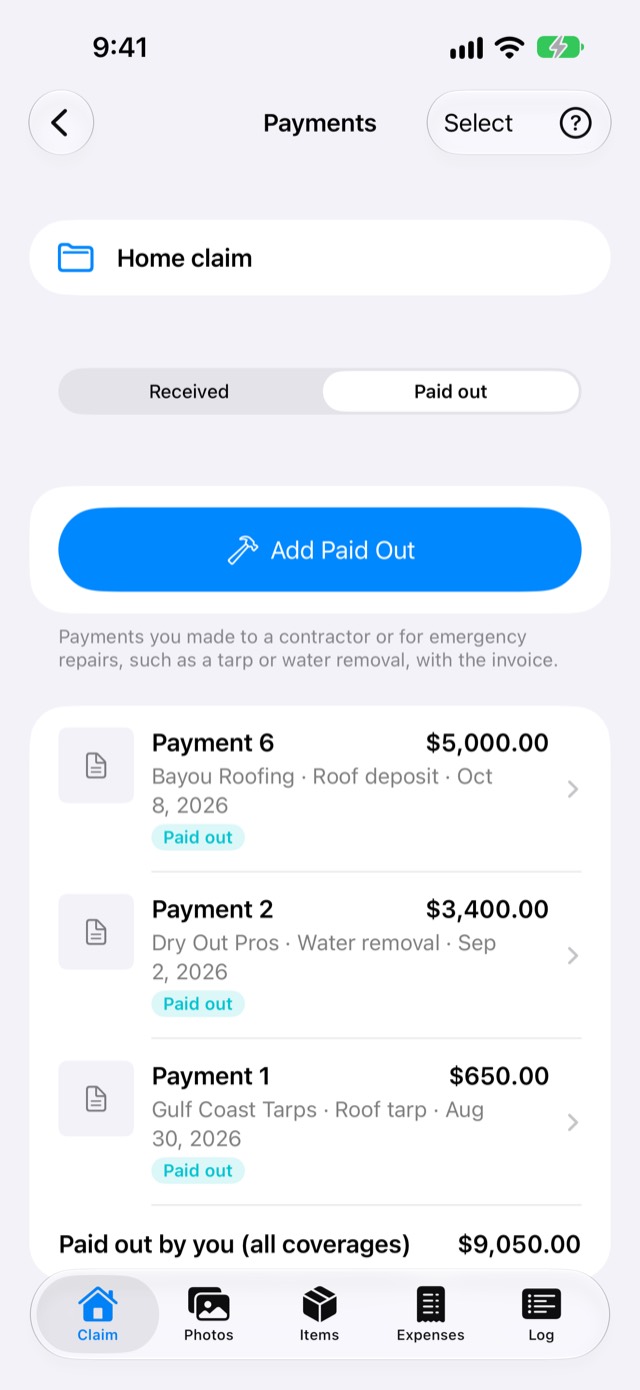
  1. Open Payments and tap Paid out at the top.

  2. Tap Add Paid Out.

  3. Fill in Amount, Date, Paid to and Work, and Work finished if the work is done. Tap Save.

  4. On the payment, tap Add Invoice for the invoice, and Link Documents… for the contract or lien release.

You should see the payment under Paid out, and Paid out by you (all coverages) goes up. Work finished prints when you share the payment and in the claim report's Payments list, so the insurer sees when the repairs were done. Emergency repairs (a roof tarp, water removal) go here too, not under Expenses.

Back to questions

Screenshot: Payments, Paid out half

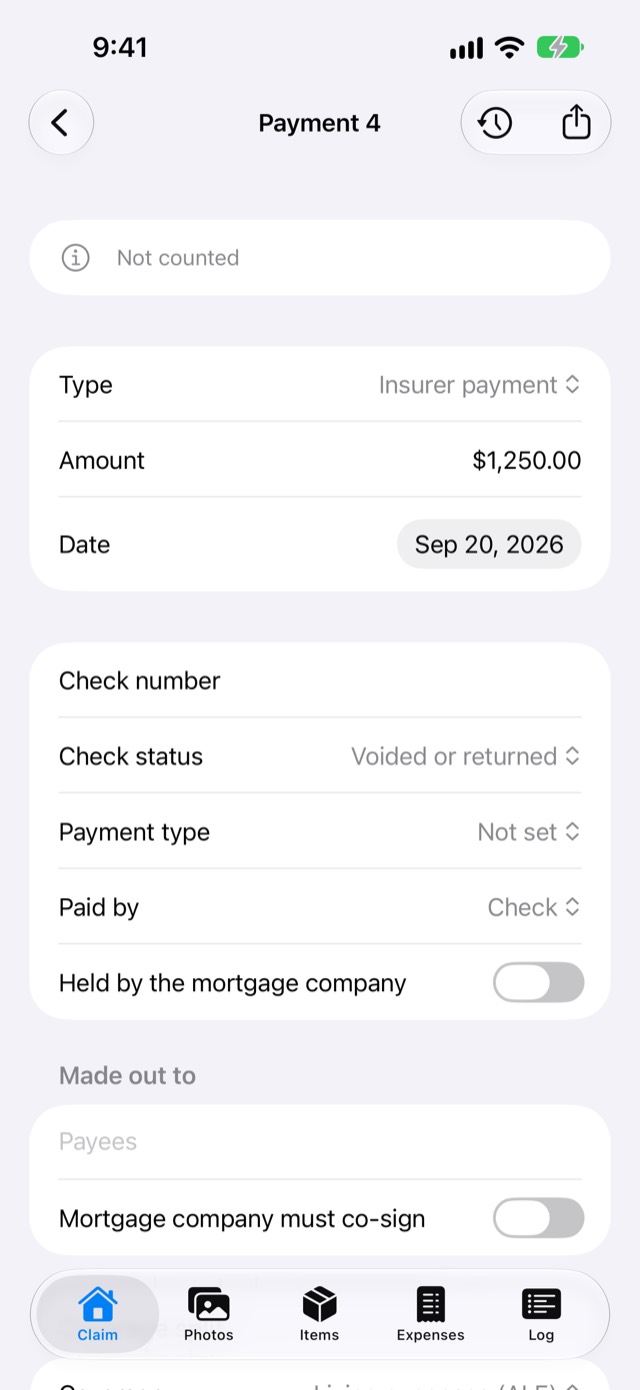
When a check bounces or is returned

Open the payment → Check status → Voided or returned. You should see it struck through and marked Not counted, and it's left out of Paid by insurer.

Back to questions

Screenshot: Payment 4: Voided or returned, Not counted

When a total says "Couldn't read this claim's payments"

  1. Close Claim Binder in the app switcher.

  2. Open Claim Binder again.

You should see the totals again. Nothing was lost: Claim Binder shows no total rather than a wrong one. The same can show for items ("Couldn't read this claim's items.") and expenses ("Couldn't read this claim's expenses."). If it keeps happening, email support@poshjoshllc.com.

Back to questions

Screenshot: Claim tab with the read failure line

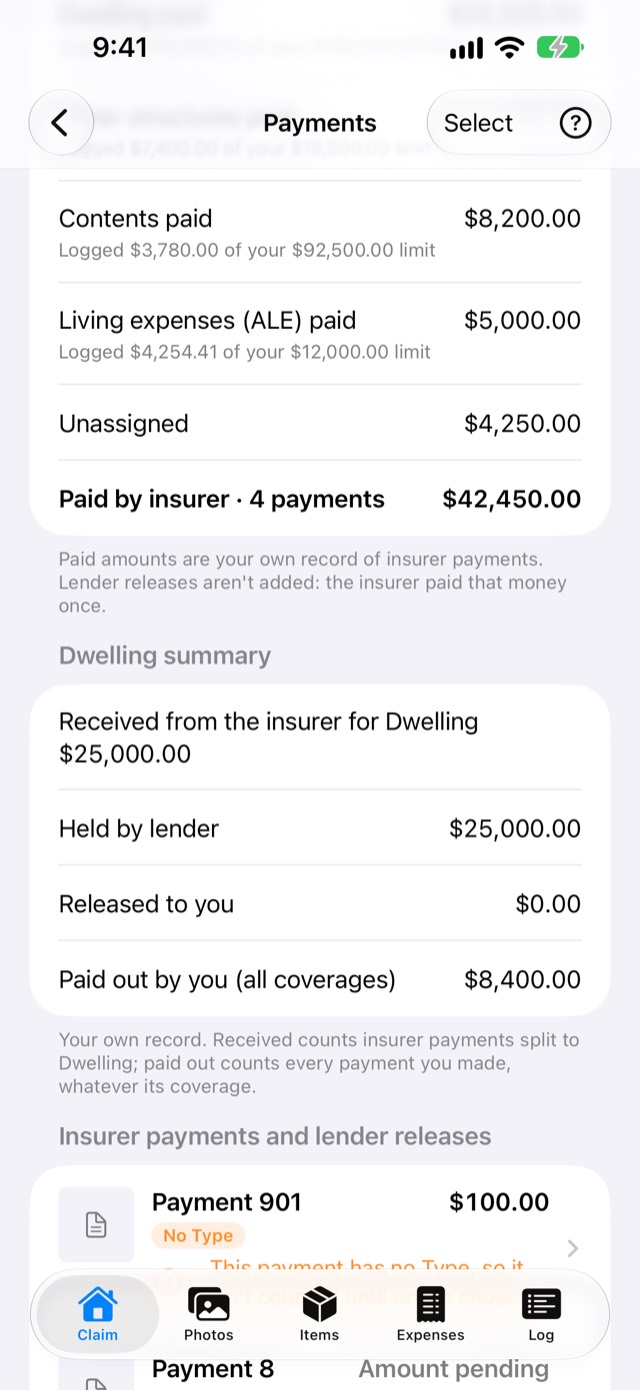
When a payment has no Type

  1. Payments → tap the payment marked No Type.

  2. Set Type to Insurer payment, Lender release or Paid out.

You should see the warning go away, and the payment counted in the totals again. A payment with no Type isn't counted until one is chosen.

Back to questions

Screenshot: Payments: a payment marked No Type

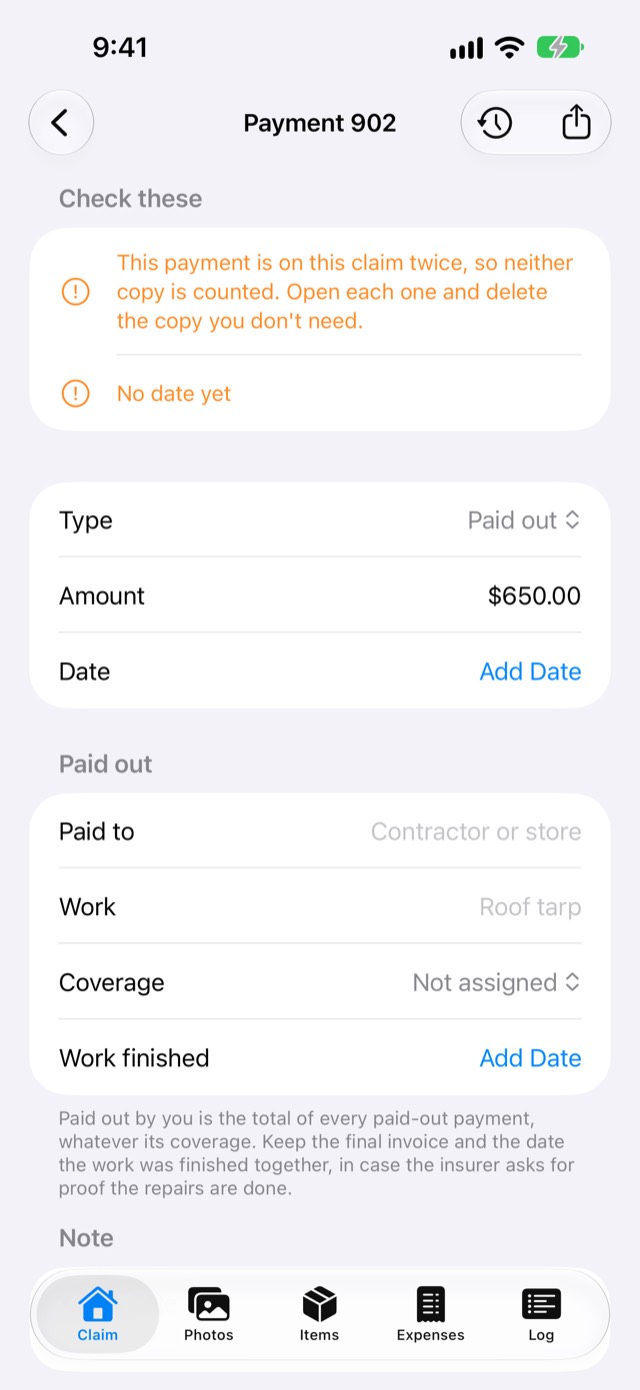
When a payment is on a claim twice

  1. Payments → open each payment with the warning "This payment is on this claim twice" and compare them.

  2. On the copy you don't need, tap Delete, then Delete Payment.

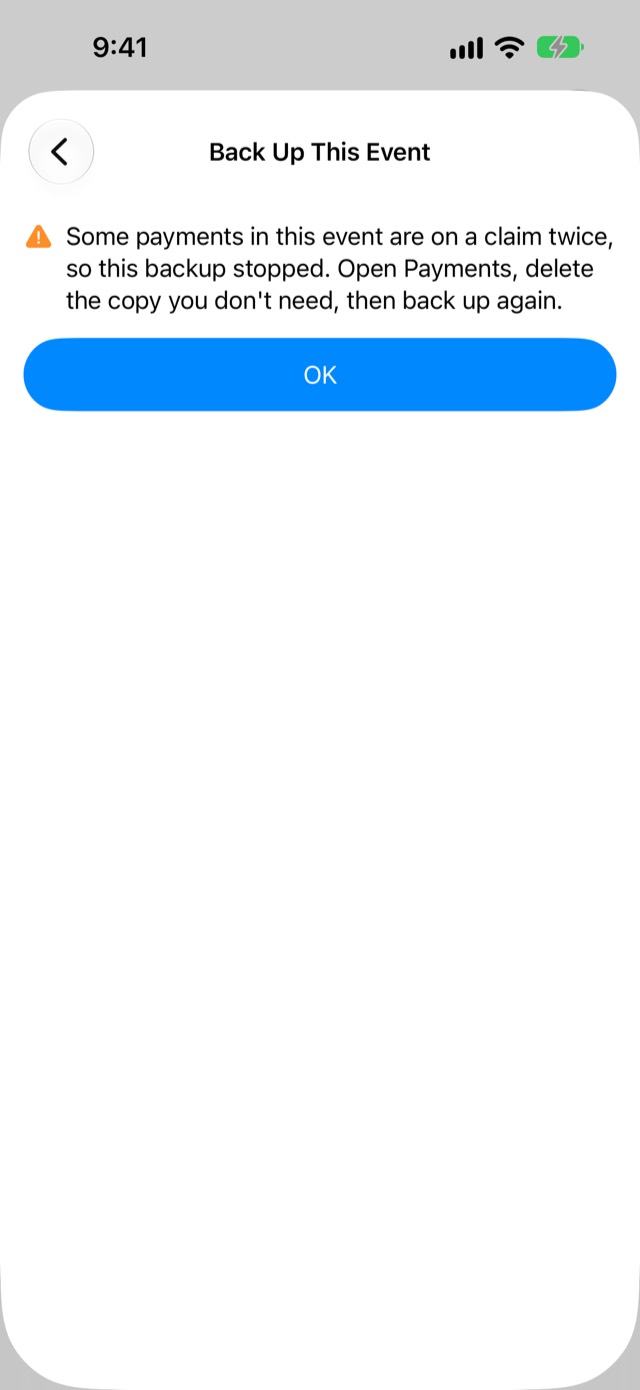
You should see the warning go away and the payment counted again. Neither copy is counted while both are there. A deleted copy stays in Recently Deleted for 30 days, and a backup that stopped for this will work now.

Back to questions

Screenshot: A payment with "on this claim twice"

Documents

Documents are the papers from your insurer, adjuster and contractors: estimates, letters, proof of loss forms, the declarations page, bids, contracts, invoices, lien releases. They belong to the event, so one document can be linked to several claims.

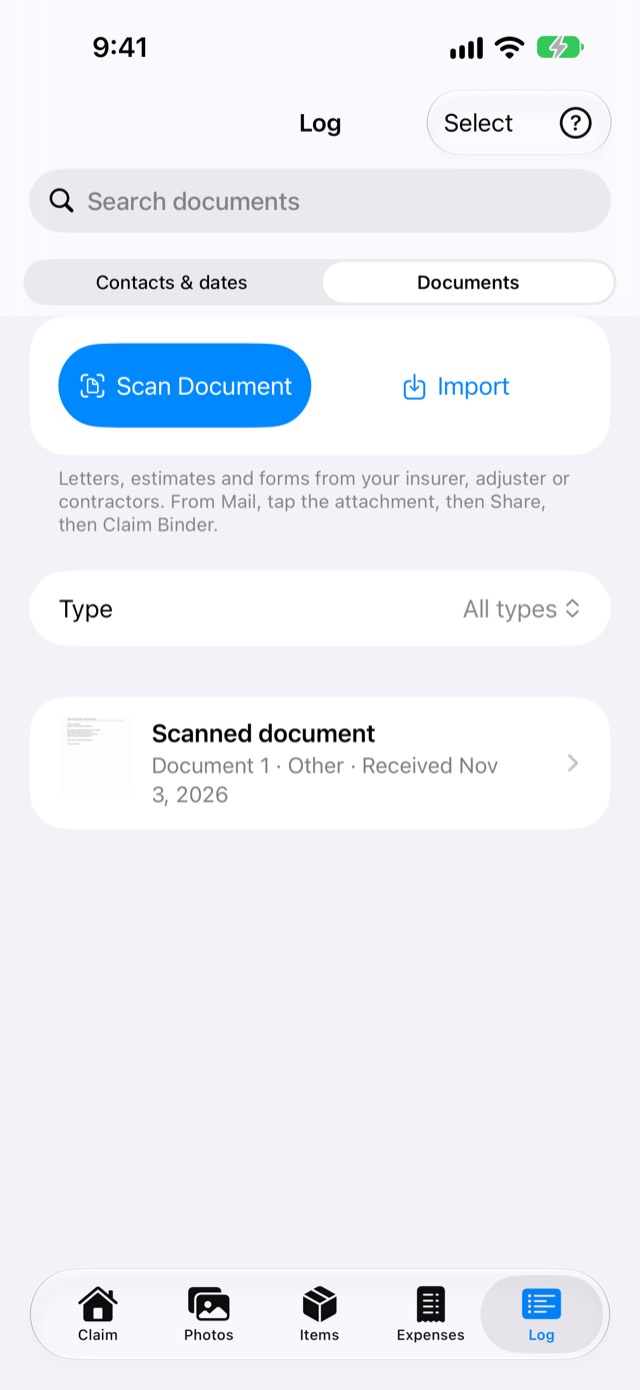
Scan a paper document

  1. Tap the Log tab.

  2. At the top, tap Documents (the other half is Contacts & dates).

  3. Tap Scan Document, scan every page, then tap Save in the scanner.

  4. Tap the new document and set its Type (such as Estimate or Payment letter), Title, Received date and Sender.

You should see the document in the list, such as "Document 8 · Estimate", with "Reading…" while its words are read for search. A payment letter you link on a payment's screen (under Linked documents) shows that payment on the document, under Payments, with its Type, amount and date. Tap it to open the payment.

Back to questions

Screenshot: Log → Documents: the scanned document (made-up sample)

Add a PDF from email or Files

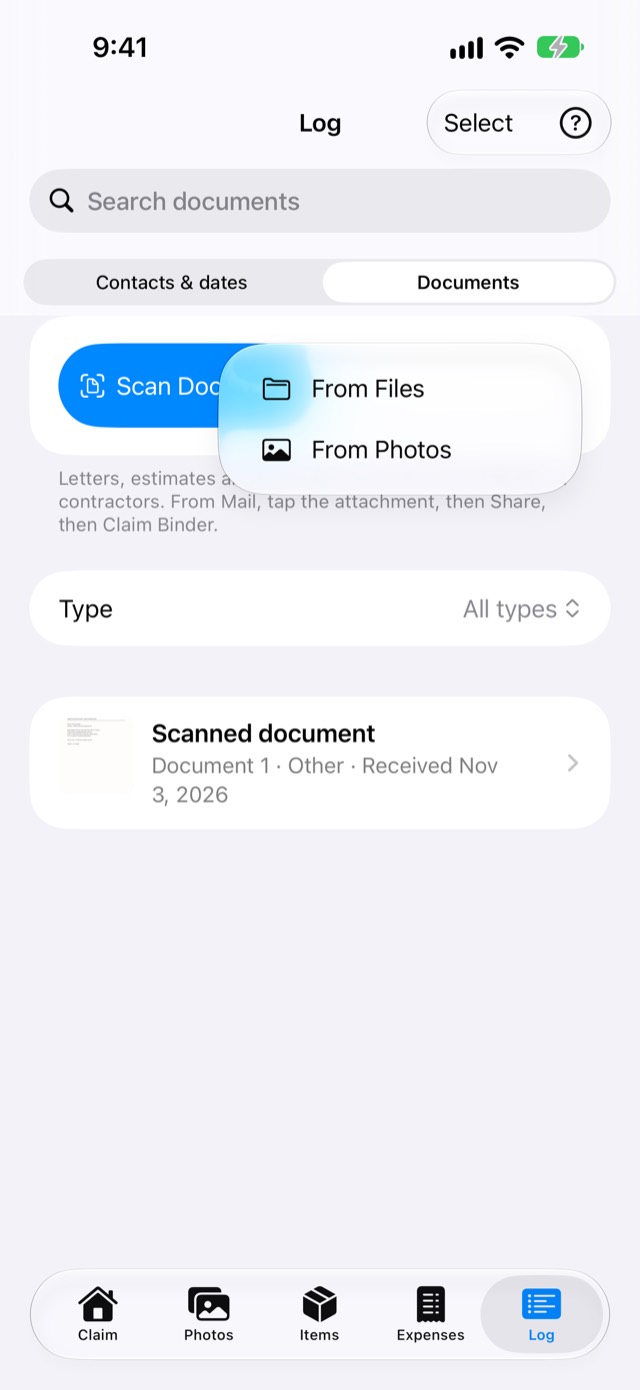
  1. Log tab → Documents → Import → From Files or From Photos.

  2. Pick the file.

You should see a new document for each file, titled with the file's name. Or from Mail or Files: tap the attachment, then Share → Claim Binder → Document.

Back to questions

Screenshot: Documents → Import: From Files, From Photos

Add a deadline from a letter

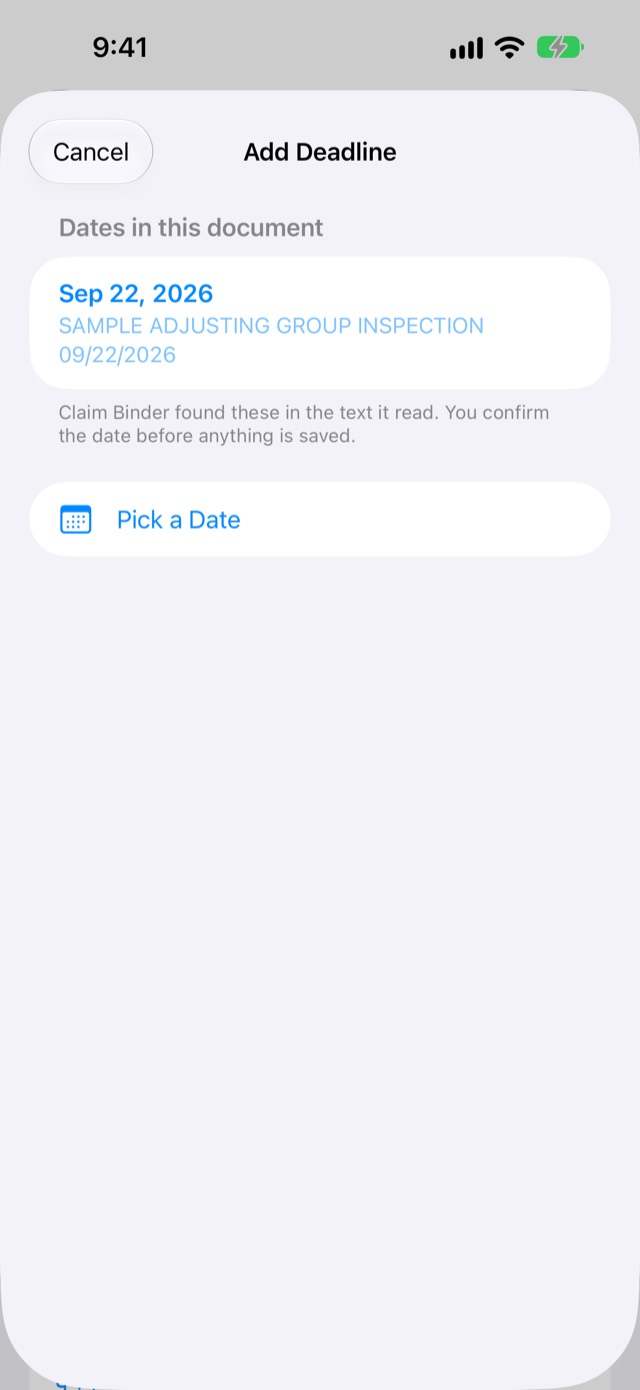
  1. Log tab → Documents → tap the letter.

  2. Tap Add Deadline from This Document.

  3. Tap one of the dates found in the letter, or Pick a Date.

  4. Check the title, date and claim, then tap Save.

You should see the deadline under Deadlines on the letter, and under Upcoming deadlines on Contacts & dates. Nothing is saved until you tap Save.

Back to questions

Screenshot: Add Deadline from This Document: the dates found

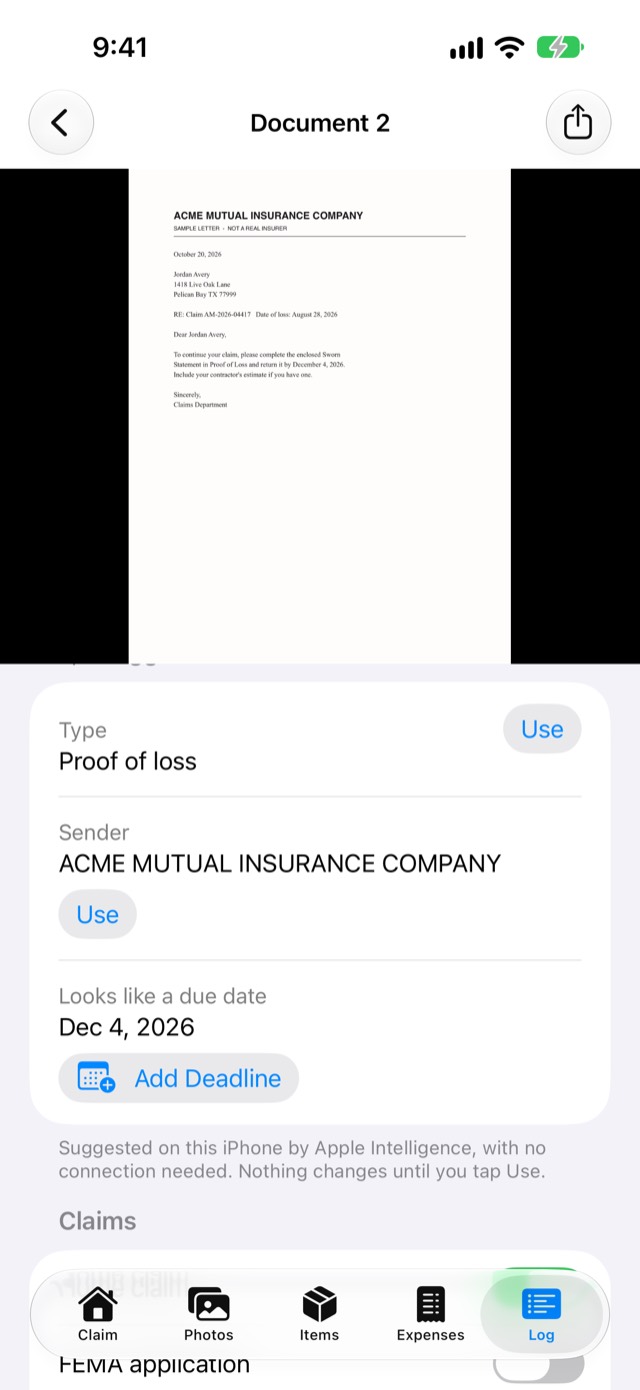
Get suggestions for a document's type, sender and due date

Only on an iPhone or iPad with Apple Intelligence (iOS 26 or later), while Apple Intelligence is on. Without it, type the details yourself; everything else works the same.

  1. Log tab → Documents → tap the document after it's been read.

  2. Tap Suggest Details.

  3. Tap Use beside a suggestion you want. For "Looks like a due date", tap Add Deadline, tap the date marked as suggested, then tap Save.

You should see the Type or Sender you used in the document's fields. Nothing changes until you tap Use. If it says "No suggestions this time. Fill in the fields yourself.", tap Try Again or type them in.

Only the document's first page is read, on your phone.

Back to questions

Screenshot: A made-up letter's Document detail: Suggestions after Suggest Details (Type, Sender, Looks like a due date)

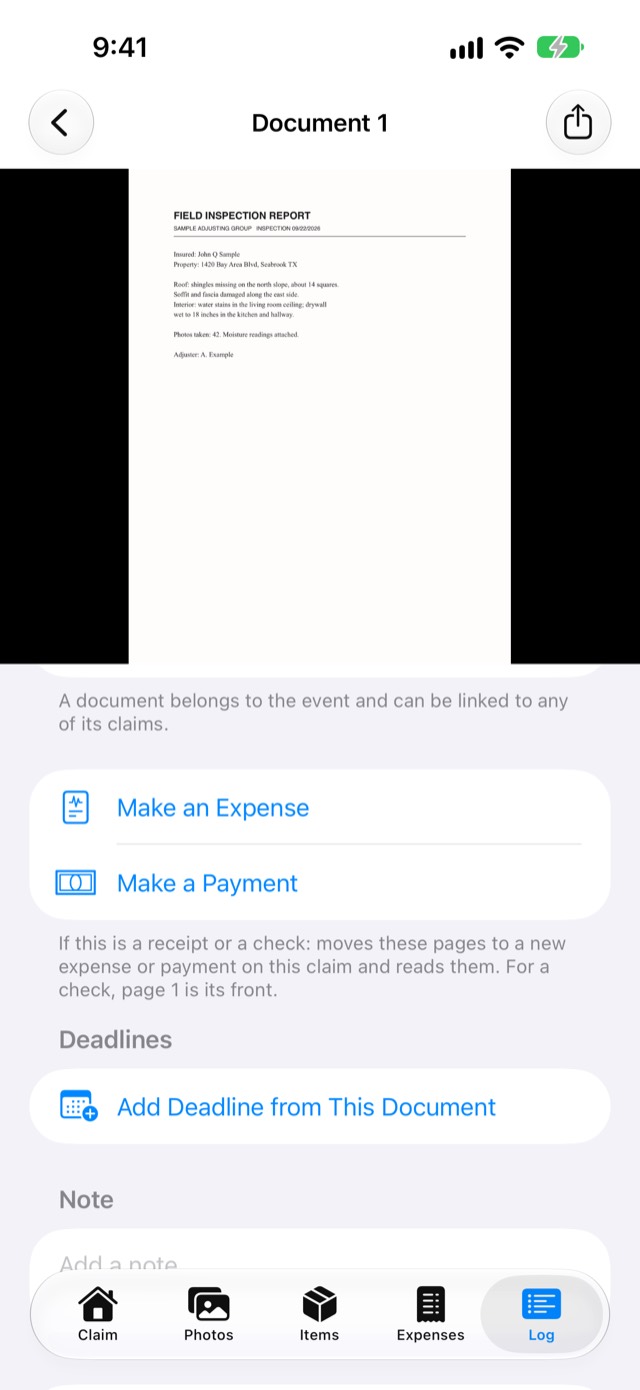
Make an expense or a payment from a document

Use this when a receipt or a check ended up under Documents, for example scanned there, or kept as a document because the event had no claim yet or the free claim already had 10 expenses.

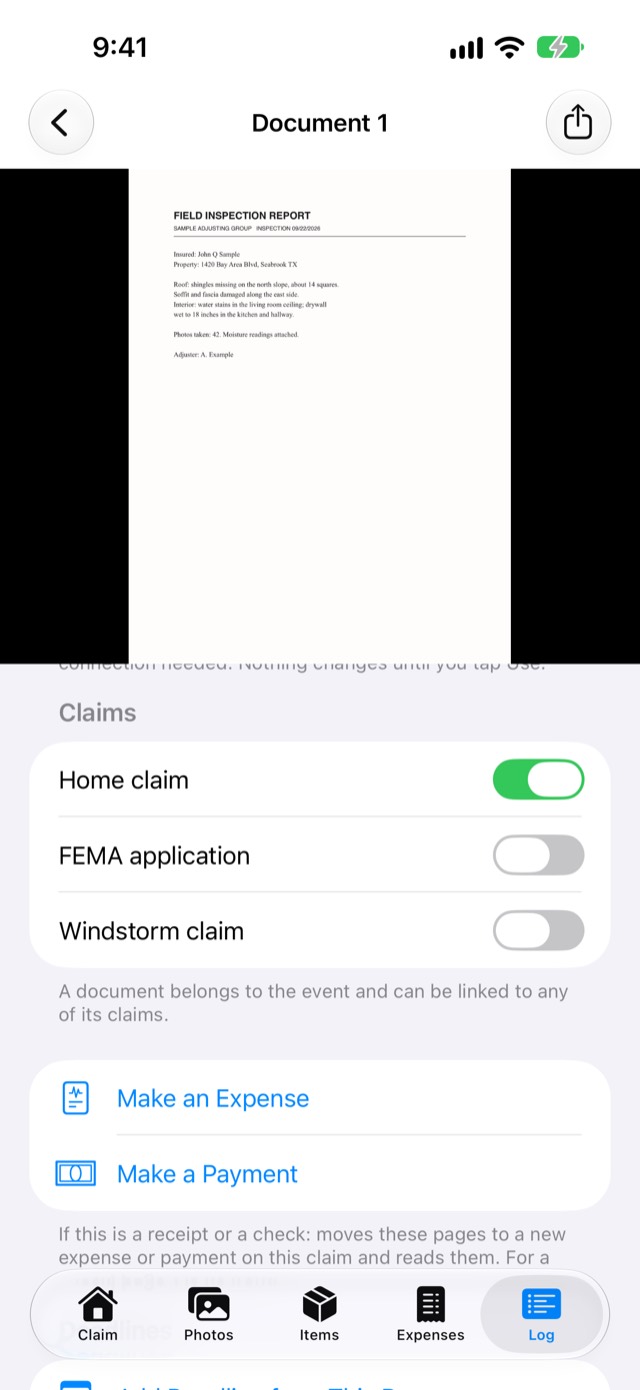
  1. Log tab → Documents → tap the document.

  2. Scroll down and tap Make an Expense or Make a Payment.

  3. Claim Binder asks first ("Make an expense from this document?"). Tap Make an Expense (or Make a Payment) to go on.

You should see the new expense or payment open and its pages read, and a bar saying, for example, "Document 8 is now Expense 26." with Undo. For a payment, page 1 is the check's front. The buttons only show for a document of Type Other that isn't already in use.

Back to questions

Screenshot: Document detail: Make an Expense, Make a Payment

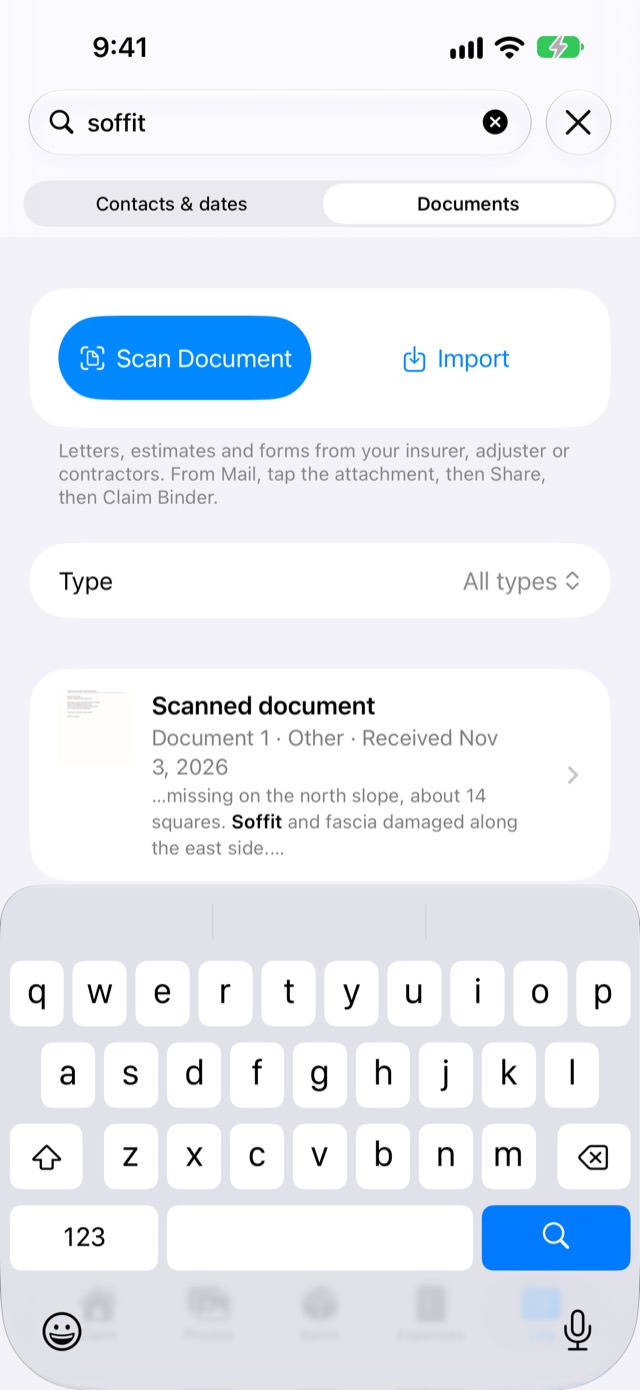
Find a document

Log tab → Documents → type in the search field ("Search documents"), or pick a Type. You should see the matching documents, with the words that matched. Search looks at titles, senders, notes and the words read from the pages, all on your phone.

Each document in the list also says what it's linked to, such as "Linked: Payment 3 · Proof of loss": its payments first, then the deadlines made from it and the requests it was sent for.

Back to questions

Screenshot: Documents searching "soffit", the matching words

Contacts and deadlines

All of this is on the Log tab, left half: Contacts & dates. The Log remembers which half you used last, so check the switch at the top.

Add your adjuster or a contractor

  1. Log tab → tap Contacts & dates at the top.

  2. Tap Add Contact.

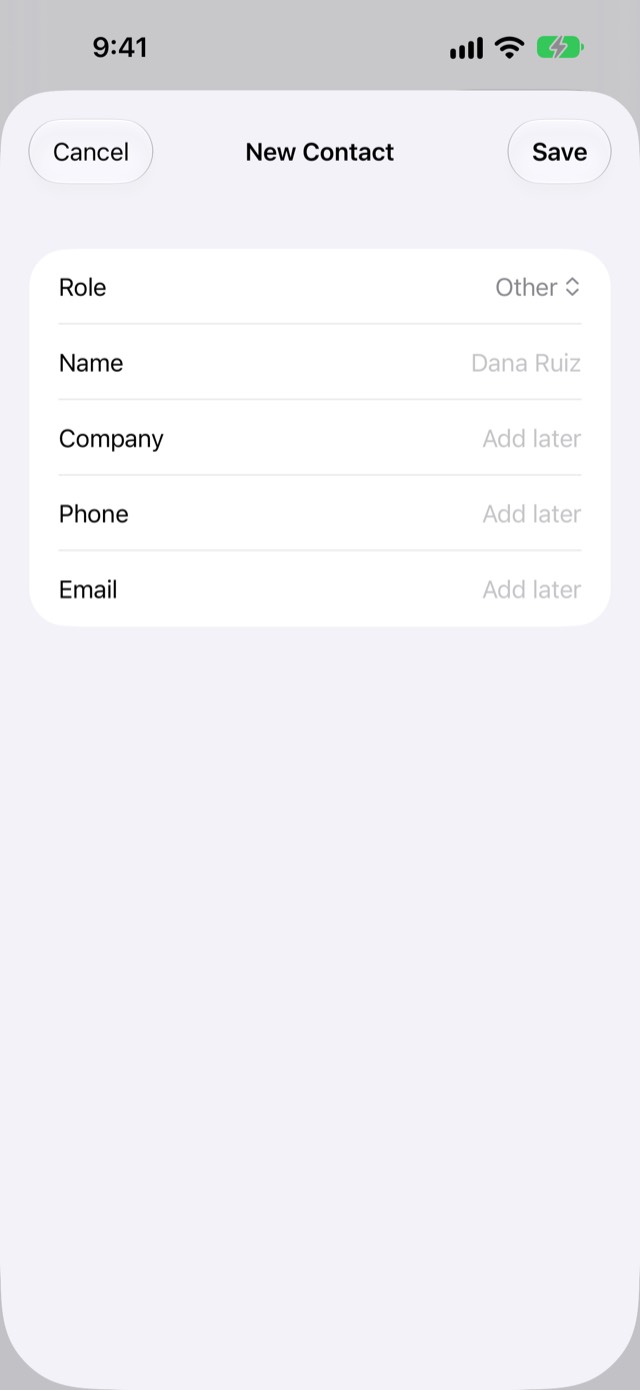
  3. Pick the Role (such as Adjuster or Contractor), then fill in the name, company, phone and email.

  4. Turn on Primary adjuster for your main adjuster, then tap Save.

You should see the contact under Contacts, with Call and Email. The primary adjuster also shows on the Claim tab's adjuster row. To reuse a contact from another claim, tap Add from Another Claim….

Back to questions

Screenshot: New Contact form

Log a call or email

  1. Log tab → Contacts & dates.

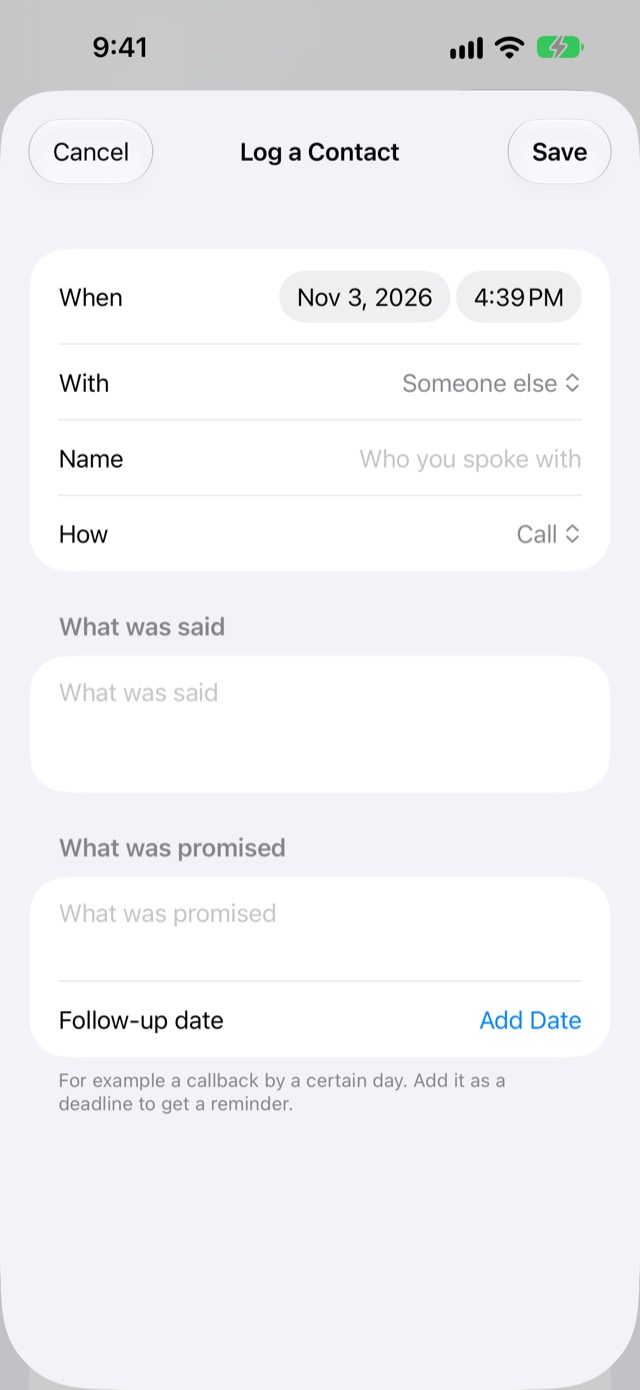
  2. Under Contact log, tap Log a Contact.

  3. Set When, then pick who it was With and How (such as Call or Email).

  4. Type What was said and What was promised, add a Follow-up date if one was promised, then tap Save.

You should see the entry under Contact log, newest first, such as "Call with Dana Ruiz". A follow-up date doesn't remind you by itself: open the entry and tap Add as a Deadline for a reminder.

Back to questions

Screenshot: Log a Contact form

Record a voice note after a call

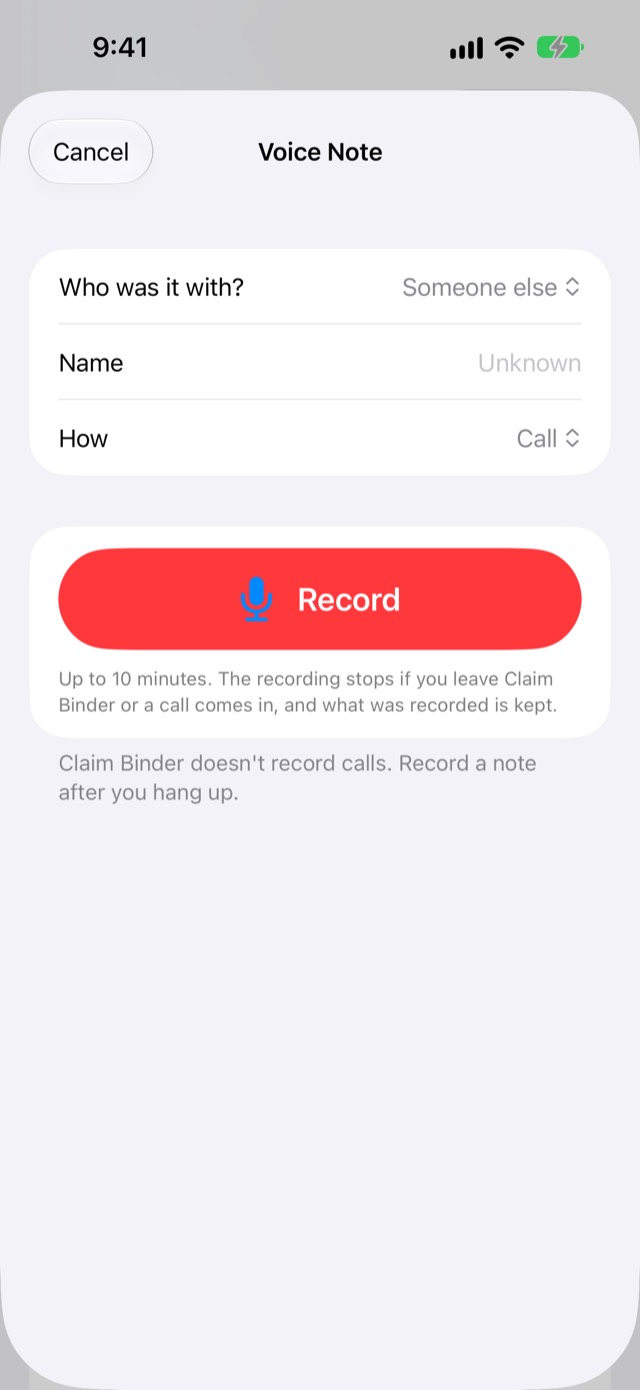
  1. Log tab → Contacts & dates → Voice Note.

  2. Pick Who was it with? and How (Call is first).

  3. Tap Record and speak your notes. Tap Stop when you're done; it stops by itself at 10 minutes.

You should see the entry under Contact log with a voice note. Claim Binder writes out what you said, on your phone, into the entry; check it and fix it if needed. The audio is kept. Claim Binder never records phone calls themselves: record a note after you hang up.

Back to questions

Screenshot: Voice Note sheet, before Record

Fill in a call from a voice note

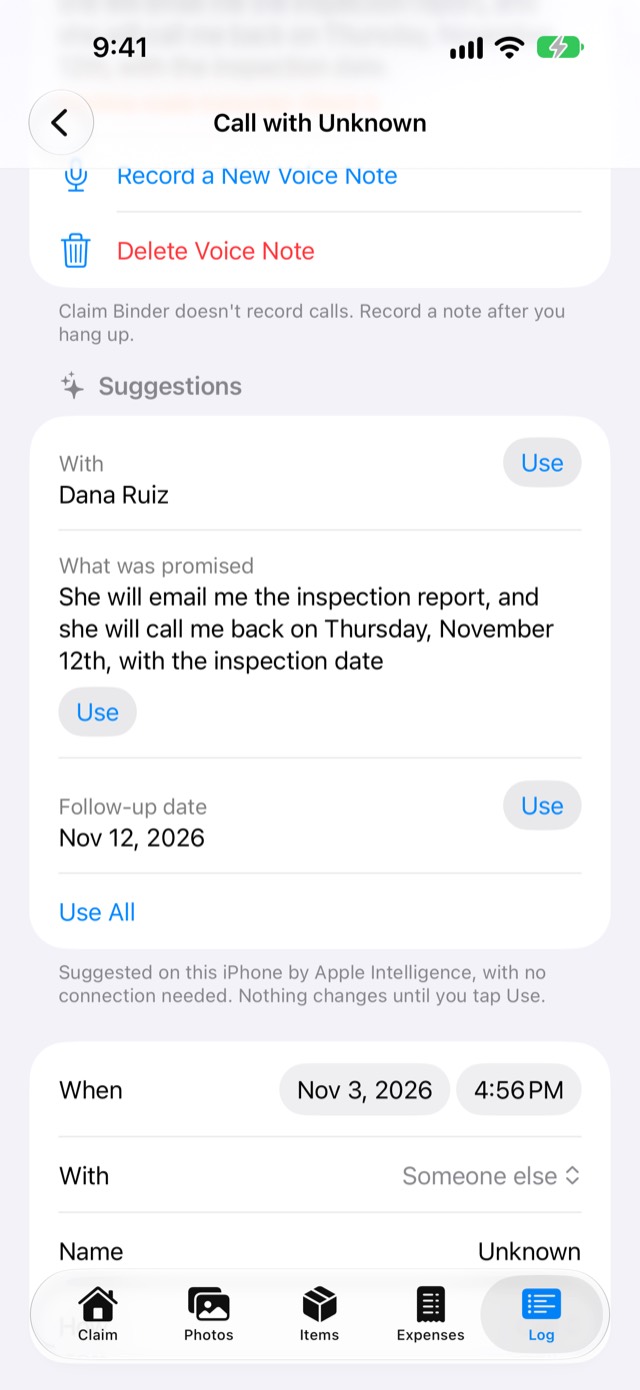
Only on an iPhone or iPad with Apple Intelligence (iOS 26 or later), while Apple Intelligence is on. Without it, type the details yourself; everything else works the same.

  1. Log tab → Contacts & dates → tap the log entry once its transcript is there.

  2. Tap Suggest from the Transcript.

  3. Tap Use beside each suggestion you want, or Use All.

  4. For a reminder, tap Add as a Deadline, check it, then tap Save.

You should see With, What was promised and Follow-up date filled in with what you used. Nothing changes until you tap Use, and a date becomes a deadline only when you add it.

Back to questions

Screenshot: A log entry from a voice note: Suggestions after Suggest from the Transcript

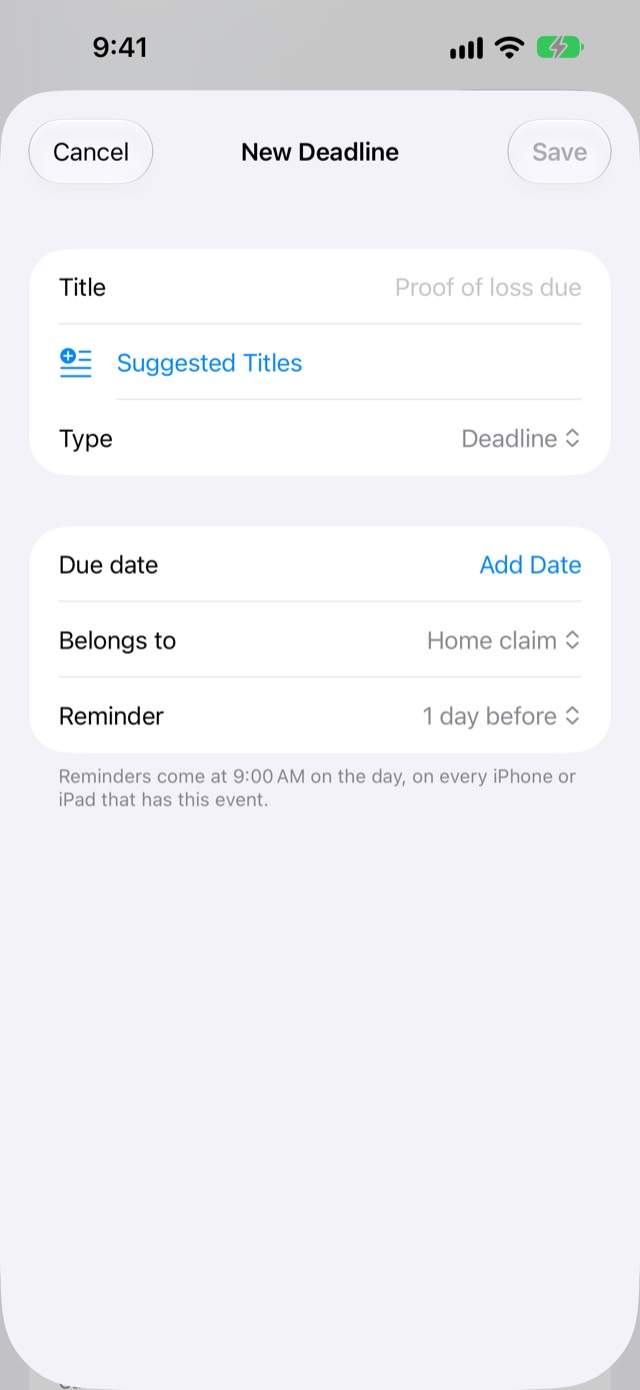
Add a deadline

  1. Log tab → Contacts & dates → Add Deadline.

  2. Type the Title, or pick one from Suggested Titles.

  3. Set the Type, the Due date, and Belongs to (a claim, or The whole property).

  4. Check Reminder (it starts at 1 day before), then tap Save.

You should see the deadline under Upcoming deadlines, and on the Claim tab when it's the next one. Reminders come at 9:00 AM. The first time, Claim Binder asks "Turn on reminders?": tap Continue, then allow notifications. A deadline of the Type Property tax relief also has an Office link (see Property tax relief). To add one from a letter, see Documents.

To see every deadline, tap See All Deadlines under Upcoming deadlines. To mark several done at once, use Select there.

Back to questions

Screenshot: New Deadline form

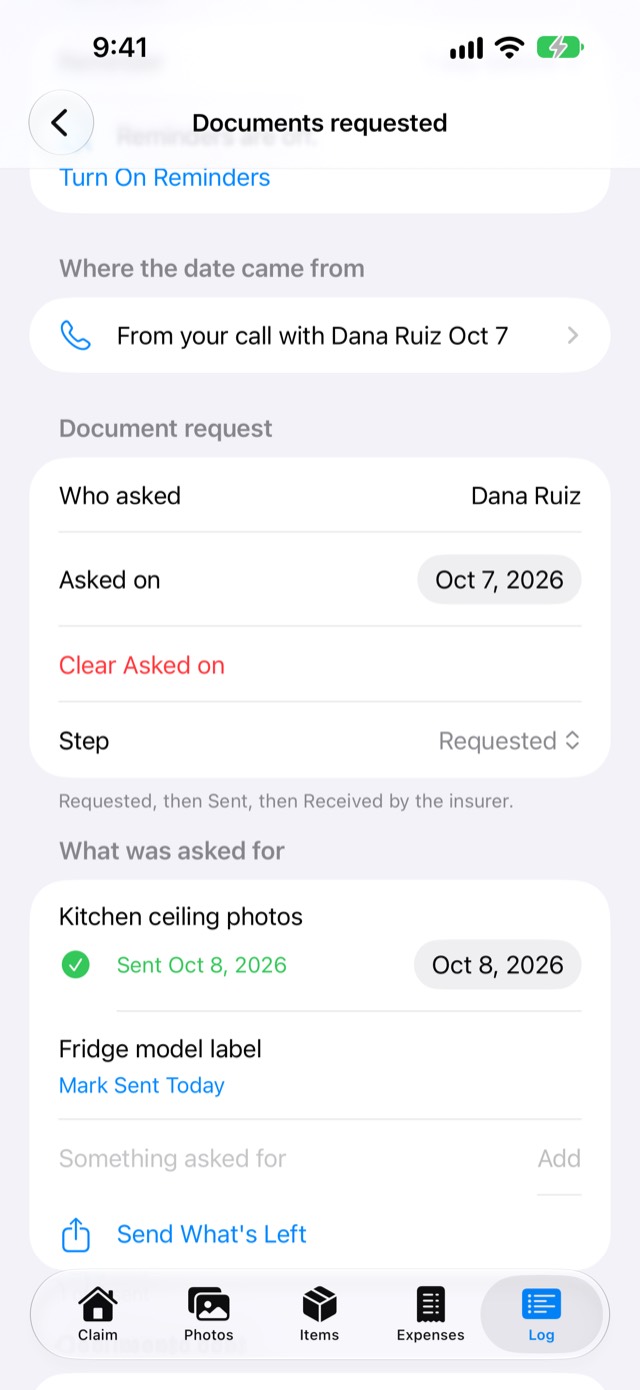
Track documents the adjuster asked for

  1. Log tab → Contacts & dates → Add Deadline.

  2. Set Type to Documents requested (or pick it from Suggested Titles), add the date and Who asked, then tap Save.

  3. Open the deadline. Under What was asked for, type each thing asked for, such as "kitchen ceiling photos", and tap Add.

  4. As you send each one, tap Mark Sent Today.

You should see progress such as "1 of 2 sent". Change Step from Requested to Sent, then to Received when the adjuster confirms.

Back to questions

Screenshot: Documents requested deadline: what was asked for, 1 of 2 sent

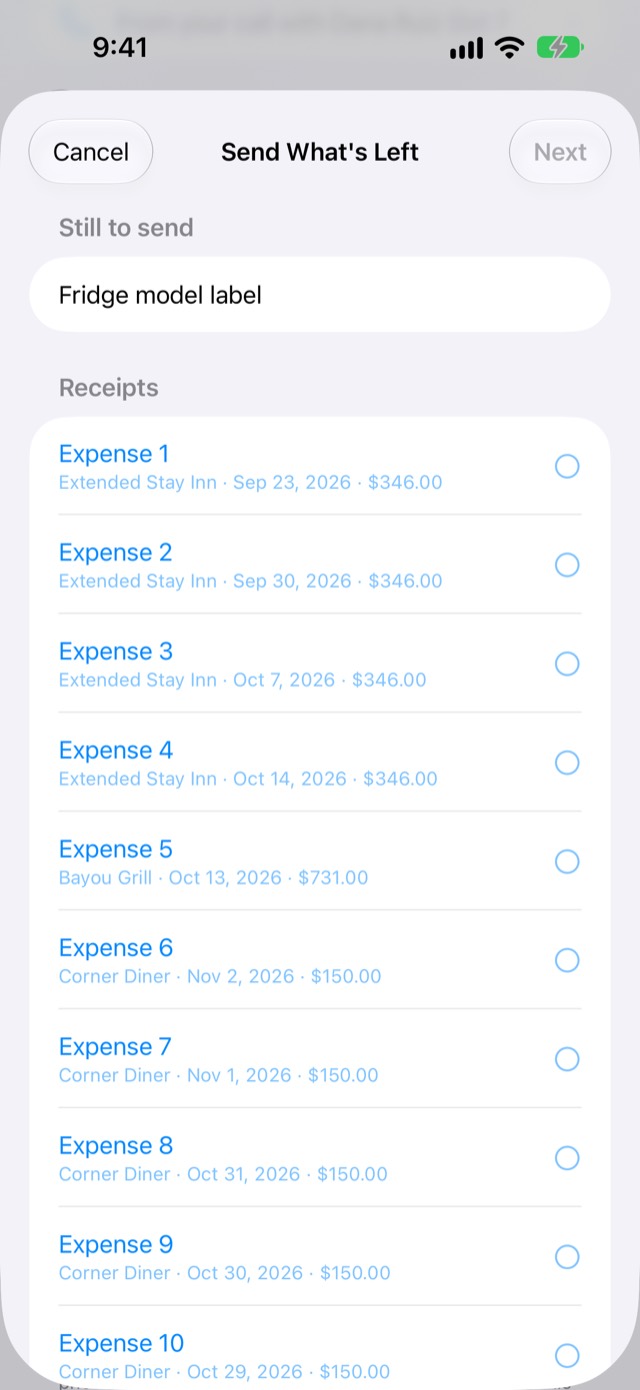
Send what the adjuster asked for

On a Documents requested deadline, Send What's Left gathers the things still to send into one share.

  1. Log tab → Contacts & dates → open the request (under Upcoming deadlines, or See All Deadlines).

  2. Under What was asked for, check each thing is listed. You should see a line like "0 of 2 sent".

  3. Tap Send What's Left.

  4. Under Still to send you see what's left. Tick the receipts, documents and photos that answer it. Tap Next.

  5. Share Preview opens. Check the pages, then tap Send or Save to Files.

  6. In What Did You Send?, tick each thing you just sent (nothing is ticked for you). Tap Save.

You should see "1 of 2 sent" (or similar), each sent thing with today's date, the documents you sent under Documents sent, and each send under Sent for this request, newest first, with what went and who it went to. On each entry there, Add Who It Went To and Link a Confirmation work as in Export History.

Share Preview shows Missing evidence when something you're sending has no photo, no receipt or no date; tap it to see which. It's for your own check: it never stops Send. The request's Step doesn't move on its own; change it to Received when the adjuster confirms. Sending two or more records at once is part of the one-time unlock.

Back to questions

Screenshot: Send What's Left: Still to send, then what can go

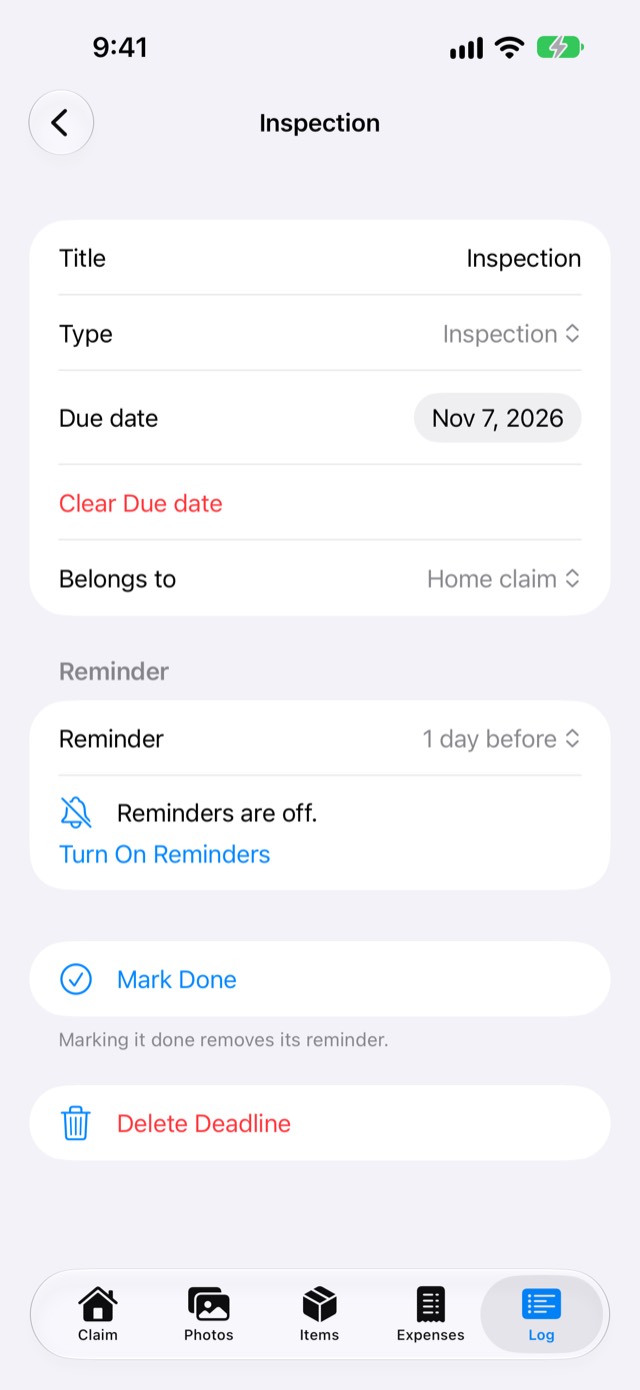
Mark a deadline done

Log tab → Contacts & dates → tap the deadline → Mark Done. You should see it under Done in Deadlines, and it stops reminding you. Tap Not Done to take it back.

Back to questions

Screenshot: Inspection deadline: Mark Done

Coverage and estimates

The coverage bars compare what you've logged with the policy limits you typed in. They're your own record: the app never says what's covered or what's owed.

Coverage What fills its bar
Dwelling (Building on a flood claim), Other structures Repair estimate lines you enter
Contents The item list
ALE (living expenses) Expenses with ALE coverage

Enter your policy limits

  1. Claim tab → scroll to Logged vs. your policy limit and tap it to open Coverage. (With no limits yet it says Add your policy limits to see these bars; tap that and skip to step 3.)

  2. Tap Edit Limits.

  3. Type the limits and the Deductible from your declarations page → Save.

You should see a bar for each coverage, with how much of its limit you've logged. On a flood claim, enter the building deductible: a flood policy has separate building and contents deductibles, and your declarations page shows both.

Back to questions

Screenshot: Coverage → Edit Limits (Edit Claim's limits)

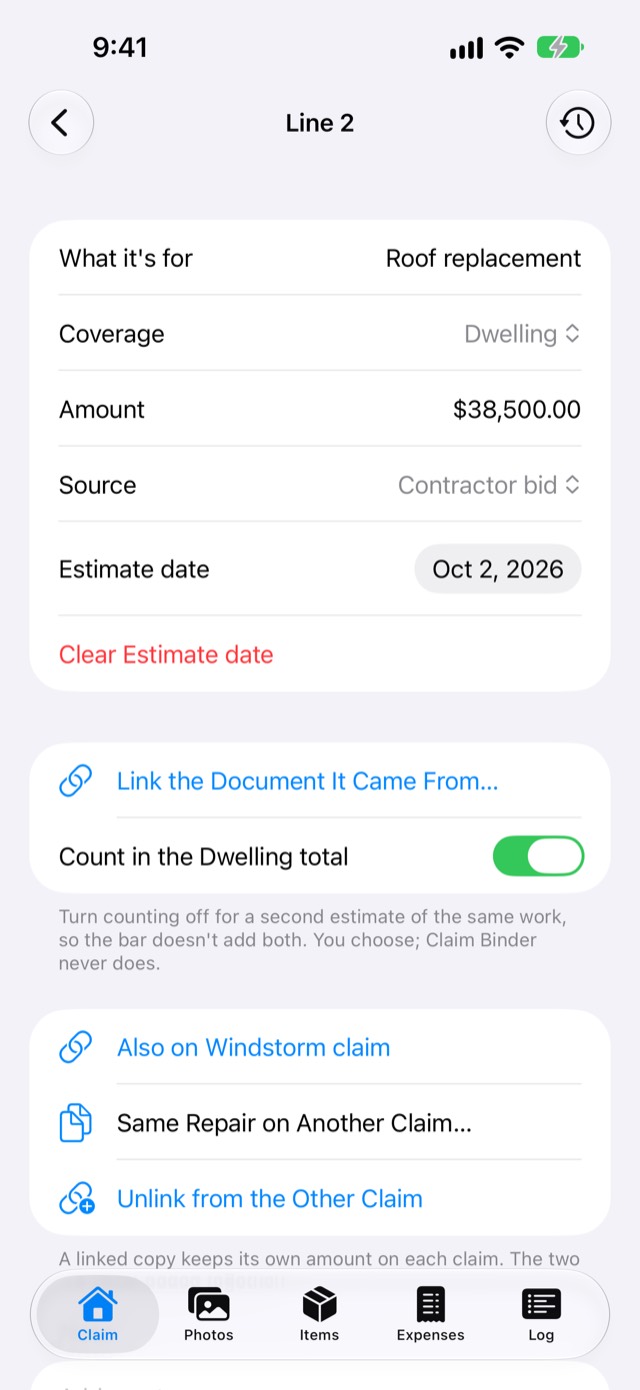
Enter a repair estimate

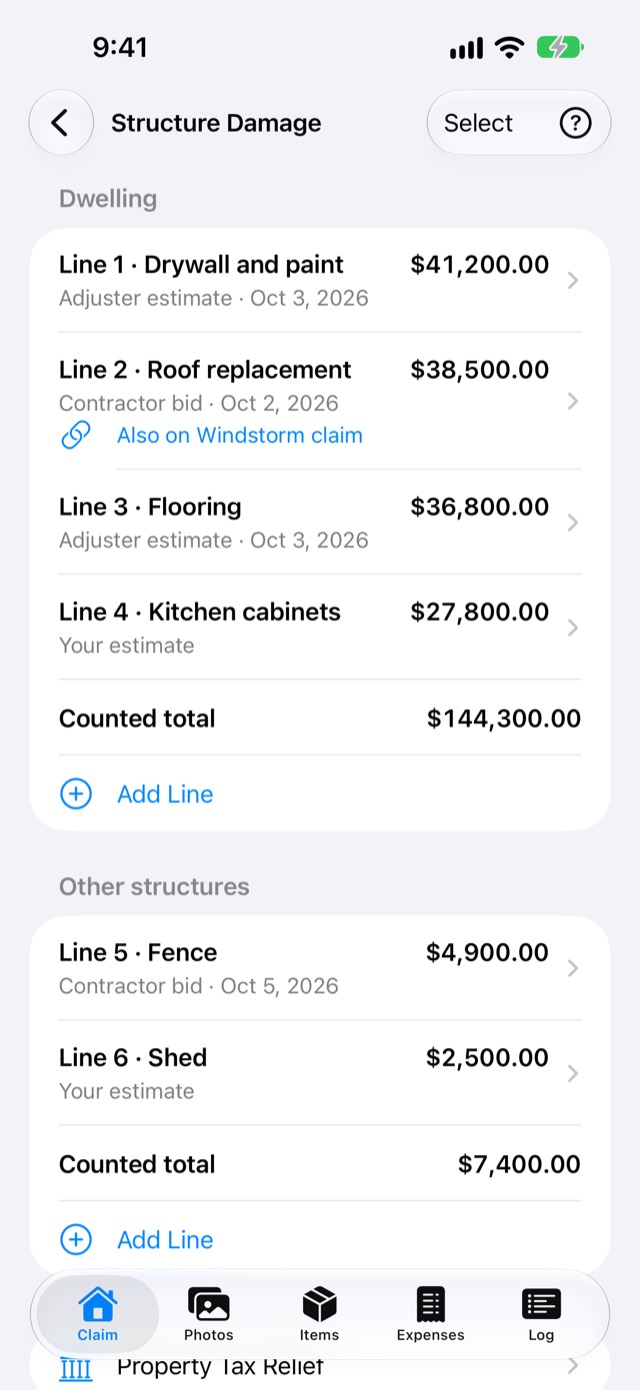
  1. Open Coverage (as above). On the Dwelling or Other structures card, tap Structure Damage.

  2. Tap Add Line.

  3. Fill in What it's for ("Roof replacement"), the Amount, the Source (contractor bid, adjuster estimate, your estimate) and the Estimate date, and pick the document it came from under From document.

  4. Tap Save.

You should see the line under its coverage, and the Counted total and the Dwelling bar go up. If you have both a contractor's and an adjuster's number for the same work, turn off Count in the Dwelling total on one, so it isn't counted twice. Lines that may be the same repair are flagged, never merged. Structure damage is for homeowners, windstorm and flood claims.

Back to questions

Screenshot: Structure Damage: estimate lines and counted totals

Property tax relief (Texas, Florida, other states)

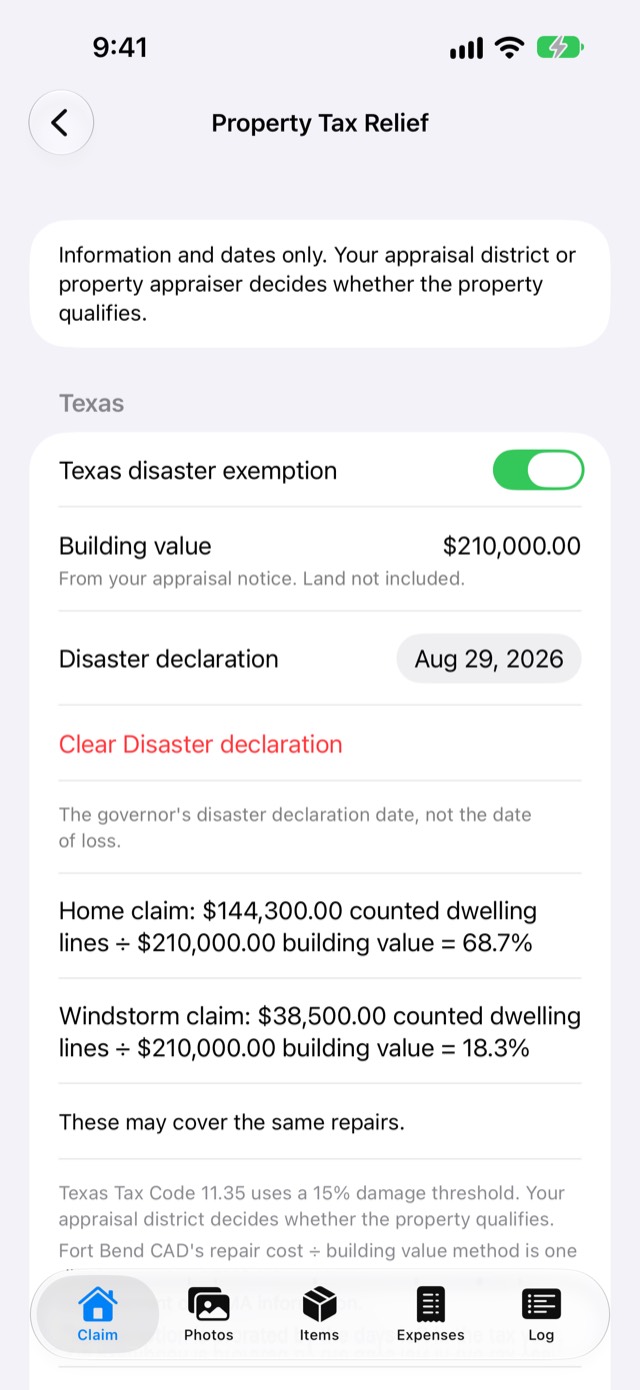
  1. Coverage → on the Dwelling card, tap Property Tax Relief. (It's also on Structure Damage.)

  2. Turn on the card for your state: Texas disaster exemption or Florida catastrophic-event refund.

  3. For another state, tap Add a Property Tax Relief Deadline and add the date and your county or parish office's Office link.

  4. Tap a deadline to choose its Reminder (it starts at 1 day before), then tap Save.

You should see dates and simple arithmetic only; your appraisal district or property appraiser decides whether the property qualifies. Reminders come at 9:00 AM; the first time, Claim Binder asks "Turn on reminders?": tap Continue, then allow notifications.

Tap the office link to open it in Safari, or tap Copy Link. Type it like hcad.org: Claim Binder adds the https:// part. A Property tax relief deadline you add from Log → Contacts & dates → Add Deadline has the Office link too.

Back to questions

Screenshot: Property Tax Relief: the Texas card

Sharing with family

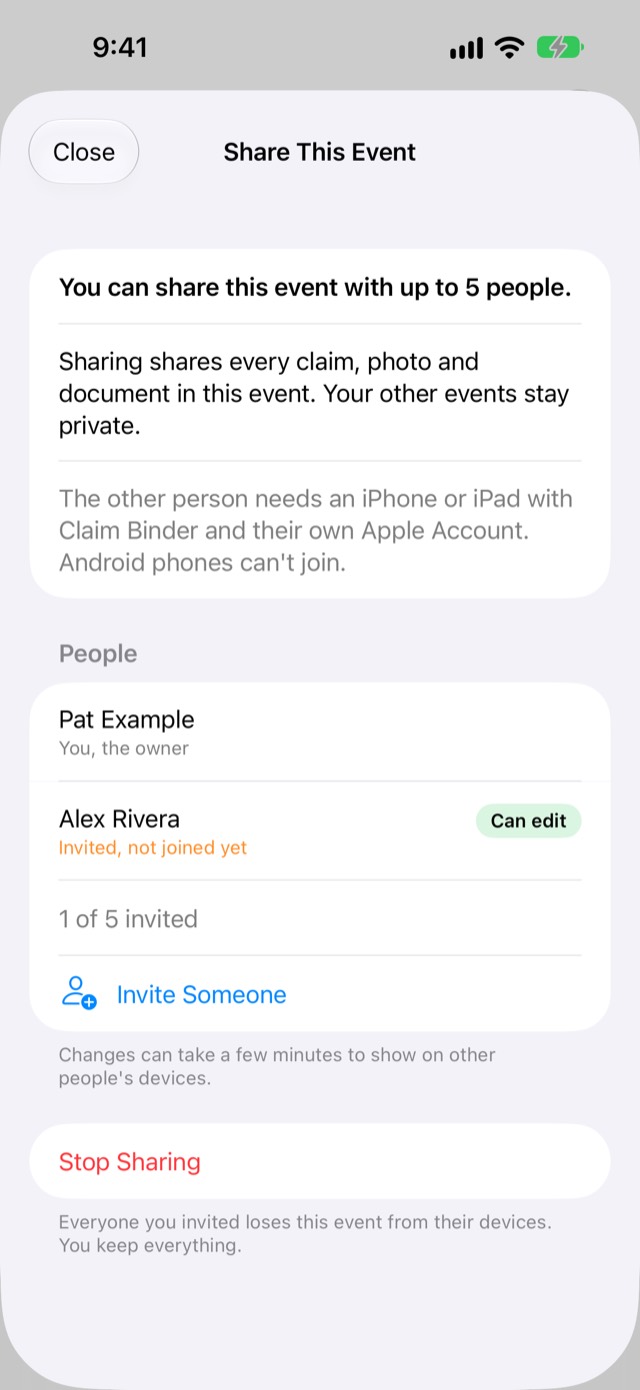
You share a whole event: all its claims, photos and documents. Your other events stay private. Up to 5 people can be invited, and each needs an iPhone or iPad with Claim Binder and their own Apple Account. Android phones can't join; Settings says so under Share This Event too.

Invite someone

  1. Claim tab → tap the gear at the top right → Settings.

  2. Under Family sharing, tap Share This Event.

  3. Tap Invite Someone.

  4. Choose Can edit (add, change and delete) or View only (see and export only).

  5. In Apple's sharing screen, send the invite by Messages or Mail.

You should see the person under People, "Invited, not joined yet" until they tap the link on their iPhone or iPad. Shared changes can take a few minutes to show up on other people's devices.

Back to questions

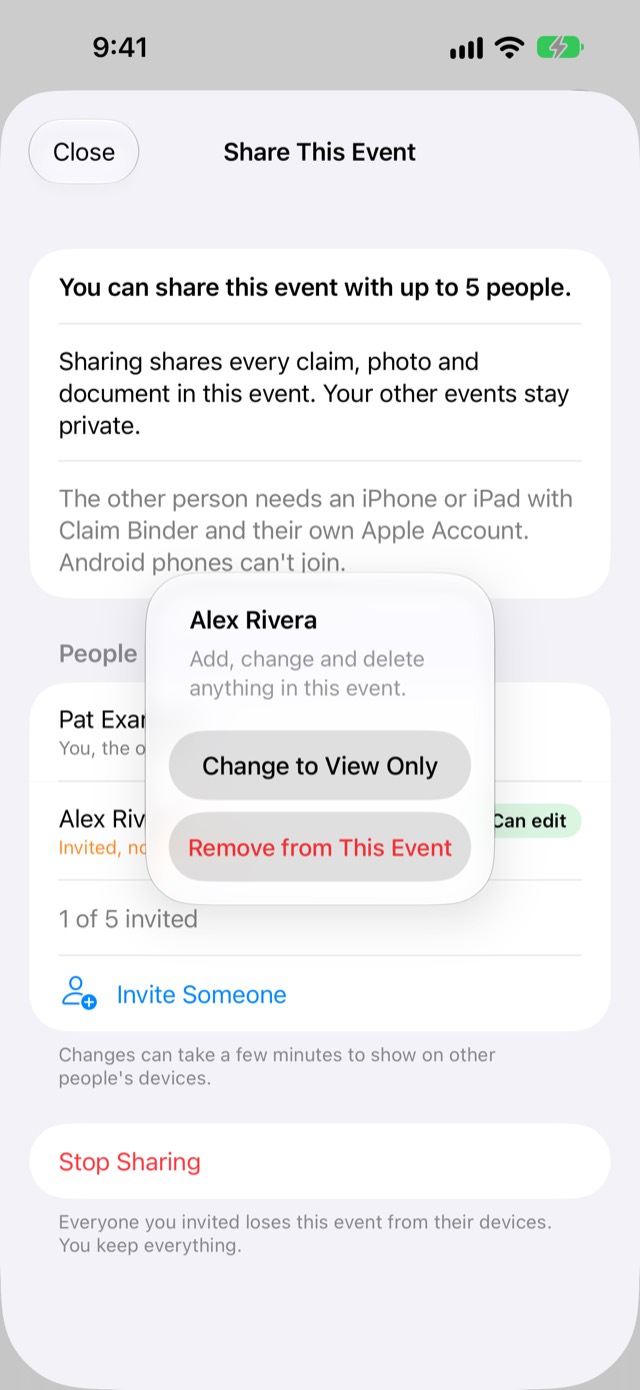
Screenshot: Share This Event, one person invited

Change someone's access or remove them

  1. Settings → Share This Event.

  2. Tap the person.

  3. Tap Change to View Only or Change to Can Edit, or Remove from This Event.

You should see their new access beside their name. A removed person loses the event from their devices at their next sync; you keep everything. Only the person who shared the event can do this. To end sharing for everyone, tap Stop Sharing.

Back to questions

Screenshot: Share This Event: a person's access choices

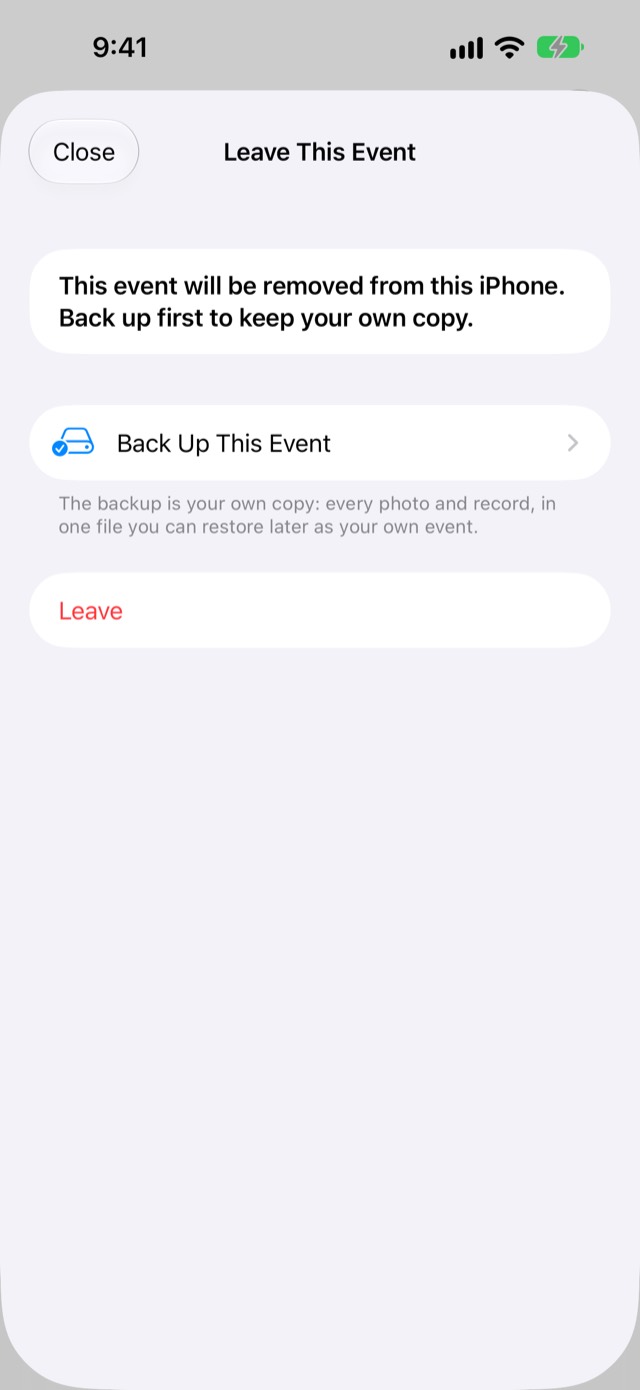
Leave an event someone shared with you

  1. Settings → under Family sharing, tap the row that says Shared by and the owner's name.

  2. Tap Leave This Event.

  3. Tap Back Up This Event first to keep your own copy, then Leave.

You should see the event gone from this device. The owner and everyone else keep it.

Back to questions

Screenshot: Leave This Event

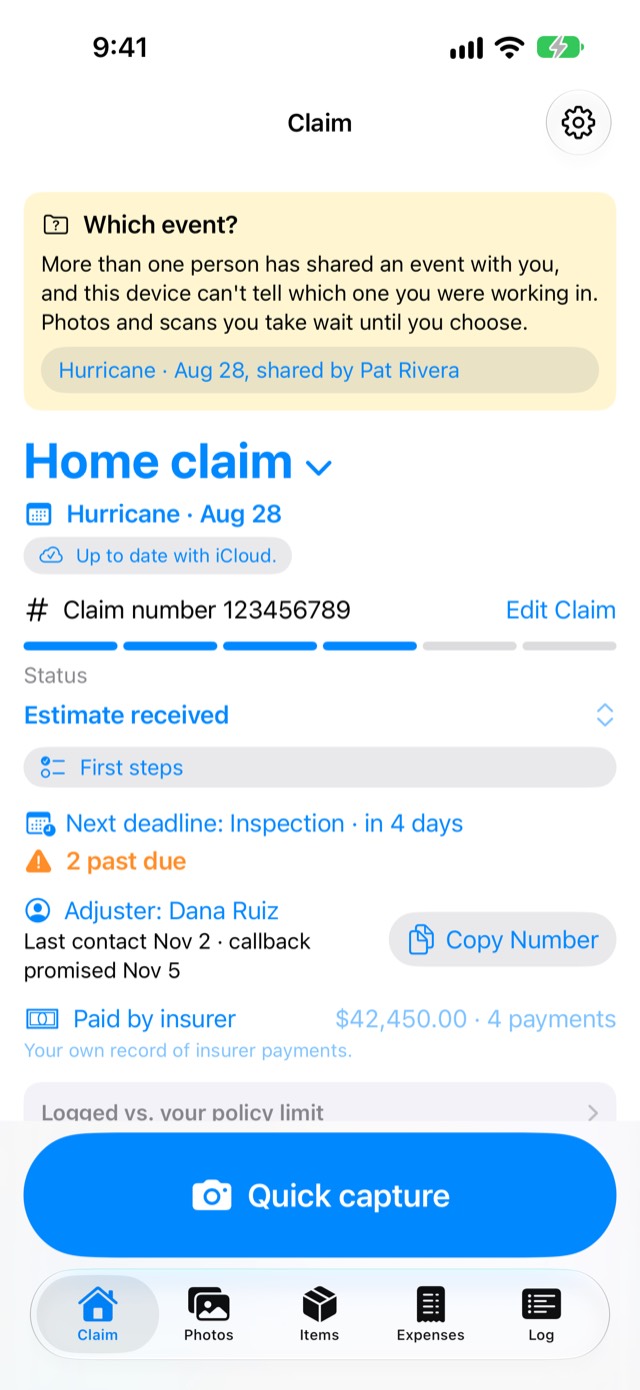
When the Claim tab asks "Which event?"

It asks when more than one person has shared an event with you and this device can't tell which one you were working in. Photos and scans wait, safe on this device, until you choose.

  1. Claim tab → under Which event? at the top, tap the event you were working in. Each shows the event's name and who shared it.

You should see that event on every tab. Photos and scans you took while it asked are saved into it.

Beta testers: People who join should keep their own backup.

Back to questions

Screenshot: Claim tab: Which event?

The unlock and free limits

Claim Binder is free to use with one open claim at a time. A one-time Claim Binder Full Unlock adds more. Nothing you've saved is ever locked: "Your records stay yours, unlocked or not."

What's free and what the unlock adds

Free The one-time unlock adds
One open claim at a time. Closing a claim frees the slot. More than one open claim.
Unlimited photos. Unlimited items and expenses.
Up to 10 items and 10 expenses on each claim. The full PDF report, with photo pages, receipt images and documents.
Unlimited documents, payments, estimate lines and voice notes. Excel and CSV exports from the Export screen, with your choice of sections and dates.
The contact log, deadlines and property tax relief cards; saved homes and policies. Sharing several records at once, as one PDF or separate files.
A full backup and a basic PDF report, any time; sharing one record at a time, with card and account numbers covered.

On a free claim the Items and Expenses tabs show how many you've used, for example "7 of 10 free items". Deleting one frees its place.

Taking photos is never blocked. At 10 items, an Item photo is saved as a damage photo ("Saved as a damage photo. Free claims hold 10 items."). At 10 expenses, a scanned receipt is kept as a document ("Saved as Document 7. Free claims hold 10 expenses. Unlock to make it an expense."); open it later and tap Make an Expense.

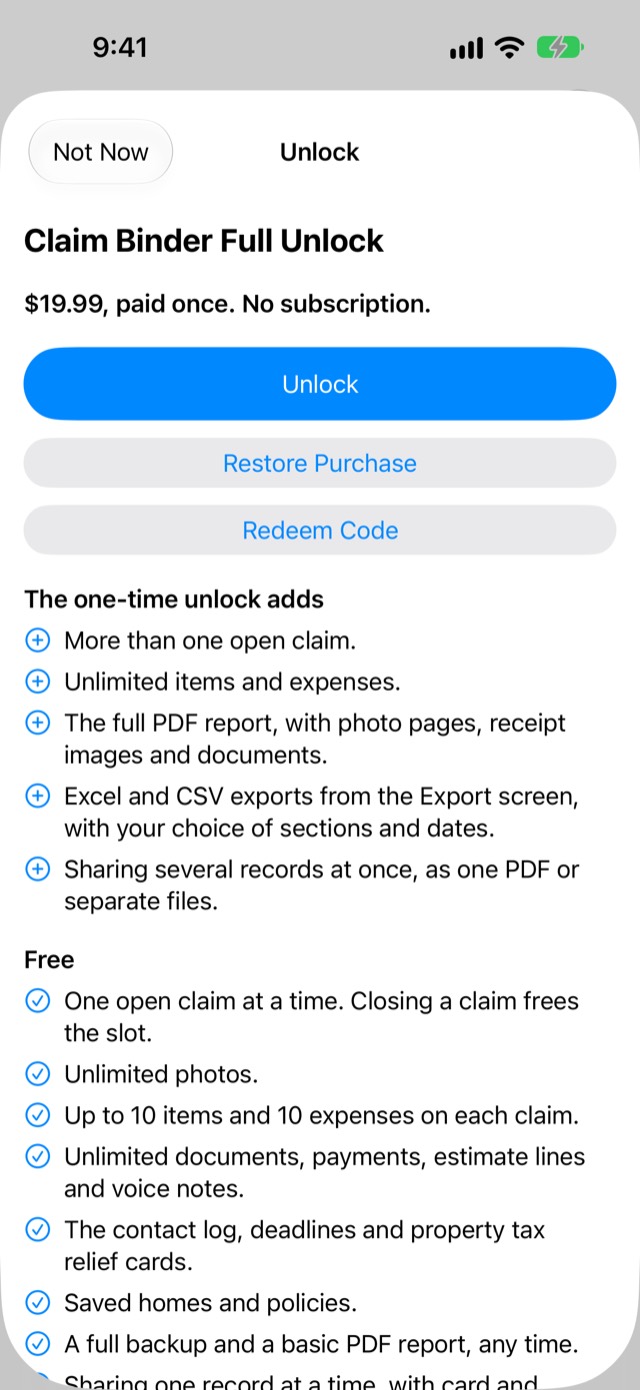
Back to questions

Screenshot: Unlock screen: the one-time unlock adds, Free (StoreKit test price)

Buy the unlock

  1. Claim tab → tap the gear → Settings.

  2. Find Claim Binder Full Unlock (it shows the price) → tap Unlock.

  3. On the Unlock screen, tap Unlock, then confirm in Apple's payment sheet.

You should see the row say Unlocked. The Unlock screen also opens by itself when you reach a free limit; it says why at the top (for example "Free claims hold 10 items."), and once you've bought the unlock, what you were doing carries on. Buying needs an internet connection: "Buying needs an internet connection. Everything else works offline."

Back to questions

Screenshot: Settings: Claim Binder Full Unlock with the price, Unlock, Restore Purchase, Redeem Code

Restore the unlock on a new iPhone or iPad

Settings → Claim Binder Full Unlock → Restore Purchase. You should see the row say Unlocked. Use the same Apple Account you bought it with. If nothing turns up, you'll see "No earlier purchase of the unlock was found for this Apple Account."

Back to questions

Screenshot: the same screen as buy-the-unlock

Use a code

Settings → Claim Binder Full Unlock → Redeem Code, then type the code in Apple's sheet. You should see the row say Unlocked once the code is accepted.

Back to questions

Screenshot: the same screen as buy-the-unlock

Close a claim instead of buying

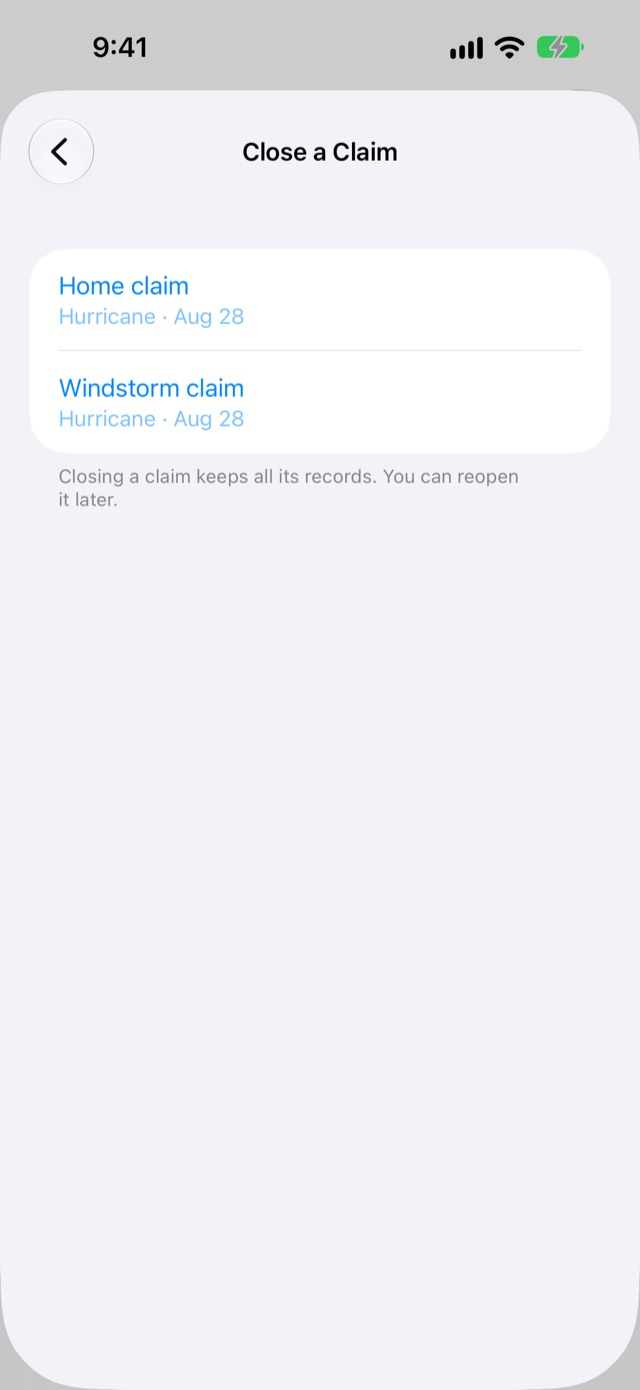
When the Unlock screen says "You have a claim open.", tap Close a Claim Instead → tap the claim to close → Close Claim. Closing keeps all its records, and you can reopen it later. What you were doing (a new claim, a reopen) carries on.

Back to questions

Screenshot: Close a Claim: the open claims

In an event shared with you

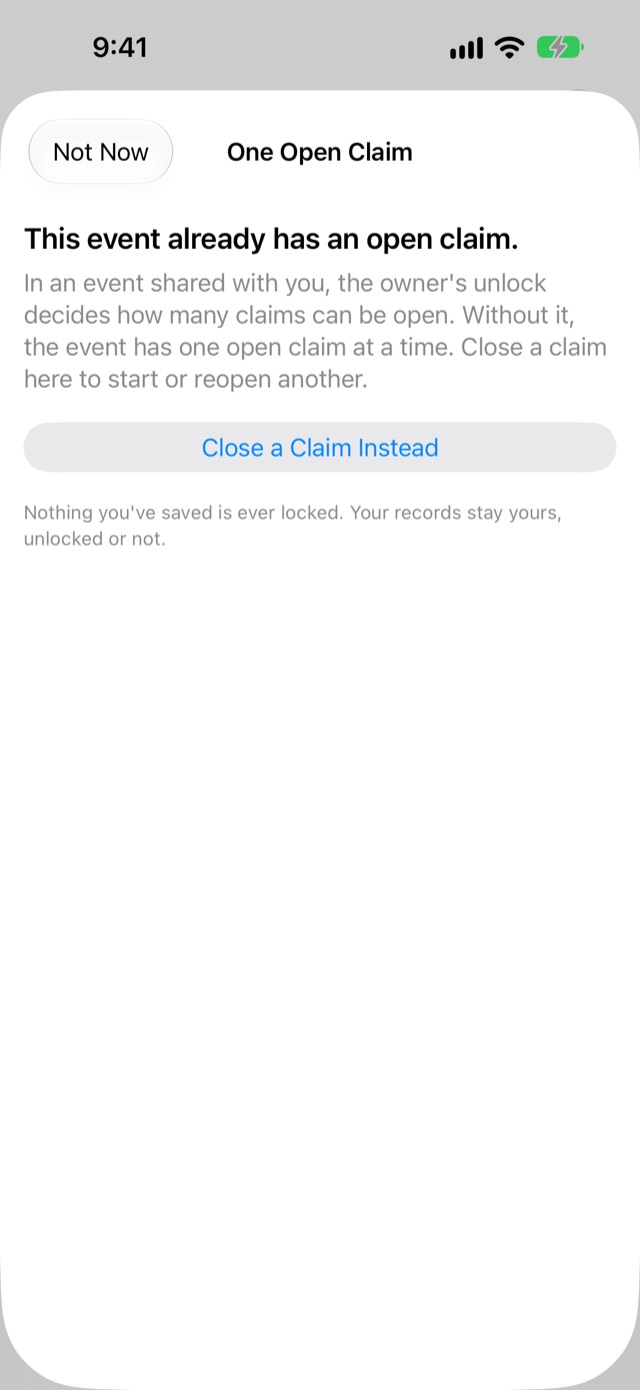
The event owner's unlock decides how many claims can be open there. If the owner hasn't unlocked, you'll see One Open Claim with "This event already has an open claim." Tap Close a Claim Instead and close a claim in that event to start or reopen another, or ask the owner whether they'll buy the unlock. Your own events follow your own unlock.

Back to questions

Screenshot: One Open Claim: "This event already has an open claim."

Backup and recovery

Your records save on the phone the moment you enter them, and iCloud copies them when you have a connection. The iCloud line under the event's name on the Claim tab tells you where things stand ("Up to date with iCloud.").

Save a full backup file

  1. Claim tab → tap the gear at the top right → Settings.

  2. Under Back up and restore, tap Back up this event.

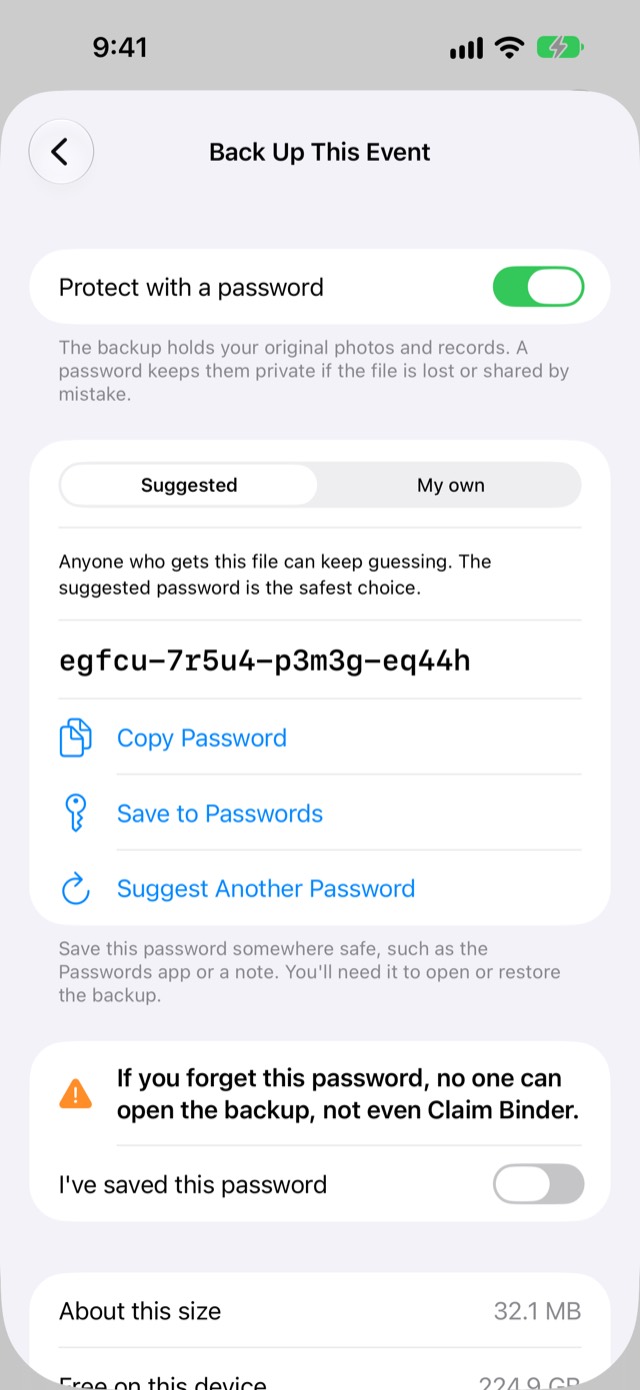
  3. Leave Protect with a password on, with Suggested picked.

  4. Tap Save to Passwords and save it when iOS asks (iOS 26.2 and later), or tap Copy Password and keep it somewhere safe, such as the Passwords app or a note. Then turn on I've saved this password.

  5. Tap Make Backup, and keep Claim Binder open until it's done.

  6. Tap Save to Files or Share or AirDrop, and keep the .zip file somewhere other than this iPhone, such as a computer or a USB drive.

You should see Backup saved, and Settings shows "Last full backup" with the date. The file opens on any computer: photos in room folders, receipts, documents, a PDF report and a spreadsheet. Keep it private. A full backup is always free.

Back to questions

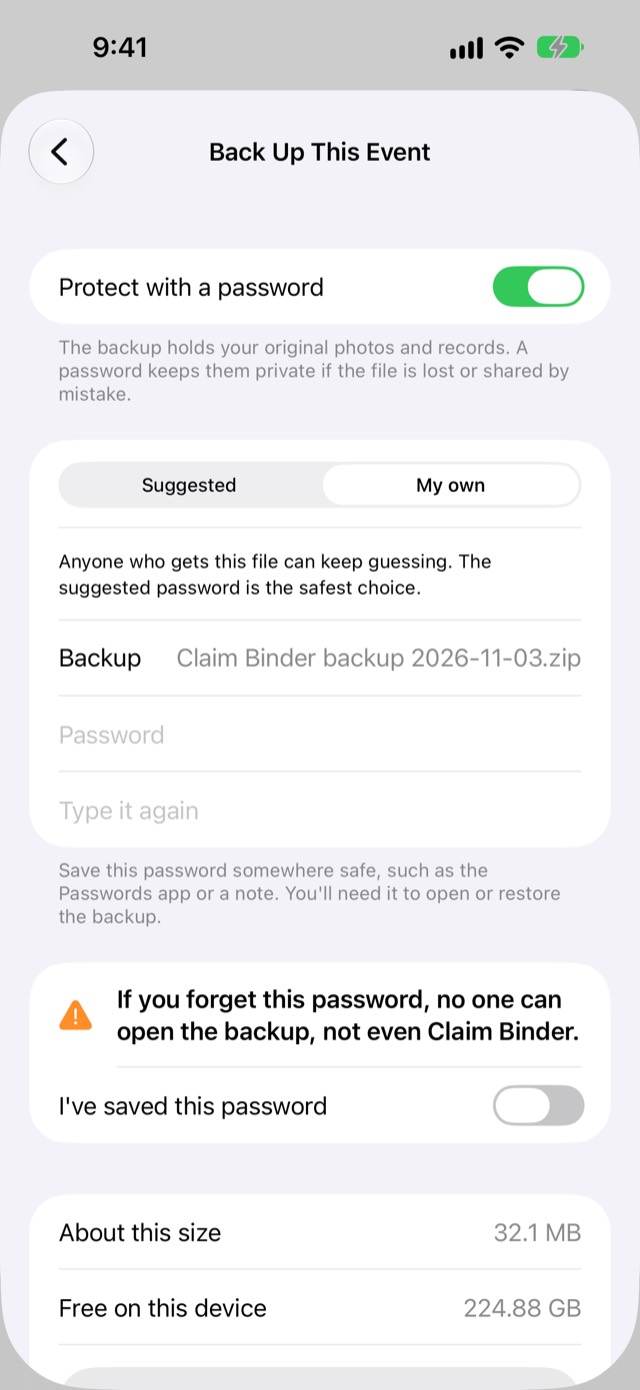
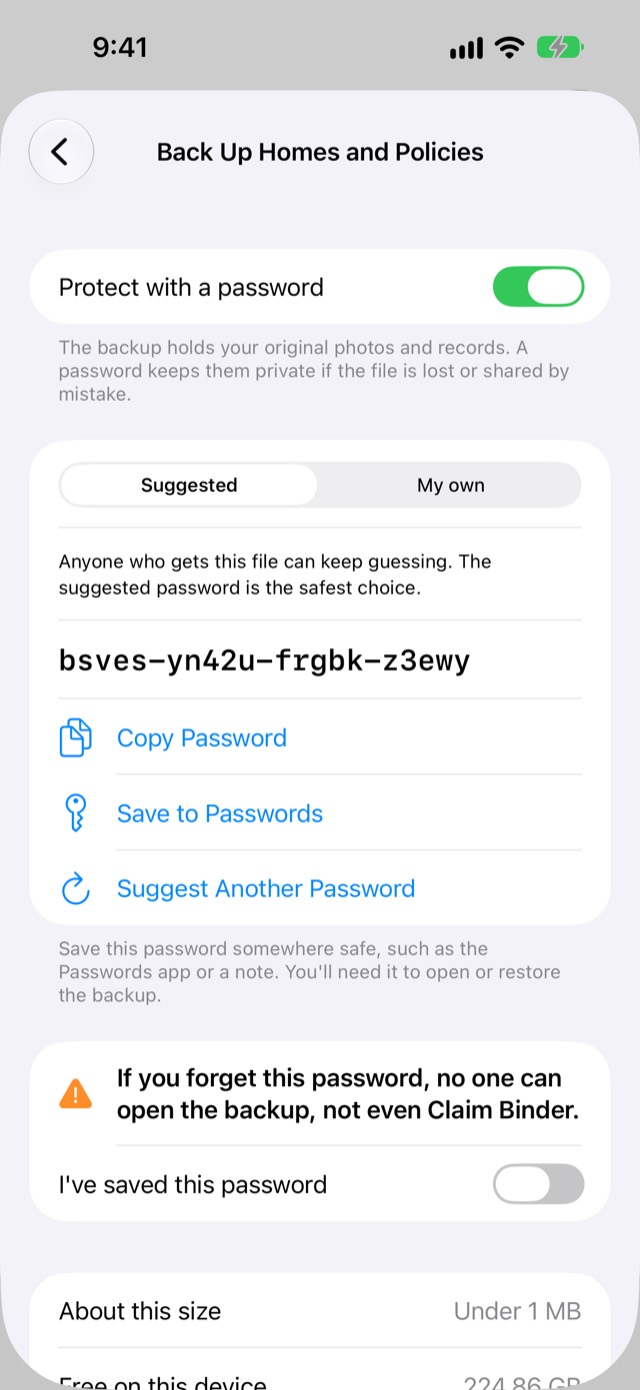
Screenshot: Back Up This Event: Suggested password

Choose a backup password

Protect with a password is on at first. Leave Suggested picked and tap Save to Passwords (iOS 26.2 and later): iOS asks to save it in the Passwords app, under the backup's name. Claim Binder can't tell whether it was saved, so turn on I've saved this password once iOS says it is. Or tap Copy Password and paste it somewhere safe, such as a note, then turn on I've saved this password. Without it no one can open the backup, not even Claim Binder.

To type your own, pick My own and type it in Password and Type it again. It must be at least 16 characters and not easy to guess: Claim Binder refuses common passwords, patterns like "1234" or a keyboard row, and words from the event itself ("That password is too easy to guess. Use the suggested one, or a longer one."). As the screen says: "Anyone who gets this file can keep guessing. The suggested password is the safest choice."

Or, under My own, tap Password and choose Use Strong Password above the keyboard: iOS makes a strong password and offers to save it in the Passwords app when you tap Make Backup (or Turn On Automatic Backups).

Back to questions

Screenshot: Back Up This Event: My own

What's inside a backup file

  1. On a Mac, double-click the .zip and type the password. Then double-click backup.zip in the folder that opens. (A backup with no password shows its folders at once.)

  2. On Windows, open it the same way with 7-Zip.

You should see:

Where What
Top of the file A Claim Binder report PDF and an Excel workbook (.xlsx) for each claim in the event, and a READ ME
Photos/ Every photo at full quality, in a folder per room (Unsorted for photos with no room)
Receipts/, Documents/, Payments/ Receipt pages, insurer and contractor documents, check and invoice images, named by date, number and store or title ("2026-09-04 Expense 3 Extended-stay hotel")
Voice notes/ The recordings from the contact log
Recently deleted/ Anything deleted in the app in the last 30 days
Data/ A folder per claim with its lists as CSV files, plus the file the app uses to restore

The report inside a backup lists every record and names its file, but has no photo or receipt pages; the files sit beside it. The backup holds your numbers uncovered, so keep it private.

Back to questions

Restore a backup on a new phone

  1. Settings → under Back up and restore, tap Restore a backup and pick the .zip file.

  2. Type the password and tap Open.

  3. Check what it holds, then tap Restore.

You should see "Restored:" with what came back, and Work in This Event to open it. If the event is already on this device, it can only come back as a separate copy, with Restore as a Separate Copy; nothing is ever overwritten. If iCloud is still bringing your records back, Claim Binder offers Wait for iCloud.

A room walkthrough's backup comes back as that home's walkthrough, under Settings → Homes and Policies, never as an event.

Back to questions

Back up saved homes and policies

  1. Settings → under Saved homes and policies, tap Back up my homes and policies.

  2. Set the password and save the file, as for an event.

You should see Backup saved. To bring them back, tap Restore my homes and policies and pick the file.

Back to questions

Screenshot: Back Up Homes and Policies

Get back something you deleted

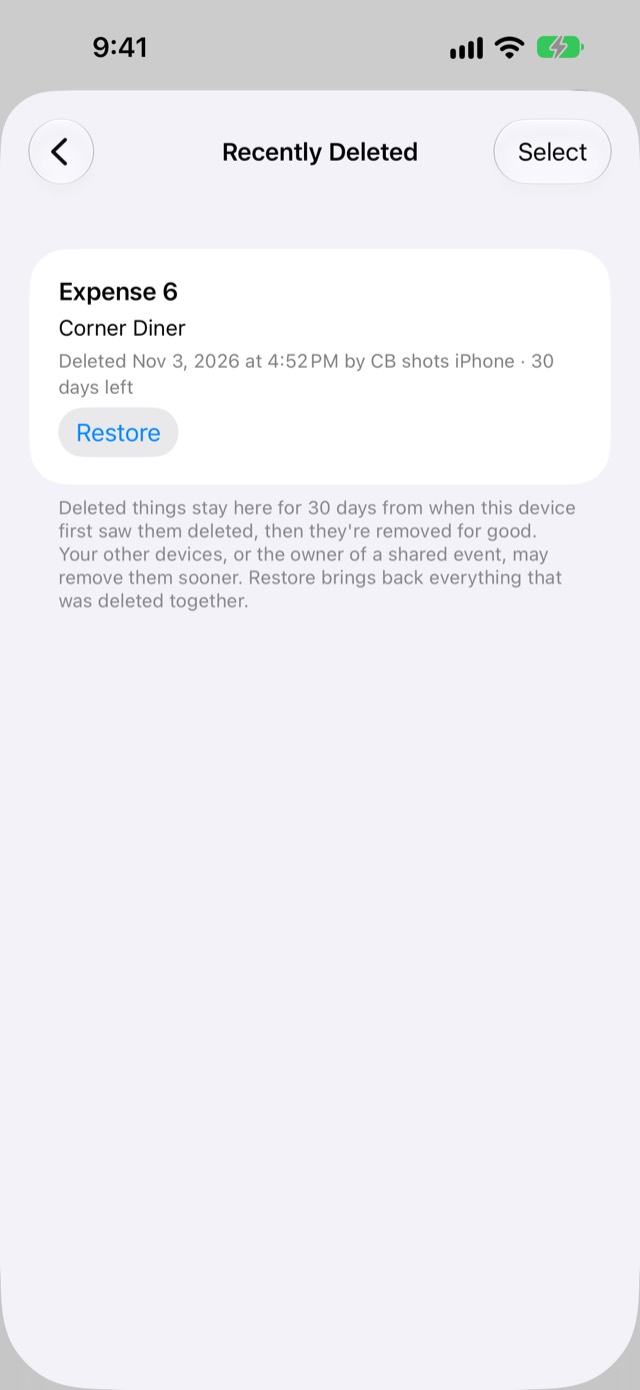
  1. Claim tab → tap the gear at the top right → Settings → tap Recently Deleted.

  2. Find the row. Rows are newest first and show what it was ("Expense 5", "Room"), when, who deleted it, and how many days are left.

  3. Tap Restore on the row.

You should see the row leave the list and a bar "… restored." with Undo. The record is back where it was. To bring back several, tap Select (top right), tick the rows, then Restore in the bottom bar.

Things deleted together (a claim with its expenses, three photos deleted at once) come back together. If something can't come back alone because the claim or room above it is still deleted, the row says so: tap Restore That First (or the button that names it). A View only person can see this list but can't restore.

How long things stay: "Deleted things stay here for 30 days from when this device first saw them deleted, then they're removed for good. Your other devices, or the owner of a shared event, may remove them sooner. Restore brings back everything that was deleted together." A row whose time is up says removed soon. There's no message when they go, and after that only a backup file made earlier can bring them back.

Back to questions

Screenshot: Recently Deleted: one deleted expense with Restore

Undo a change

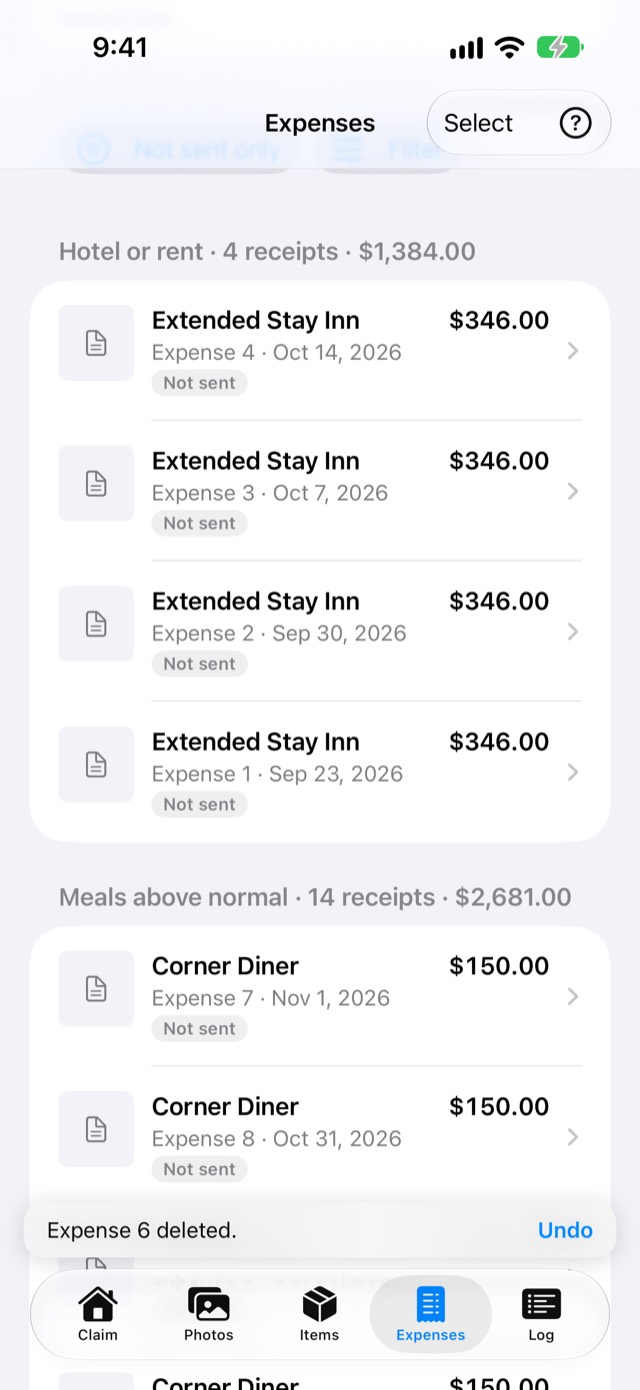
After every add, change, delete, restore or combine, a bar at the bottom says what happened ("Expense 5 deleted.") with Undo. Tap Undo to take it back; you should see "Undone."

  • After a change on a record's screen, the bar stays as long as you're on that screen. When you go back, it shows on the list for about 8 seconds more.

  • After a delete, it shows for about 8 seconds. Missed it? Use Recently Deleted (above).

  • Shake the iPhone to undo, then tap Undo in the box. On an iPad with a keyboard, press Command-Z.

Undo goes back one action at a time (everything you did with one tap). It doesn't reach past closing the app.

Back to questions

Screenshot: Expenses: the Undo bar after a delete ("Expense 6 deleted.")

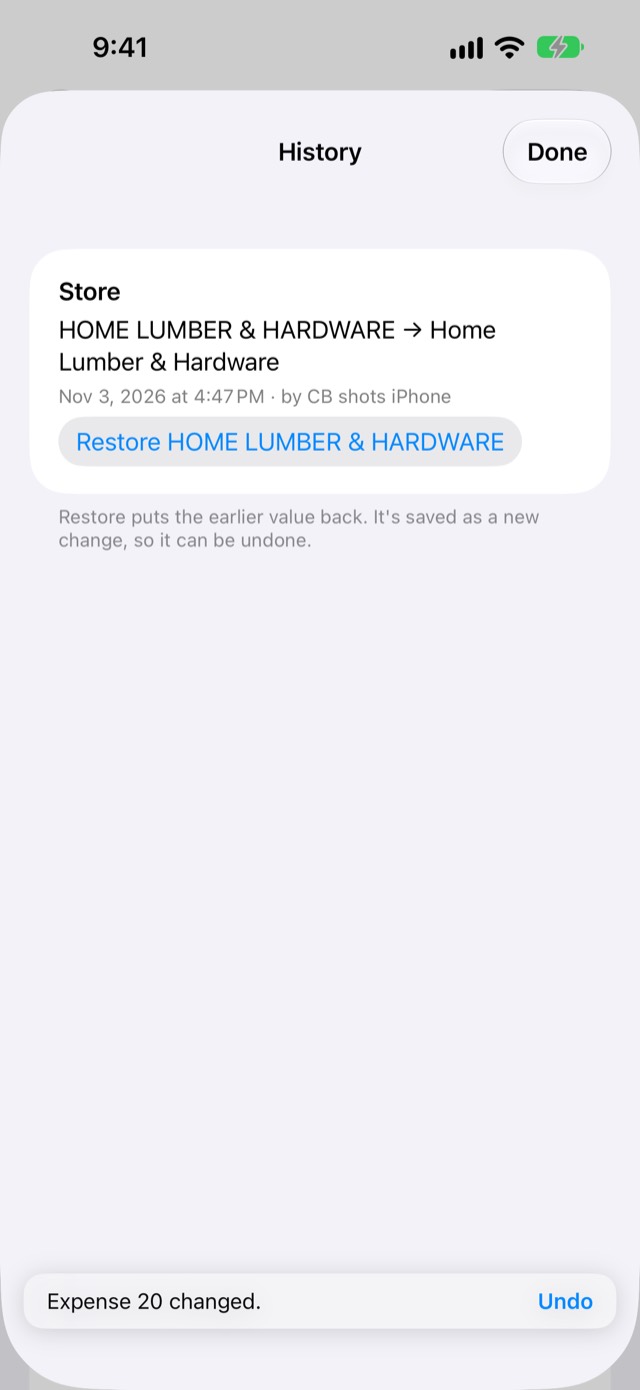
See a record's history and put an old value back

Expenses, payments, items, estimate lines and the claim itself keep a list of every change.

  1. Open the record. Tap History (the clock at the top right). For the claim: Claim tab → Edit Claim → the History row.

  2. Read the rows, newest first. Each shows what changed ("Store: Hotle Inn → Hotel Inn"), when, and who changed it.

  3. To go back to an older value, tap Restore on that row, then Done.

You should see a new row at the top for the restore, and the record showing the old value. A restore is a change like any other: it shows in History and can be undone. If two people changed the same thing, both values show here; the latest one is what the screen shows. Notes, photo rooms and contact log text aren't tracked.

Back to questions

Screenshot: History of an expense: a Store change with Restore

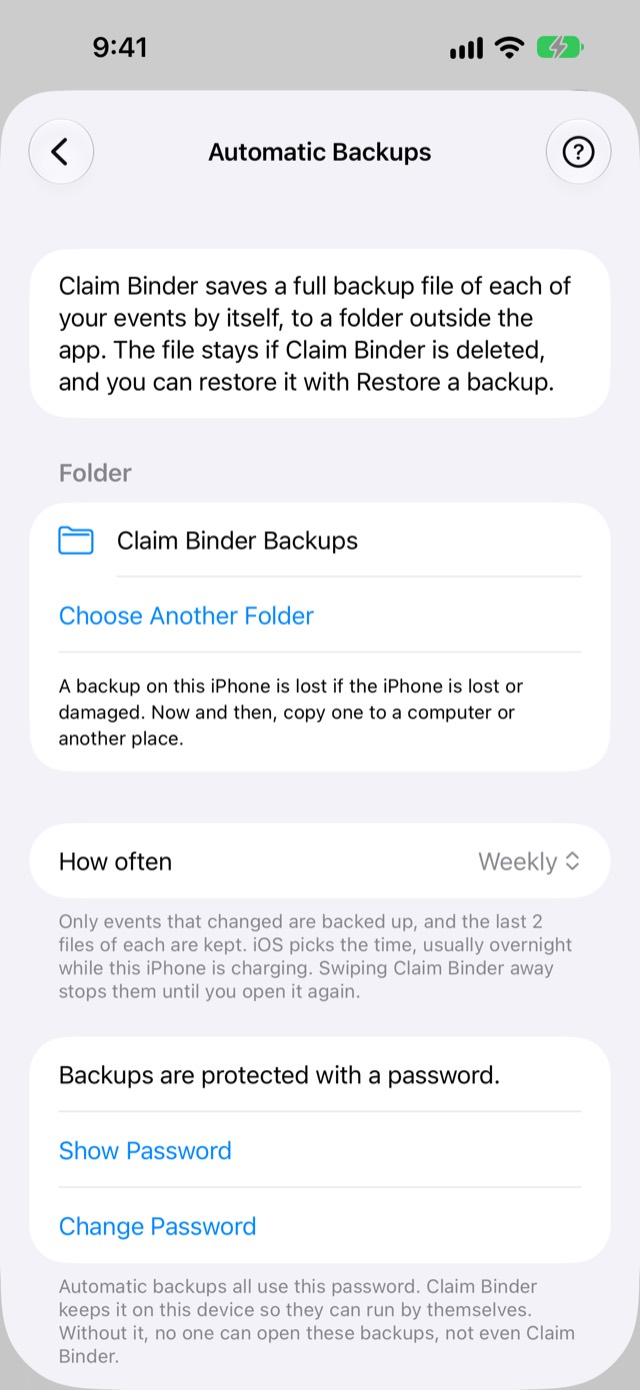
Set up automatic backups

Automatic backups save a backup file of each of your events by themselves, into a folder outside Claim Binder. The file stays even if Claim Binder is deleted, and you restore it with Restore a backup.

  1. Claim tab → tap the gear → Settings → Back up and restore → Automatic Backups.

  2. Tap Choose a Folder. In the window that opens, tap Browse, then On My iPhone, then Open. (On an iPad: On My iPad, then Open.) Claim Binder makes a folder named Claim Binder Backups there.

  3. Leave How often on Weekly, or pick Daily.

  4. Set the password as in Choose a backup password above, and turn on I've saved this password.

  5. Tap Turn On Automatic Backups.

  6. Tap Back Up Now for the first file.

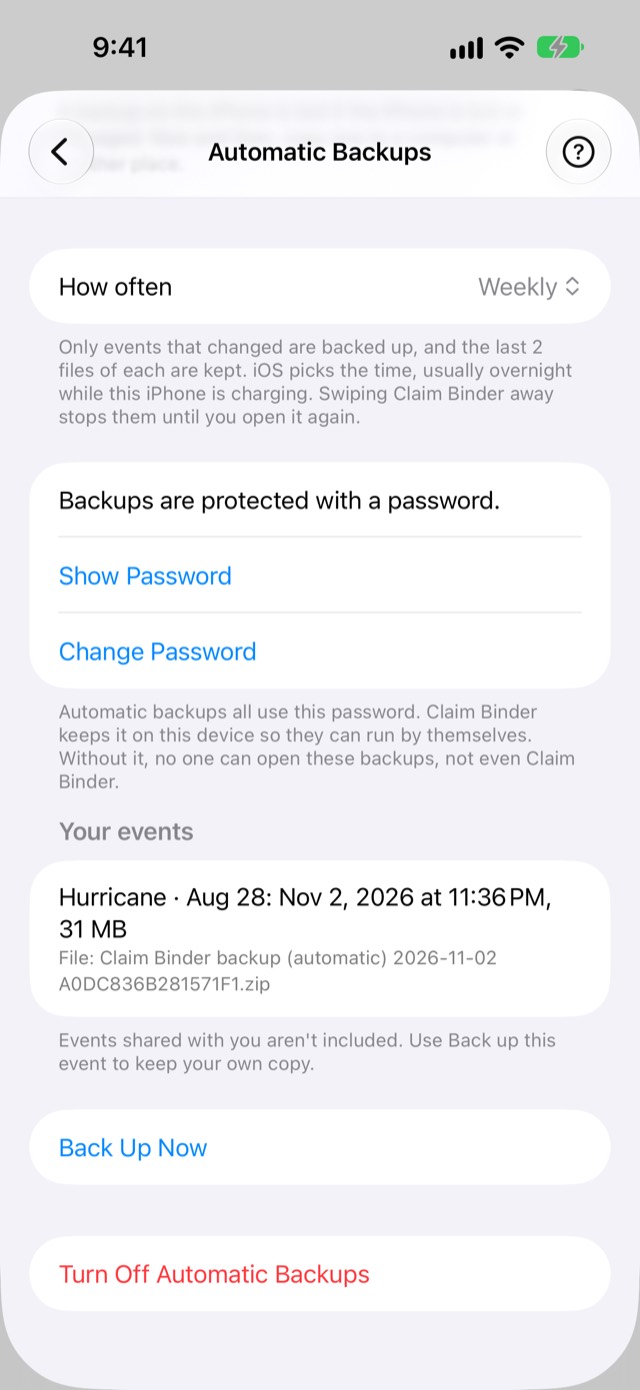
You should see "The backup is in your folder." and, under Your events, each event with its date, size and file name. The last 2 automatic files of each event are kept; files you saved yourself are never touched.

Claim Binder also asks once, right after you first save something: Choose where to keep automatic backups, with Choose a Folder and Later. After Later, the line "Automatic backups are off until you choose a folder." stays on the Claim tab until you choose one.

On your iPhone or online? A folder on this iPhone works with no signal, but "A backup on this iPhone is lost if the iPhone is lost or damaged. Now and then, copy one to a computer or another place." A folder in iCloud Drive or another online service asks first (This folder is online storage): backups there need a connection to upload and use that account's storage.

Events shared with you aren't included. Use Back up this event to keep your own copy.

Back to questions

Screenshot: Automatic Backups: the folder, how often, the password

See, change or turn off automatic backups

On Automatic Backups:

  • Show Password and Change Password ask for Face ID, Touch ID or your passcode first.

  • Choose Another Folder moves future backups. Every event is backed up there the next time backups run, or when you tap Back Up Now.

  • Turn Off Automatic Backups → Turn Off stops them and leaves the files already in the folder.

You should see your choice on the Automatic Backups row in Settings: the folder and how often, or Off.

Back to questions

Screenshot: Automatic Backups, lower: Your events, Back Up Now, Turn Off

Why an automatic backup didn't run

iOS picks the time, usually overnight while your iPhone is charging. A backup can wait when:

  • Background App Refresh is off. The screen says "Background App Refresh is off for Claim Binder, so backups run only when you tap Back Up Now." Turn it on in the Settings app → General → Background App Refresh.

  • Low Power Mode is on.

  • You swiped Claim Binder away in the app switcher. Backups wait until you open it again.

  • The folder can't be reached ("Claim Binder can't reach your backup folder."), for example a USB drive unplugged: tap Choose a Folder.

  • There isn't room ("Not enough free space for the automatic backup.").

If a backup is more than 3 days late, the Claim tab says "Your automatic backup is [n] days late." with Back Up Now. Only events that changed get a new file; with nothing changed you'll see "Nothing has changed since the last backup."

Back to questions

Screenshot: Claim tab: "Your automatic backup is 5 days late."

Why a backup stopped

A backup stops rather than make a file that can't be restored. What to do depends on its message:

  • "Some payments in this event are on a claim twice…": open Payments, delete the copy you don't need, then back up again.

  • "Couldn't read this claim's payments.": close Claim Binder, open it again, then back up again.

  • "There isn't enough storage to make this backup.": free up space on your iPhone, then try again.

  • "Some records in this event don't fit together…" or "…is damaged in Claim Binder's storage…": email support@poshjoshllc.com. Nothing was changed, and your earlier backups are still there.

You should see Backup saved once the cause is fixed. When a restore stops with "This backup isn't complete" or "This backup is damaged or was changed after it was made", the file was cut short or changed: copy it again from where you saved it, and try again.

Back to questions

Screenshot: Back Up This Event stopped: a payment on the claim twice

How much space your claim takes

  1. Settings → look under Back up and restore for "This event's photos and files", then each claim's size, then what's free on this iPhone.

  2. If it says "Your iPhone is almost out of storage", free up space in the iPhone's own Settings app → General → iPhone Storage.

You should see lines such as "This event's photos and files: 1.4 GB", "Home claim: 900 MB" and "Free on this iPhone: 12 GB".

A claim counts its own receipts, checks and voice notes, and the photos and documents linked to it. A photo linked to two claims counts in both, so the claims can add up to more than the event. The low-storage line also shows on the Claim tab and on the camera while less than 1 GB is free; below that, photos and backups may stop saving. Apple says when iCloud storage is full, not before: then the iCloud line says "iCloud storage is full." Make a backup file, or free up iCloud storage.

Back to questions

Screenshot: Settings → Back up and restore: the event's and each claim's size

When iCloud is off or you sign out

Signing out of iCloud, or turning iCloud off for Claim Binder, makes Apple remove synced records from the phone, including changes not yet sent. Claim Binder protects you two ways:

  • It opens with iCloud off and keeps everything on this iPhone. You'll see iCloud is off for Claim Binder once: "Your claims are kept on this iPhone. After you sign in again, close Claim Binder and open it again, and your changes will go to iCloud. Make a backup file to keep a copy somewhere else." Tap OK, or Back Up Now to make a file.

  • It keeps a safety copy of your records on this iPhone, made each time you leave the app. Safety copies aren't backups: they stay on this phone and go if Claim Binder is deleted.

Under the iCloud line, "[n] changes waiting to send." means changes haven't reached iCloud yet. Don't sign out while it shows; wait for "Up to date with iCloud." After you sign in again, close Claim Binder and open it again.

Back to questions

Screenshot: Claim tab with the not-signed-in line (the simulator has no Apple Account)

If your claim data was removed from this iPhone

  1. If Claim Binder opens with Your claim data was removed from this iPhone, tap Put Back My Copy.

  2. If you see Close Claim Binder and open it again, do that.

  3. If a different Apple Account signed in, tap Save as a Backup File instead. Keep that file and restore it later.

You should see your claims again, with every record and photo the copy held; what was already in iCloud comes back when you sign in again. Where the same thing was changed both here and on another device, the copy's version wins.

Back to questions

If you delete Claim Binder

Deleting the app deletes everything it keeps on this iPhone, including safety copies. What's in iCloud comes back when you reinstall with the same Apple Account. Anything else is gone unless you have a backup file. Before you delete it, check Back up and restore in Settings says "Up to date with iCloud.", and make a backup file with Back up this event or turn on Automatic Backups.

Back to questions

Get back photos or scans kept aside

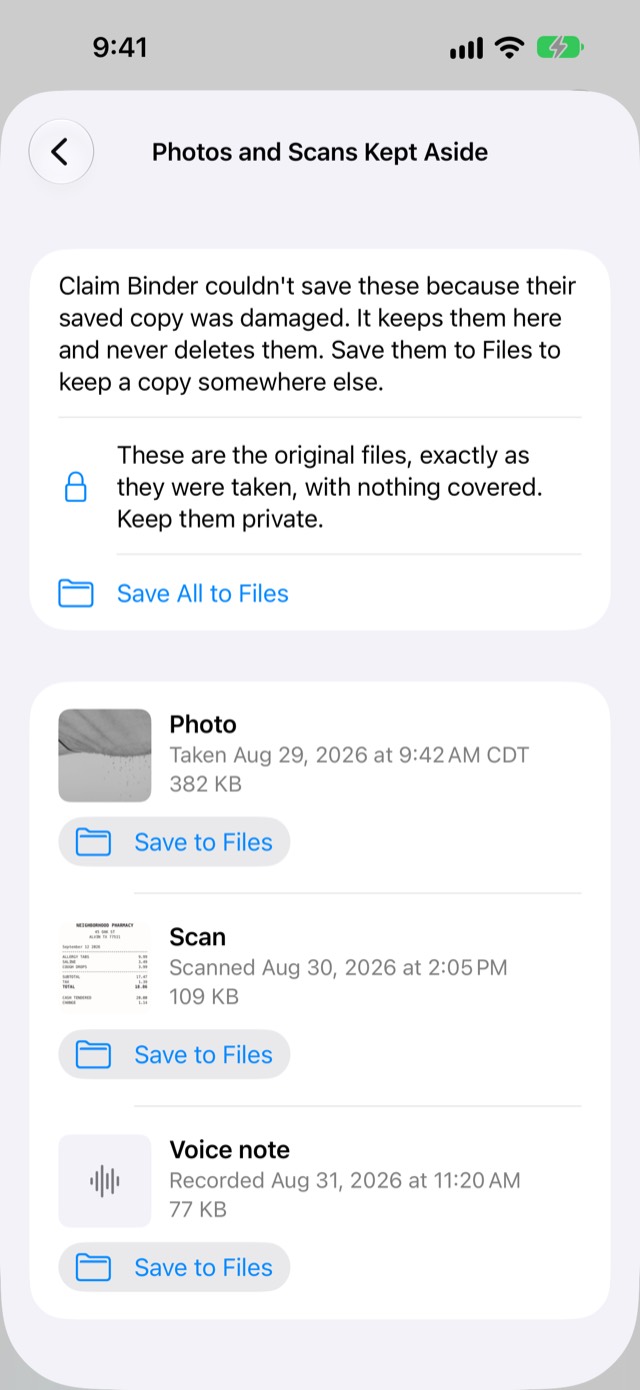
Claim Binder keeps a photo, scan or voice note aside when its saved copy was damaged, for example by a crash or a full iPhone at the wrong moment. It never deletes them. The Claim and Photos tabs then say so in a yellow notice.

  1. Claim tab → tap the gear → Settings. Under Back up and restore, tap Photos and Scans Kept Aside. (Or tap Photos and Scans Kept Aside in the notice.)

  2. Tap Save to Files under a photo, scan or voice note, or Save All to Files at the top.

  3. Choose a place in Files, such as On My iPhone, iCloud Drive or a USB drive, and save them there.

You should see the files where you saved them, named like "Kept aside photo 1". The row is in Settings only while something is kept aside.

These are the original files, exactly as they were taken, with nothing covered. Keep them private. To put a photo back in an event, save it from Files to your photo library (Save Image in the Share sheet), then use Import from Photos on the Photos tab.

Back to questions

Screenshot: Photos and Scans Kept Aside: a photo, a receipt scan and a voice note, each with Save to Files

Lock Claim Binder

The lock asks for Face ID, Touch ID or your passcode before showing anything in Claim Binder. It's off at first.

Turn the lock on or off

  1. Claim tab → tap the gear → Settings.

  2. Turn on Face ID Lock (on some devices Touch ID Lock, Optic ID Lock or Passcode Lock), and let iOS check it's you.

Turning it off asks too. If your iPhone has no passcode, the switch is off and greyed: set a passcode in the iPhone's Settings first.

Back to questions

Screenshot: Settings: the lock switch (Passcode Lock: the simulator has no Face ID)

When the lock asks

  • When Claim Binder opens, and when you come back after more than a minute away.

  • Not while you use the camera, scanner, Files window, Share sheet, photo picker or the purchase sheet from inside Claim Binder.

  • If Face ID doesn't work (gloves, a mask, wet hands), iOS offers your iPhone passcode.

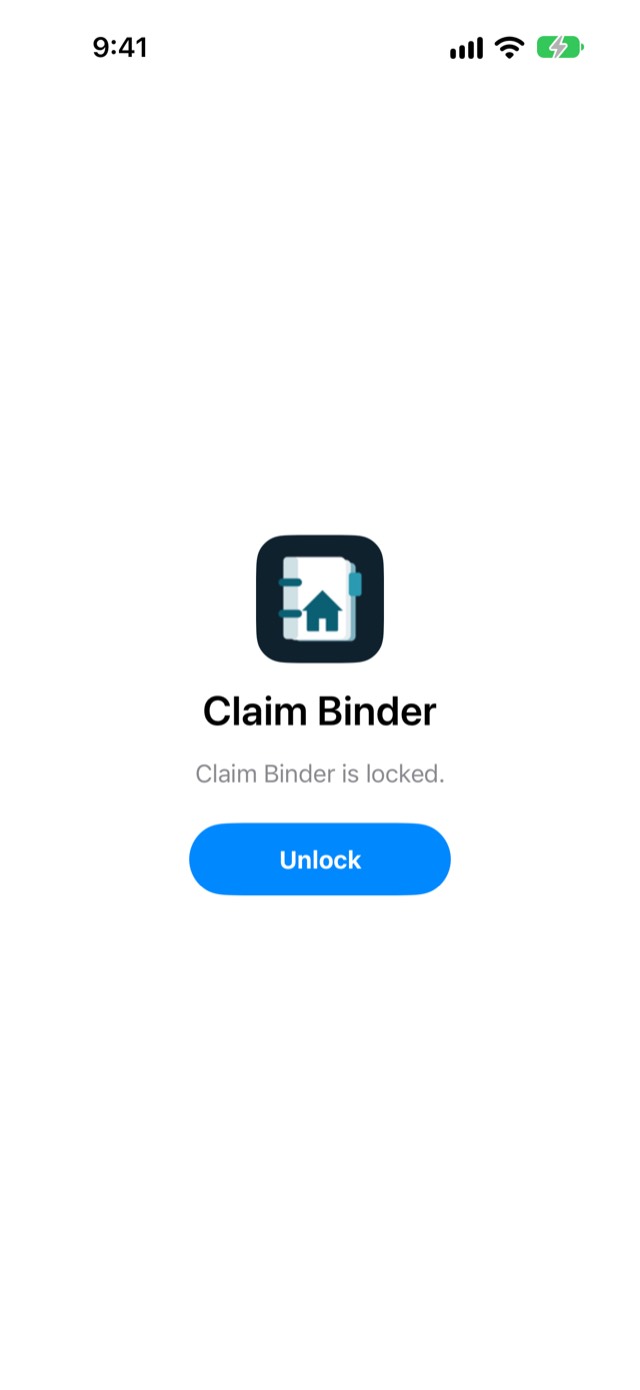
You should see the locked screen, "Claim Binder is locked." with Unlock, and nothing about your claim. After unlocking, Claim Binder is exactly as you left it. In the app switcher, Claim Binder shows only its icon and name. Backups, sync and reminders keep running while it's locked.

Reminders on the lock screen: a deadline reminder shows its title, for example "Proof of loss is due today." To hide reminder text until your iPhone is unlocked, set Show Previews to When Unlocked in the Settings app → Notifications.

Back to questions

Screenshot: The locked screen

Reports and sharing with your insurer

Everything that leaves the app goes through Share Preview first, so you see each page exactly as it will be sent. Card and account numbers are covered with black bars unless you turn that off. Your originals inside the app never change.

Share one receipt, document, payment, item or photo

  1. Open the record (an expense, document, payment, item or photo).

  2. Tap Share (top right, the square with an up arrow). Share Preview opens: "Getting page 1 of 1 ready…", then each page.

  3. Look at every page. You should see black bars with only the last 4 digits showing, and a line like "6 numbers covered on 1 page".

  4. Tap Send to pick Mail, Messages, AirDrop or Print, or tap Save to Files.

  5. When it asks "Who did you send it to?", type a short note ("Adjuster Smith") and tap Save, or tap Skip.

Tap Cancel at any point and nothing is sent or recorded. The share is listed later in Export History. Sharing one record is always free.

  • An item shares its photos plus a one-page item summary.

  • Every payment has Share. A payment shares its check and invoice pages; one typed in with Add Manually shares a one-page summary of what you typed. The pages of any letter linked to it follow.

  • If an expense has no receipt, an item no photo, or an expense, payment or document no date, Share Preview shows Missing evidence. It never stops Send.

Back to questions

Screenshot: Share Preview of an item: its summary page and photo

What gets covered

Claim Binder reads each receipt, document and check page on your phone and covers:

  • Card numbers, leaving the last 4 digits. A long number next to "Card" is covered even if it's misread.

  • Account, loan and member numbers next to their label, including in tables and boxes.

  • Routing numbers and the bank line along the bottom of a check.

  • Every repeat of a covered number elsewhere on the page.

What stays readable: dates, amounts, totals, check numbers, and your own policy, claim and FEMA numbers in reports. On a scanned page, a number shaped like a card number is covered even next to "Claim number". Damage photos aren't read for numbers. A shared photo goes out without its location unless you turn covering off.

If you see "A number may still show on page 1", Send is off until you cover it (next section). For a check, if you see "Check that the bank line along the bottom of the check is covered.", look along its bottom edge.

Claim Binder can miss a number. Check every page before you send. To look closely, pinch or double-tap a page in Share Preview.

Back to questions

Screenshot: Share Preview of the scanned check: the bank line barred

Cover more, or take a bar off

All of this happens on Share Preview, before you send.

  • Cover something else: tap Cover More, drag a box across it, then tap Done Covering.

  • Cover a whole line: tap Cover a Line…, pick the line, then Cover this whole line. (This also works with VoiceOver.)

  • Take a bar off: tap the bar. It disappears and the number shows.

  • Change your mind: tap Undo to put back the last bar change.

  • Send originals with nothing covered: turn off Cover private numbers. It asks "Send the originals with nothing covered?"; tap Send Originals or Cancel. Originals keep everything, including a photo's location.

You should see the count of covered numbers change as you go.

Back to questions

Screenshot: Cover a Line: the lines read on the check

Share several at once

  1. Open the list (for example the Expenses tab) and narrow it with Filter if you like.

  2. Tap Select (top right) and tick the records, or tap Select All.

  3. Tap Share in the bottom bar.

  4. On Share Preview, choose Send as: One PDF or Separate Files.

  5. Check the pages, then Send or Save to Files.

One PDF starts with a cover page listing each record's number, store or title, date and amount, with the total. Every page after it has a header like "Expense 12 · page 1 of 1". Separate Files is a .zip with one file per record. With covering on, every page is a picture, so covered numbers can't be copied out. Missing evidence at the top lists what you're sending with no photo, no receipt or no date, such as "2 expenses have no receipt."; tap it to see which. It never stops Send. Sharing several at once is part of the one-time unlock.

Back to questions

Screenshot: Share Preview of two expenses: One PDF, Missing evidence

Send a claim report

  1. Claim tab → tap the gear at the top right → Settings → Export Claim Report.

  2. If you have more than one claim, check Claim shows the one you want.

  3. Format: PDF report, Excel or CSV.

  4. Report: Basic or Full (PDF only; see below).

  5. Sections (Full PDF, Excel and CSV): turn off any you don't want.

  6. Dates: All dates, or set From and To.

  7. Leave Cover private numbers on.

  8. Tap Preview & Share. A long report says "Making page 3 of 41…" while it builds; keep Claim Binder open.

  9. Look through it, then Send or Save to Files, and answer "Who did you send it to?" (Save or Skip).

Report What's in it Cost
Basic PDF Claim summary, then the items, expenses and payments lists, all dates, no pictures Always free
Full PDF The sections you choose, with photo pages (two to a page with time, place and room), receipt, check and document pages One-time unlock
Excel, CSV Every list as a spreadsheet (next sections) One-time unlock

The summary always covers the whole claim; dates only narrow the lists. Each list has a Counted column saying whether a row is in the totals, and why not. The totals match the Claim tab. The Payments list shows Work finished for money you paid out. The file is named like "Claim Binder report – Windstorm claim – 2026-10-28.pdf". If a page might still show a number, that page is left out with a note; share that record on its own to cover it by hand.

Back to questions

Screenshot: Export Claim Report, top

Check for missing photos and receipts

  1. Settings → Export Claim Report → look under Missing evidence, such as "3 items have no photo." or "2 expenses have no receipt."

  2. Tap it to see which records, by number.

  3. Go back and add what you can.

You should see "Every item has a photo, every expense a receipt, and every record a date." once nothing is missing. It's for your own check; it doesn't say whether anything is enough for your insurer.

Share Preview checks the same way before every share (one record, several, or Send What's Left), only for what you're sending: Missing evidence shows at the top when there's something to list. A photo on its own has nothing to check.

Back to questions

Screenshot: Export Claim Report: Missing evidence

Excel and CSV

  • Excel is one workbook for people to read. Tabs: Summary, Items, Estimate lines, Expenses, Payments, Payment splits, Contacts, Contact log, Deadlines, Documents and Photos. Dates are dates, money is dollars, each list has its totals under it and a Counted column. Totals are typed values, not formulas.

  • CSV is a .zip with one .csv file per list and a README, for other software. Dates look like 2026-09-04 and amounts like 346.00.

Any text you typed that starts with = + - or @ gets an apostrophe in front, so a spreadsheet program shows it as text instead of running it.

To make either: Settings → Export Claim Report → Format → Excel or CSV → pick the Sections and Dates → Preview & Share. The preview shows the first rows only ("The first rows. Everything is in the file.").

Back to questions

Screenshot: Excel preview: the first rows

See what you sent

Every share, report and backup you complete is listed, newest first. Cancelled shares aren't.

  1. Settings → Export Claim Report → Export History.

  2. Each row shows what went out ("Expense 9–12, Document 7"), the format, how many numbers were covered, the size, and "Sent to:" if you noted it.

  3. To note who got it: tap Add Who It Went To (or Edit Who It Went To), type it, Save.

  4. To attach the insurer's confirmation: first save their email or letter in Log → Documents, then on the row tap Link a Confirmation, tick the document, Done.

You should see "Confirmation: Document 12" on the row. What you sent with Send What's Left is also listed on its request, under Sent for this request. A View only person's shares aren't recorded and they can't add notes here.

Every item, expense, payment and document keeps the same number (Item 37, Expense 12) in every report, so you and your adjuster can refer to them the same way.

Back to questions

Screenshot: Export History: the automatic backup's row